The tutorial shows how to perform spell check in Excel manually, with VBA code, and by using a special tool. You will learn how to check spelling in individual cells and ranges, active worksheet and the entire workbook.
Although Microsoft Excel is not a word processing program, it does have a few features to work with text, including the spell-checking facility. However, spell check in Excel is not exactly the same as in Word. It does not offer advanced capabilities like grammar checking, nor does it underline the misspelled words as you type. But still Excel provides the basic spell checking functionality and this tutorial will teach you how to get most of it.
Spelling mistakes in Excel can really undermine the professionalism and credibility of your work But fret not – Excel has some simple yet powerful ways to fix those pesky typos and make your spreadsheets error-free!
In this comprehensive guide I will show you various methods and tricks to spell check in Excel so you can create polished, mistake-free Excel reports and dashboards.
Why Spell Check in Excel
Here are some key reasons to use Excel’s spell check features:
- Avoid embarrassing spelling errors in reports and dashboards
- Ensure accuracy of text-based formulas and calculations
- Professionalism – no manager wants a report with silly typos
- Credibility and trust – spelling mistakes may indicate sloppy work
- Clarity of communication – bad spelling can confuse readers
- Consistency of brand image and style
- Save time over manual proofreading and dictionary look-ups
Catching spelling errors in Excel is critical before sharing workbook with colleagues or management. Now let’s see how it can be done.
Excel Spell Checker Overview
Excel has a built-in spell checking feature that checks for spelling mistakes in:
- Cell contents
- Formulas
- Text in shapes/objects
- Chart elements like titles, labels, legends
- PivotTable reports
- And more…
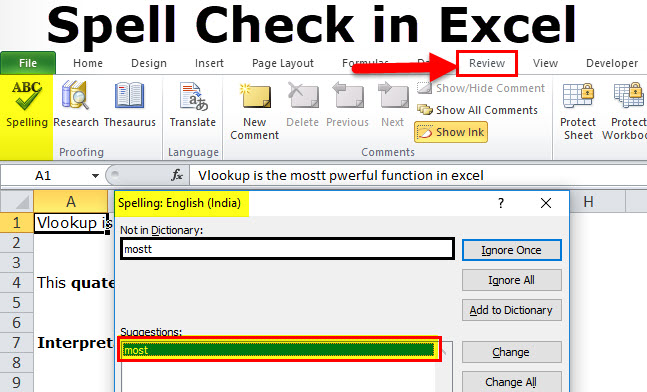
You can access it via the Review tab Just click Spelling or use the shortcut F7
The spell checker compares words against standard dictionaries for English, French and Spanish. It can also scan multiple worksheets at once.
![Excel Spell Checker][]
Now let me walk you through different ways to leverage this tool.
Spell Check Entire Worksheet
To run a spell check on the entire worksheet:
- Press Ctrl + A to select the full worksheet
- Go to Review tab and click Spelling
- Excel will start checking from Cell A1 onwards
- It highlights the first misspelled word and shows suggestions
- Click on the right suggestion and click Change to correct it
- The spell checker moves to the next cell and so on
This scans every cell, object and text element in the worksheet.
Spell Check Specific Cells
To check spelling only in certain cells:
- Select the cells you want to check
- Hit F7 to open the spell checker
- It will now scan only the selected cells for errors
For example, before finalizing a dashboard, you may want to spell check just the titles, labels and text elements without wasting time on data cells.
Check Spelling in Formulas
Normally, Excel skips over formulas while spell checking. But you can selectively check them as below:
- Double click the formula cell to edit mode
- In formula bar, select the specific text you want to check
- Press F7 and correct any errors
This ensures formula accuracy is not affected by incorrect text strings.
Spell Check Multiple Worksheets
To check spelling errors across multiple worksheets:
- Press Ctrl to multi-select several sheet tabs
- Once selected, click Spelling in the ribbon
- Excel will spell check the sheets one by one
Spell Check the Entire Workbook
To perform a blanket spell check on all worksheets in the Excel workbook:
- Right click on any sheet tab
- Select Select All Sheets from the context menu
- Click on Spelling in the ribbon
- The spell checker scans through every worksheet
This helps you eliminate spelling mistakes Workbook-wide before finalizing it.
Use AutoCorrect for Real-time Checking
The AutoCorrect feature helps fix spelling errors on the fly as you type text. To enable it:
- Go to File > Options > Proofing
- Under AutoCorrect options, check “Replace text as you type”
- Click OK to save setting
Now common typos and spelling mistakes will be automatically corrected in real-time as you type!
Add Words to Custom Dictionary
Excel flags uncommon proper nouns or technical terms as incorrect spellings.
To avoid this, add such words to the Custom Dictionary:
- Right click on the flagged word and select Add to Dictionary
- The word is added so Excel won’t mark it as an error again
This improves spell check accuracy for your unique business terms.
Tips and Best Practices
Here are some tips to use Excel spell checker effectively:
- Add industry-specific terms and acronyms to the custom dictionary
- Disable spell check on irrelevant items like data cells
- Run spell check as the final step before sharing workbook
- Manually review formulas, headers and footers as extra precaution
- Adjust Autocorrect settings to ignore casing, initial caps, etc.
- Disable automatic spell checking if it slows down performance
Following these best practices will help you leverage Excel spell check proactively and catch mistakes before they get embarrassing!
Mistakes in Excel reports and dashboards can undermine your hard work and expertise. Use the various methods in this guide to eliminate spelling errors.
The Excel spell checker tool along with Autocorrect can help you quickly improve the professionalism, clarity and accuracy of your Excel workbooks.
Spell check individual cells and ranges
Depending on your selection, Excel Spell check processes different areas of the worksheet:
By selecting a single cell, you tell Excel to perform spell check on the active sheet, including text in the page header, footer, comments, and graphics. The selected cell is the starting point:
- If you select the first cell (A1), the entire sheet is checked.
- If you select some other cell, Excel will start spell checking from that cell onward till the end of the worksheet. When the last cell is checked, you will be prompted to continue checking at the beginning of the sheet.
To spell check one particular cell, double-click that cell to enter the edit mode, and then initiate spell check.
To check spelling in a range of cells, select that range and then run the spell-checker.
To check only part of the cell contents, click the cell and select the text to check in the formula bar, or double click the cell and select the text in the cell.
Change the Excel spell check settings
If youd like to tweak the behavior of spell check in Excel, click File > Options > Proofing, and then check or uncheck the following options:
- Ignore words in uppercase
- Ignore words that contain numbers
- Ignore internet files and addresses
- Flag repeated words
All the options are self-explanatory, maybe except the language-specific ones (I can explain about enforcing strict ё in the Russian language if someone cares 🙂
The screenshot below shows the default settings: 
