If you’re going to be away from work on vacation, a leave of absence, or something similar, you may want to set up out-of-office in Microsoft Outlook. This is an automatic reply that lets others know that you’re away and won’t be responding for a particular time period. Contents
The nice thing about automatic replies like this in Outlook is that you can schedule them for the timeframe you need. If you prefer, you can also turn the feature on and off manually.
Here’s how to set up out of office messages in Outlook on Windows, Mac, and the web. Recommended Videos
Setting up an automatic out of office message in Outlook is a great way to let people know you won’t be responding right away while you’re away from the office. Whether you’ll be out for a few hours, a couple days, or an extended vacation, configuring out of office replies ensures email senders are aware of your absence
In this comprehensive guide, we’ll cover everything you need to know about setting up out of office messages in Outlook. You’ll learn how to enable auto-replies, set start and end dates, customize your message, and more We’ll provide detailed steps for Outlook on both Windows and Mac operating systems.
Overview of Out of Office Messages
An out of office message, also known as an automatic reply, is an automated message sent in response to emails received during your absence When enabled in Outlook, it will automatically be sent to anyone who emails you, informing them you are out of the office and unable to respond right away.
Here are some key things to know about Outlook’s out of office feature:
- It sends an auto-reply to all incoming emails while enabled.
- You can customize the message recipients will receive.
- Start and end dates can be set to automatically turn on and off.
- It can be configured for internal recipients, external recipients, or both.
- Manual control is also available to turn on and off as needed.
Now let’s dive into the step-by-step process for setting up out of office replies in Outlook on both Windows and Mac!
How to Set Up Out of Office in Outlook on Windows
Setting up an automatic out of office reply in Outlook on Windows only takes a few minutes. Follow these simple steps:
Step 1: Open the Out of Office Assistant
To get started, open Outlook and select the File tab. Then choose Automatic Replies from the left sidebar.
Alternatively, you can access it from the ribbon by going to File > Info > Automatic Replies.
Step 2: Enable Auto Replies
In the Automatic Replies window, mark the Send automatic replies option at the top to turn on auto-replies.
Step 3: Set Date Range (Optional)
If you want emails to auto-reply only during a certain timeframe, check the box for Only send during this time range and enter the start and end dates and times.
If you leave this unchecked, the auto-reply will stay on until you manually disable it.
Step 4: Customize Internal Message
In the text box under Inside My Organization, enter the out of office message you want sent to recipients inside your company.
You can format the text with different fonts, sizes, colors, and more. Add details like when you’ll be back and who people can contact in your absence.
Step 5: Customize External Message (Optional)
If you also want to auto-reply to people outside your organization, fill in the text box under Outside My Organization.
Note that this will reply to every external email, including newsletters, so we suggest limiting it to only contacts.
Step 6: Save Settings
Once you’ve customized your out of office messages, click OK to save the settings. The auto-reply will now be enabled.
When configured correctly, you’ll see an indicator in Outlook letting you know auto-replies are turned on.
And that’s it! Out of office messages in Outlook for Windows are easy to set up.
How to Set Up Out of Office in Outlook on Mac
You can also configure out of office replies in Outlook for Mac, either in the legacy or new Outlook version. The process is nearly identical with a few small differences:
Access the Out of Office Assistant
- Legacy Outlook – Go to Tools > Out of Office
- New Outlook – Go to Tools > Automatic Replies
Enable Auto Replies
Just check the box to Enable automatic replies and customize the out of office message.
Set Date Range (Optional)
To limit auto-replies to a timeframe, check the box for Only send during this time period and set start/end dates.
Customize Internal & External Messages
Fill in the out of office messages for recipients Inside your organization and Outside your organization (optional).
Save Settings
Click OK to save when finished. The auto-reply is now active.
And that covers configuring out of office messages in Outlook for Mac! The steps are very similar to Outlook for Windows.
Out of Office Message Best Practices
Now that you know how to set up out of office replies in Outlook, let’s go over some best practices to create effective messages:
-
Be concise – Get straight to the point in 1-2 sentences. Avoid lengthy messages.
-
Include key details – Specify your return date and who to contact in your absence.
-
Set date range – Prevent auto-replies from going on indefinitely by setting start/end dates.
-
Customize external message – Limit external recipients to avoid spamming newsletters.
-
Proofread carefully – Double check for typos, formatting issues, and clarity.
-
Set and forget – Once enabled, let Outlook handle the auto-replies so you can relax.
Following these tips will ensure your out of office messages are useful for recipients and prevent any problems while you’re away.
Turning Off Out of Office Messages
Once you’ve returned and are ready to turn off auto-replies, here is how to disable the out of office message in Outlook:
Outlook on Windows
- Go to File > Automatic Replies
- Uncheck the Send automatic replies box
Outlook on Mac
- Go to Tools > Automatic Replies
- Uncheck the Enable automatic replies box
The out of office message will stop being sent and your regular inbox will resume. Welcome back!
Troubleshooting Out of Office Problems
While out of office auto-replies usually work seamlessly, occasionally issues pop up. Here are solutions to common problems:
-
Not receiving external replies – Check that you enabled responses for outside your organization. Also try limiting to contacts only to prevent spam.
-
Replies not stopping – Make sure to disable the out of office message when you return. Also check for any date range settings prolonging it.
-
Message not sending – Confirm the auto-reply is enabled and Outlook is running for messages to be sent automatically.
-
Weird formatting – Strip any formatting and re-addstyles to correct formatting issues in your message text.
-
Contacts receiving multiple replies – This can happen if correspondences have multiple email threads. Consider a more general message.
Following the troubleshooting tips above should help identify and correct any issues with Outlook auto-replies.
Customizing Advanced Settings
Outlook also offers more advanced settings to further customize your out of office experience:
-
External message recipients – Choose to respond to all external emails, only contacts, or specific domains.
-
Message language – Create separate out of office emails for different languages.
-
Message formatting – Add advanced text formatting, images, tables, hyperlinks, and more.
-
Auto-decline meetings – Automatically decline new meeting invites during your absence.
-
Disable notifications – Block notifications about certain message types like newsletters.
Take time to explore these additional options to tailor your auto-replies even further.
Alternative Methods
While Outlook’s out of office assistant is the standard way of setting up auto-replies when away, there are some other options as well:
-
Outlook rules – Set up inbox rules to send auto-replies when criteria are met. Requires Outlook running to function.
-
Macros – Use Visual Basic for Applications (VBA) to code auto-reply macros triggered by events.
-
Third party apps – Apps like Leftou can add advanced rules for smarter auto-replies.
-
Email aliases – Forward your Outlook account temporarily to an auto-reply enabled alias.
However, for most situations the simple built-in out of office method works great, and requires no additional software or technical setup.
Key Takeaways
Setting up out of office messages in Outlook is useful for temporarily handling your emails while you are away or unavailable. Here are some key takeaways:
-
Out of office replies are enabled through the Automatic Replies settings in Outlook.
-
Customize separate messages for internal and external recipients.
-
Set start/end dates to limit the duration of auto-replies.
-
Disable the out of office when you return to stop sending replies.
-
Follow best practices to create effective and helpful auto-responses.
So if you plan to be out of the office and want to easily notify email senders, be sure to utilize Outlook’s automatic reply feature
How to setup an automatic out of office reply in Outlook on Mac
If you’re using the new Outlook on Mac, you can set up and schedule your out of office reply using the following steps:
Step 1: Open Outlook on Mac and select Tools > Automatic replies from the menu bar.
Step 2: When the Automatic Replies window appears, check the box at the top to enable automatic replies, and enter your message into the box directly below.
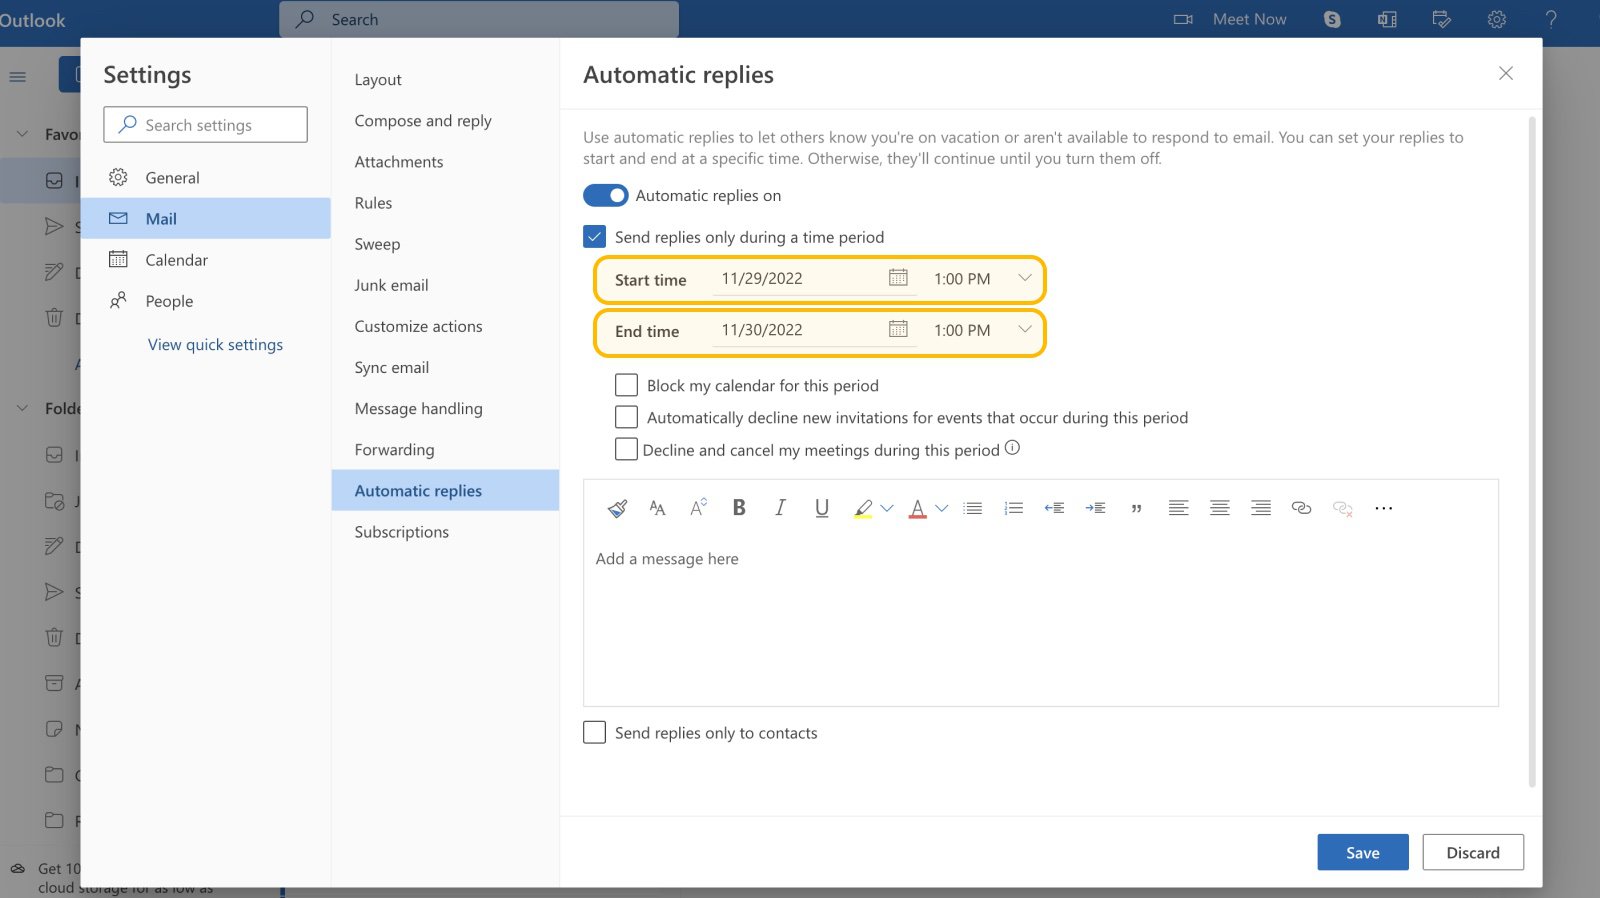
Step 3: To schedule the reply, check the box for Send replies only during this time period. Then, pick the start and end dates and times.
If you don’t use the schedule feature, return to this area to turn off the automatic reply manually.
Step 4: To send the out of office reply to those outside your organization, check that box next. You can choose Send only to my contacts or Send to All External Senders.
Then, enter the automatic reply you’d like to send in that text box.
Step 5: Click OK when you finish.
How to setup an automatic out of office reply in Outlook on Windows
You can create and schedule an out of office reply in the Outlook desktop app on Windows in just minutes.
Step 1: Open Outlook on Windows and select the File tab.
Step 2: Confirm that Info is selected on the top-left. Then, click Automatic replies on the right.
Step 3: At the top of the pop-up window, mark the option for Send automatic replies and then type your message in the text box at the bottom.
Step 4: To schedule the reply, check the box for Only send during this time frame and choose the start and end dates and times.
If you don’t select a timeframe, return to this spot to turn off the automatic reply manually.
Step 5: Click OK when you finish.
How to set up an out-of-office reply in Outlook | Microsoft
FAQ
How do I set my out of office for Outlook?
How do I set up an out of office reply?
To get started, open Outlook and select the File tab. Related: How to Set Up an Out of Office Reply on Outlook.com In the Info section, use the drop-down box at the top to select an account if you have more than one. Then, choose “Automatic Replies.” In the pop-up window, mark the Send Automatic Replies option at the top.
How to set up out of office messages in outlook?
Here’s how to set up out of office messages in Outlook on Windows, Mac, and the web. You can create and schedule an out of office reply in the Outlook desktop app on Windows in just minutes. Step 1: Open Outlook on Windows and select the File tab. Step 2: Confirm that Info is selected on the top-left. Then, click Automatic replies on the right.
How do I send out of office emails?
Type in your out of office message. This will be the automatic response sent to people from your company who email you while you’re away. Note: Outlook does not attach your signature when it sends automatic replies. If you have a signature, you might want to paste it below your message.
How do I create an out of office message?
If you’re using an IMAP or POP3 account, such as a Yahoo or Google Gmail account, go to Use rules to create an out of office message and follow the steps under “Use rules to reply to incoming emails while you’re away.”
