Its important to know how to save the documents you are working with. Frequently saving your documents prevents you from losing your work, and using Save As allows you to edit a document while leaving the original copy unchanged.
There are several ways to share and receive documents, which will affect how you need to save the file. Are you downloading the document? Saving it for the first time? Saving it as another name? Sharing it with someone who doesnt have Word 2010? All of these factors will affect how you save your Word documents. In this lesson, youll learn how to use the Save and Save As commands, how to save as a Word 97-2003 compatible document, and how to save as a PDF.
Microsoft Word is used by over 1 billion people globally to create documents for personal and professional use. While writing in Word is common knowledge, saving Word documents appropriately is an important skill.
In this comprehensive guide, I will share the essential tips and steps to save your Word files on both Windows PCs and Mac devices
Why Properly Saving Word Documents Matters
Saving your Word document seems straightforward. You just click the Save button and your work gets stored, right?
Well, not exactly. Here are some key reasons why you need to follow the best practices for saving Word documents:
-
It ensures your work is stored in the intended location on your PC or Mac. The default save location may not always be what you want.
-
Gives you flexibility to save in different file formats like .doc, .docx, .pdf etc. based on your needs.
-
Allows you to maintain previous versions by saving copies as you progress.
-
Lets you organize your documents in optimal folders and with intuitive names.
-
Enables easy sharing and collaboration for team documents stored in cloud services.
-
Can help recover unsaved work in case of app crashes or hardware failure.
In short, mindfully saving your Word files will save you from headaches down the road. Let’s look at the step-by-step process now.
Save Word Document for the First Time
When you create a new document in Word, you’ll need to save it to retain your work. Follow these quick steps:
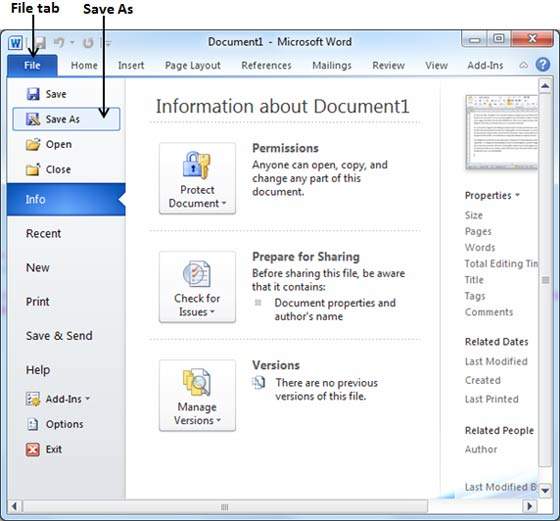
- Click File > Save As on Windows or File > Save on Mac.
- Select the folder location you want to save to.
- Enter a descriptive file name and click Save.
That’s it! Your Word document will be saved to the chosen location.
Save Existing Word Document to Current Location
If you want to update a Word document you’ve already saved previously, here is how to save it again:
- Click File > Save on Windows and Mac.
- Your updated document will be saved in the existing location.
This quick 2-step process will overwrite your older document with the latest changes.
Choose Save Location on PC and Mac
When saving a new or existing Word document, you can choose where to store it. Here’s how:
On Windows:
- Go to File > Save As.
- Click Browse and select the desired folder location.
- Enter the file name and click Save.
On Mac:
- Go to File > Save As.
- Navigate and select the target folder.
- Enter the file name and click Save.
This gives you flexibility to organize your Word documents in specific folders.
Save Word File as PDF
Converting your Word documents to PDF is often required for sharing, printing or compliance purposes. Follow these simple steps to save as PDF:
On Windows:
- Go to File > Save As.
- Click Browse and choose the folder to save to.
- From the Save as type dropdown, select PDF (.pdf).
- Click Save.
On Mac:
- Go to File > Export To > PDF.
- Select the folder location and enter file name.
- Click Save.
That’s all you need to seamlessly convert Word documents to PDF – no additional software required!
Change Default Save Location
Instead of choosing the save location every time, you can change the default folder where Word saves your documents:
On Windows:
- Go to File > Options > Save.
- Under Save documents, click Browse and select the new default location.
- Click OK to save the changes.
On Mac:
- Go to Word > Preferences > Save.
- Next to Default local file location, choose the new save folder.
- Click OK.
Now all your Word files will be saved to the chosen default location.
Enable AutoSave and Recover Unsaved Files
To avoid losing your work if Word crashes, enable AutoSave and AutoRecover:
On Windows:
- Go to File > Options > Save.
- Check the boxes for Save AutoRecover info and Keep last AutoRecovered files.
- Click OK.
This will save your Word document automatically at regular intervals. If Word closes unexpectedly, your unsaved work can be recovered when you relaunch it.
On Mac:
AutoSave and AutoRecovery are enabled by default on Mac. To customize settings:
- Go to Word > Preferences > General.
- Adjust AutoSave frequency and AutoRecovery files.
With AutoSave enabled, you’ll have peace of mind and avoid frustrating data loss scenarios.
Knowing how to properly save your documents is an essential Word skill. Whether you want to save locally, to the cloud, as PDF, with a custom name or in a different folder, this guide covers all the techniques.
Save your Word files frequently as you work to avoid losing progress. And have backups so you always have access to the latest versions of your important documents.
How to Save a Word Document To Your Desktop [Tutorial]
How to save a Word document?
Click on File, Save As, and in this screen, you have the option of Save as Type, so you’re going to find Word. So we have here Word document, you can also do Word 1997-2003 document, if you choose, but we’re just going to go with Word document right now.
How do I find a lost or unsaved Word document?
Sometimes a lost or unsaved Word document may still exist as a temp file. Open File Explorer and search your hard drive for *.tmp files. Switch the view to Details so you can sort the files. After all the results appear, click the Date Modified header to sort the files by date, starting with the latest ones first.
How do I recover a Word document?
Recover From Manage Document open a new file or an existing file. Click the File tab > Info > Manage Document. Click Recover Unsaved Documents. You will see the list of your unsaved files. Select the file and click Open > Save As to store the Word file. Method 3. Recover From Temporary Files
