Interpolation is the process of estimating data points within an existing data set. As this is an Excel blog, then clearly the question we want to answer is: can we interpolate with Excel. This is a common question. In fact, it was the following question from a reader which first made me look into this topic:
“I have an Excel question – Is there a way to interpolate a value from a table? I have an X and Y that are not on the table, but have correlated data so want to calculate the interpolated value”.
As a simple example, if it took 15 minutes to walk 1 mile on Monday and 1 hour to walk 4 miles on Tuesday, we could reasonably estimate it would take 30 minutes to walk 2 miles.
This is not to be confused with extrapolation, which estimates values outside of the data set. To estimate that it would take 2 hours to walk 8 miles would be extrapolation as the estimate is outside of the known values.
Download the example file: Join the free Insiders Program and gain access to the example file used for this post.
Interpolating values in Excel is a useful skill that allows you to estimate values between two known data points. With interpolation, you can calculate smooth transitions between discrete data points to better understand trends and make forecasts. While Excel has a dedicated FORECAST function for interpolation you can also do it manually using simple formulas. In this comprehensive guide we’ll explore the ins and outs of interpolating values in Excel using different methods.
What is Interpolation?
Interpolation refers to the process of estimating unknown values between two known data points. It helps you find values that lie between your discrete data points on a continuous line or curve. Interpolation enables smooth transitions between data points, giving you a better sense of the overall trend.
In Excel, interpolation is useful when:
- You need to estimate weekly sales figures when you only have monthly data.
- You want to calculate monthly website traffic when you have annual figures.
- You need to forecast next year’s revenue based on data from the past 5 years.
Instead of making wild guesses about the intermediate values, interpolation gives you a scientifically derived estimate based on the existing data points. The interpolated values connect your data points smoothly rather than in sudden jumps.
Excel Interpolation Methods
There are a few different ways to interpolate values in Excel
1. Linear Interpolation
Linear interpolation calculates values between two points on a straight line, It assumes the rate of change between the known points is constant,
To do linear interpolation in Excel:
-
Enter the two known y-values in cells A1 and A2.
-
In another cell, enter the formula:
=(A2-A1)/(ROW(A2)-ROW(A1))
This calculates the rate of change between the two points.
-
In cell A3, enter the formula:
=A1+B1
Where B1 contains the rate of change formula.
- Copy the formula down from A3 to cells below it to interpolate values along the straight line.
The intervals between the calculated values will be equal.
2. Polynomial Interpolation
Polynomial interpolation fits a polynomial curve through more than two known points. It makes sense when the data demonstrates non-linear behavior.
To do polynomial interpolation in Excel:
-
Enter at least three y-values in consecutive cells (A1, A2, A3 etc.)
-
Select these cells and use Excel’s Growth trendline option.
-
Display the equation on the chart and use it to calculate additional points.
The curve connects the given points smoothly according to their relative positions.
3. Lagrange Polynomial Interpolation
The Lagrange polynomial formula lets you fit a polynomial through a number of points while passing through each point exactly.
The formula is more complex but has the advantage of interpolating multiple data points accurately.
4. Cubic Spline Interpolation
Cubic spline interpolation fits a special cubic polynomial between each pair of data points. The curves have the same slope and curvature at the junctions, resulting in a smooth overall fit.
Implementing cubic spline interpolation requires advanced numerical methods. However, Excel provides the cubic spline option for trendlines to achieve this automatically.
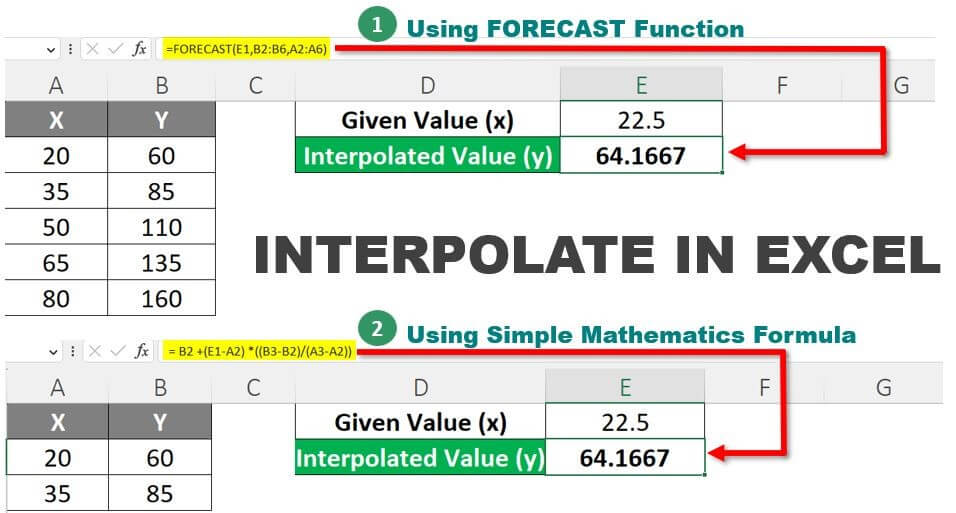
Using Excel’s FORECAST Function
The easiest way to interpolate values in Excel is using the built-in FORECAST function. FORECAST performs linear regression analysis to fit a straight line through your data points and returns the y-value for a given x-value.
To use FORECAST:
-
Enter the known y-values in a column (A1:A5)
-
Enter the known x-values horizontally in row 1 (B1:F1)
-
In another cell, use the FORECAST formula:
=FORECAST(x,known_y’s,known_x’s)
Where x is the x-value you want to interpolate.
FORECAST calculates the projected y-value based on the linear regression line. It’s great for interpolating a few values but becomes cumbersome with large datasets.
Interpolation vs. Extrapolation
Interpolation refers to estimating values within the range of known data points. Extrapolation means projecting beyond the range, based on assumed trends.
Be careful when extrapolating – the trends beyond your data may not continue as smoothly as within the range. Interpolation is usually safer for making sound forecasts.
Examples of Interpolating Values in Excel
Let’s look at some examples of different interpolation techniques in Excel for practice:
1. Basic Linear Interpolation
![Basic linear interpolation][]
Given the years and population figures in A1:B3, we can interpolate to find the population in 2007 using linear interpolation.
The formula in B4 is: =B1+((B3-B1)/(A3-A1))*(A4-A1)
It calculates the y-value in 2007 based on the change rate between 2000 and 2010.
2. Polynomial Interpolation![Polynomial interpolation][]
Here we have quarterly sales figures for the past 3 years. To interpolate sales for Q3 and Q4 of 2022, we’ll use a polynomial trendline.
Right click the data points, select Add Trendline and choose the Polynomial order. The equation gives the interpolated estimates.
3. Using FORECAST![FORECAST example][]
Here FORECAST interpolates the value in cell A7 based on the y-values A1:A6 and x-values B1:B6 using linear regression.
The formula in A7 is: =FORECAST(B7,A1:A6,B1:B6)
FORECAST returns the projected y-value in 2022 based on the data from 2016 to 2021.
Tips for Interpolating Values
Here are some best practices for interpolating values accurately in Excel:
- Use at least 3-4 data points – Two points only allow linear interpolation. More points enable non-linear regression for curve fitting.
- Check for outliers – Outlier data can skew interpolations. Consider removing anomalies before interpolating.
- Be wary of extrapolation – Only extrapolate gently beyond your data range. The trends can change quickly.
- Check interpolated values – Ensure they align logically with the raw data points. Adjust the methods if needed.
- Use interpolation for estimates – Don’t rely too heavily on interpolated values for critical business forecasts.
Interpolating in Excel helps derive meaningful insights from discrete data points. Mastering interpolation methods such as linear, polynomial and cubic regression enables you to forecast trends accurately. Use Excel’s inbuilt FORECAST function for quick linear estimates.
We looked at the key concepts behind interpolation, Excel’s capabilities and useful examples. Interpolating values is a valuable analytics skill for better data-driven decisions. Use it wisely by following the best practices!
Interpolation when perfectly linear
Now let’s use FORECAST to interpolate a result.

Using the same numbers from the example above, the formula in cell E6 is:
The FORECAST function has the following syntax:
The three arguments in the function are:
- x – the data point for which we want to predict a value
- known_y’s – the range of cells or array of values containing the known Y values
- known_x’s – the range of cells or array of values containing the known X values
When using the FORECAST function, the result of cell E6 is also 77.5 (just as in the mathematical approach).
For completeness, the example file also contains the use of FORECAST.LINEAR function. As we would expect, the result is identical to the legacy FORECAST function.
Interpolation using the FORECAST function
In the 2016 version of Excel, there were lots of new statistical functions added. To make room for these new functions, FORECAST has been replaced with the FORECAST.LINEAR function. Though FORECAST still remains at the moment for the purpose of backward compatibility with Excel 2013 and before.
As FORECAST and FORECAST.LINEAR are effectively the same, we’ll be using the terms interchangeably.
How to Interpolate Using Linear Trendline in Excel
What is interpolation in Excel?
Interpolation is a commonly used technique in various fields, such as engineering, finance, and statistics. It involves estimating a value within a given range of known values. Interpolation can be a powerful tool in assisting decision-making, but the process can be challenging unless you are familiar with the right Excel functions.
How to interpolate between two values in Excel?
The simplest way to interpolate between two values is to use the FORECAST/FORECAST.LINEAR function. Let’s go through the description below. Steps: Determine which value you want to interpolate and make new rows for the value you want to interpolate and the interpolated In this case I want to interpolate between 8 and 9 so I chose a value of 8.5.
How to perform linear interpolation in Excel?
To perform linear interpolation in Excel, you can use the FORECAST function. First, calculate the slope and intercept using the LINEST function. Then, use the FORECAST function to find the interpolated value using the slope, intercept, and known x-values.
How do I interpolate linearly in Excel?
To interpolate linearly in Excel, follow these steps: Enter your data into an Excel worksheet. This data should contain two columns: one for the independent variable (e.g., time) and another for the dependent variable (e.g., temperature). Choose the Scatter chart type and select the scatterplot that best represents your data.
