Originally launched in 1985, Microsoft Excel has long been an essential software and management tool for 99.99% of businesses, with versions available for Windows, MacOS, Android, and iOS.
This nearly ubiquitous spreadsheet software offers features such as calculations, graphing, and data sorting. Excel is commonly used for all sorts of organizational tasks such as budgeting, planning, data reporting and analysis, and more.
In 2020, Microsoft’s Security Intelligence team announced it had detected a phishing campaign that specifically targeted Excel. The campaign was based around an email that appeared to come from a medical center. The email was related to the COVID-19 pandemic and came with an Excel attachment. If downloaded and opened, the Excel file displayed a graph of COVID-19 cases in the US and a security warning.
If users bypassed the warning and allowed the file to run, the device would download and run NetSupport Manager, which is a remote access tool often used by hackers to control external devices, such as a victim’s computer.
Microsoft admitted that this campaign was just one of hundreds that targeted Excel. But Microsoft was not the only target: by September of 2021, data breaches across industries and software programs had surpassed breaches from the year prior by 17%.
This encryption should extend to Microsoft Excel files. Since Microsoft Excel spreadsheets often contain numerical inputs, its files may contain sensitive information, such as financial data. It is therefore vital to encrypt Excel files to protect the data within.
This article explains how encryption works, why enterprise-level companies need to encrypt Excel files, and provides step-by-step instructions on how to encrypt Excel files using a security solution like WinZip® Enterprise.
In today’s data-driven world, Microsoft Excel is used to store all kinds of sensitive information – from personal financial data, employee records, company financials to proprietary formulas and trade secrets.
While Excel provides various security features like password protection and Access control, these don’t fully secure your data if the file ends up in the wrong hands. Encryption is the only foolproof way to lock down the contents of your Excel workbooks.
In this step-by-step guide, you’ll learn:
- Why you need encryption to truly secure sensitive Excel data
- How to encrypt Excel files using Excel’s built-in Encrypt with Password tool
- Additional encryption options like third-party software and Windows BitLocker
- Best practices for secure key management when encrypting Excel workbooks
Follow along as I walk through the entire encryption process from start to finish By the end, you’ll have the knowledge to properly lock down critical Excel data and restrict unauthorized access. Let’s get started!
Why Encryption is Essential for Securing Sensitive Excel Data
Before we dive into the how-to it helps to understand exactly why you need encryption to secure private Excel data
Password protection is inadequate – Excel’s password protection only prevents opening a file. It does NOT encrypt the data. Passwords can be cracked and data can still be accessed by removing protection.
Access restrictions are easy to bypass – Limiting edit access to authorized users has loopholes. Users cancopy data to new files or use hacking tools.
Unencrypted data is vulnerable – Unencrypted Excel files can expose your confidential data if accessed by unauthorized parties, through theft leaks or sharing mistakes.
Encryption offers robust protection – Encrypting Excel files scrambles your data into unreadable format, even if the file ends up in the wrong hands. The data can only be decrypted with the right encryption key.
Clearly, if your Excel workbooks contain personally identifiable information, financial records, or other sensitive data, then encryption is essential to truly secure and lock down your data.
Encrypting Excel Files with Excel’s Built-In “Encrypt with Password”
Thankfully, Excel provides built-in encryption capabilities through its Encrypt with Password tool. Here’s how to use it:
-
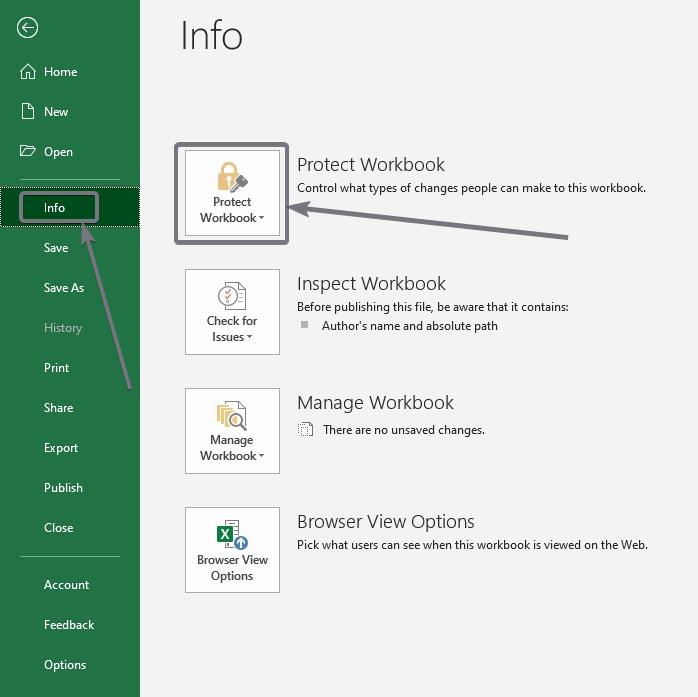
Open the Excel file and go to File > Info > Protect Workbook > Encrypt with Password.
-
Enter a strong password that will be used as your encryption key.
-
Re-enter the password to confirm. Click OK.
-
Save and close the encrypted Excel file.
That’s it! Your Excel file is now encrypted. Anyone trying to open the file will require the password to decrypt and access the data.
Some tips when using Excel’s built-in encryption:
-
Use a strong password at least 8 characters long.
-
Do not reuse passwords across files or users.
-
Store the password securely, outside of the file itself.
-
Set access permissions on the encrypted file for added security.
Now let’s look at a few other options for encrypting Excel data beyond the built-in tool.
Using Windows BitLocker for Excel Encryption
BitLocker is Windows’ disk encryption technology. Enabling BitLocker on your system drive or external storage devices encrypts all data at rest, including any Excel files stored on them.
Benefits of BitLocker encryption:
-
Encrypts your entire drive, protecting all files and data.
-
Encryption/decryption handled transparently by Windows.
-
Excel files remain fully accessible and editable when stored on BitLocker volumes.
Downsides to consider:
-
Requires Windows 10 Pro or Enterprise edition.
-
BitLocker management and recovery can be complex.
-
Entire drive is encrypted, which may be overkill if only securing select Excel files.
Third-Party Encryption Software for Excel Files
Beyond native options, third-party encryption tools provide additional capabilities:
-
Zip encryption – Password protect and encrypt Excel files inside zip archives using software like 7-Zip or WinZip.
-
Individual file encryption – Tools like AxCrypt allow encrypting specific Excel files without affecting others.
-
Email encryption – Secure email plugins can encrypt Excel file attachments in transit.
-
RM solutions – Rights management software secures Excel data usage via persistent file-level policies and access controls.
Evaluate your specific use cases to determine if third-party encryption tools are warranted versus relying on Excel and Windows capabilities.
Encryption Key Management Best Practices
The encryption keys (passwords, certificates, etc.) used to secure Excel files must be properly managed:
-
Store encryption keys separately from encrypted Excel files, in a password manager or secure physical location.
-
For sensitive data, restrict encryption key access to separate custodians or security staff not the file users.
-
Have a documented process for secure distribution, rotation and revocation of encryption keys.
-
Encrypt Excel files with different keys to limit data exposure in the event a key is compromised.
-
Have robust backup and recovery procedures in place for lost or expired keys rendering files inaccessible.
Following encryption key management best practices prevents you from unintentionally locking yourself out of your own encrypted Excel data!
Summary
Here are the key points we’ve covered on securely encrypting sensitive Excel files:
-
Encryption provides robust protection that password protection and file access controls cannot.
-
Excel’s built-in Encrypt with Password provides easy file-level encryption.
-
For wider encryption, use Windows BitLocker or third-party encryption tools.
-
Properly manage encryption keys separately from encrypted files.
-
Have backups, recovery procedures and access controls in place for encrypted Excel data.
Encrypting important Excel workbooks provides peace of mind that your confidential company, customer or personal data remains secure even if the files end up in the wrong hands.
Implement the encryption options and best practices outlined here to start locking down sensitive Excel data. Please leave a comment if you have any questions as I’m always happy to provide encryption advice to keep data secure!
Why enterprise-level companies need to encrypt Excel files
Unfortunately, Microsoft Excel files are common targets for malware––especially when these files are sent via email. Verizon reports that 46% of malware attacks that happened to organizations in 2020 originated from an email.
Microsoft products are particularly susceptible to macro viruses, which are viruses that use the same macro language as software programs such as Microsoft Word or Microsoft Excel. Since the virus is written using the same language as these software programs, it can corrupt documents––and your device’s software.
Unauthorized access to files and data can be detrimental to both the companies and their clientele. Potential consequences of unauthorized access include the following:
- The manipulation or destruction of sensitive data. Unauthorized access by nefarious third parties can lead to tampering with Excel files containing important information. If these files are not backed up on other devices, this data can be irretrievable.
- Negative impact on a company’s reputation. A Forbes study reports that 46% of businesses experience damage to their reputation and brand value because of a data breach. An additional 19% of organizations suffer reputation and brand damage caused by either a third-party security breach or an IT system’s failure.
- Loss of revenue. While a data breach can harm an enterprise’s reputation and deter potential customers, it may also affect the organization’s current customer base. PricewaterhouseCoopers (PwC) reports that 87% of consumers are willing to cut ties with a business when data breaches take place.
- Regulatory ramifications. Businesses must adhere to specific regulatory standards for data privacy. These standards will vary by industry. Merchants, vendors, and financial institutions, for example, must follow the Payment Card Industry Data Security Standard (PCI DSS) for transactions. Healthcare entities must abide by the 1996 Health Insurance Portability and Accountability Act (HIPAA) and the Health Information Technology for Economic and Clinical Health (HITECH) Act, which requires protection of protected health information (PHI) in electronic health and medical records.
- Legal ramifications. Compromised data brings into question whether companies have taken all possible measures to secure client or customer data as per federal law. Therefore, in the event of a breach, class action lawsuits are not uncommon. Equifax’s 2017 data breach, for example, cost the company $700 million in payouts to affected US customers.
Encrypted files are password-protected, which ensures that only authorized individuals can open, read, or edit the files. Since encrypting Excel files allows users to control who can access and edit sheets and workbooks, encryption helps to maintain data integrity and avoid the repercussions of data breaches.
How does encryption work?
Encryption keeps sensitive information safe from unauthorized access. The encryption process takes data and transforms it into another form or code that can only be accessed with a decryption key or password. Unencrypted data is known as plain text; encrypted data is called ciphertext.
Encoding (and decoding) data is accomplished using encryption algorithms (also known as ciphers). Part of the algorithm is an encryption key. An encryption key is a variable value which creates the cipher’s unique output. As the name suggests, it is the key to unlocking the encrypted text.
How to Encrypt Microsoft Excel Documents
What is the best way to encrypt an excel file?
Now, when you know the risk, here’s how to encrypt an Excel file: Open your Excel document. Select File and then Info. Select Protect Workbook and click Encrypt with password . Enter a password and press OK. Confirm the password and click OK.
What are the benefits of encrypting an Excel file?
Encrypted filesare password-protected, which ensures that only authorized individuals can open, read, or edit the files. Since encrypting Excel files allows users to control who can access and edit sheets and workbooks, encryption helps to maintain data integrityand avoid the repercussions of data breaches.
How do you password protect an excel file?
To password protect an Excel file, execute the following steps. 1. Open an Excel file. 2. On the File tab, click Save As. 3. Click Browse. 4. Click on the Tools button and click General Options. 5. In the Password to open box, enter a password and click OK. 6. Reenter the password and click OK. Note: this feature also encrypts your Excel file.
What happens if you forget the password to an encrypted excel file?
While unencrypting Excel file is another story. If you forgot your password, the Excel file is no longer accessible. You can try some data recovery software like Apeaksoft Data Recovery to retrieve lost excel files and try your luck with third-party tools to open the file. Its main features include:
