Installing a VPN app on your smartphone, laptop, or tablet is a great way to enhance your security and privacy. However, if you want to protect your whole network and especially devices that don’t support VPN functionality, you can install a VPN on your router. In this article, we’ll discuss the pros and cons of a VPN router and explain how to set it up at home.
A virtual private network (VPN) has become an essential tool for protecting your privacy and security when using the internet By routing your traffic through an encrypted tunnel to a remote server operated by a VPN service, you can hide your IP address and online activities from your internet service provider (ISP) and anyone else who may be snooping on your connection Setting up a VPN at home gives you access to this important privacy tool on all your household devices.
With more people working and learning from home than ever before, home VPN use is growing rapidly. VPNs are no longer just for techies and world travelers! This step-by-step guide will show you how easy it can be to configure your own VPN server on a home router. Then all your household devices can enjoy safeguarded internet access.
Why Set Up a Home VPN?
Here are some of the main benefits of running your own VPN server at home
-
Hide your home IP address – VPNs mask your real IP address so your online activities can’t be tracked back to your home internet connection.
-
Encrypt your web traffic – VPN encryption prevents your ISP and others from spying on what sites you visit and what data you send and receive online.
-
Access blocked content – VPNs allow you to bypass geographic restrictions and censorship to view blocked sites and services.
-
Enhance security on public WiFi – Connecting through a VPN adds an important layer of security when accessing public hotspots.
-
Remotely access your home network – You can securely access printers, files, and other devices on your home network when traveling.
For the highest level of privacy and anonymity online, connecting to a commercial VPN service is ideal. But for many daily home browsing and streaming needs, a DIY home VPN provides significant security and peace of mind.
Home VPN Options
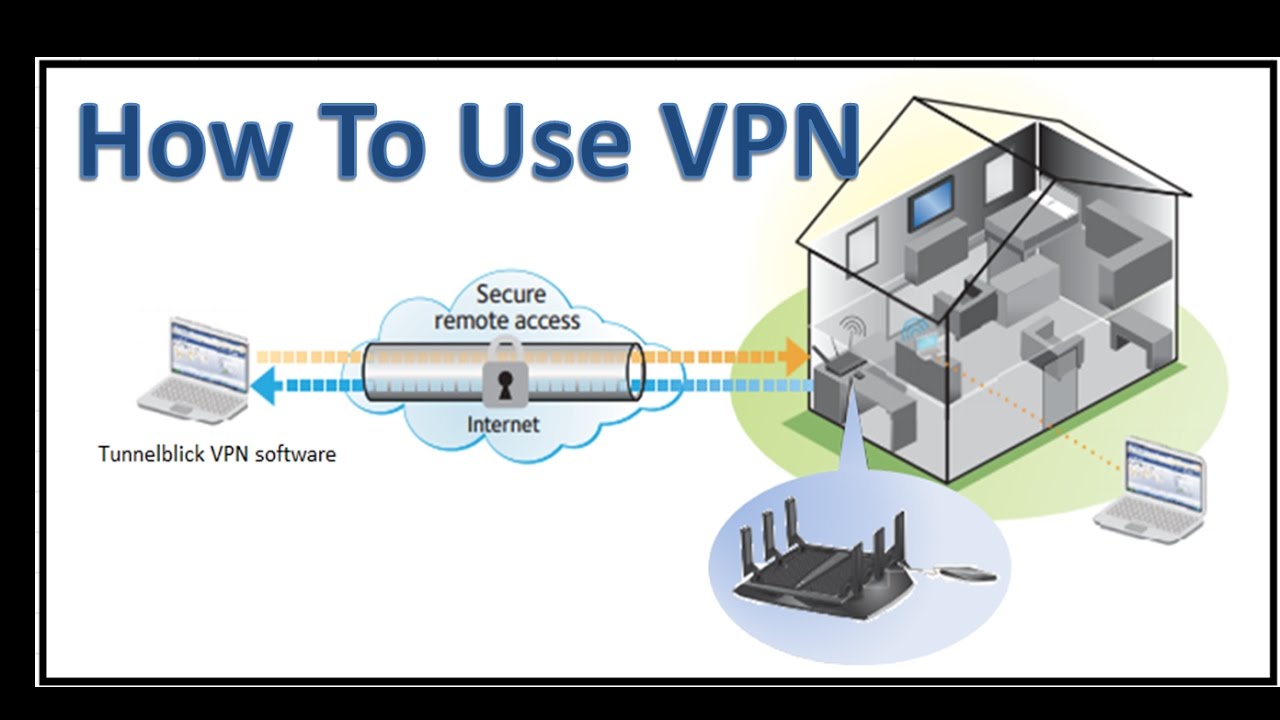
Setting up a home VPN server is easy if your WiFi router supports VPN functionality. Many popular consumer routers have built-in VPN server software. If yours doesn’t, you can configure VPN server software on a Raspberry Pi or an old PC. You’ll also need to sign up for a VPN account with a provider that allows home connections.
The two most common ways to establish a home VPN are:
-
Router-based VPN – Use your WiFi router’s built-in VPN client to connect to a VPN service provider. All devices on your home network will route through the VPN tunnel.
-
Virtual Private Server (VPS) – Rent a VPS configured as a VPN server. You’ll install VPN client software on your home router or devices to connect to the VPS.
Both methods allow you to run your home internet traffic through an encrypted VPN tunnel. The router-based setup is a bit simpler for beginners. But going the VPS route gives you more server options and better speeds.
How to Set Up a Home VPN on Your Router
Let’s look at how to configure a VPN client on your home router to route all your traffic through your preferred VPN provider. The specific steps will vary depending on your router’s make and model. But the general process is the same for most routers:
1. Log Into Your Router Admin Panel
The first step is accessing your router settings:
-
Browse to your router admin page. Usually this is at an IP address like
192.168.0.1. -
Enter your admin username and password. The default is often “admin, admin” or “admin, password”.
-
Navigate to the router firmware update page. Make sure you’re running the latest firmware.
2. Locate VPN Settings
Next, find the VPN settings in your router admin panel:
-
Look for options like “VPN”, “VPN Client” or “VPN Tunnel”. They may be under advanced settings.
-
Do NOT select VPN Server options – you want Client mode to connect your router to your VPN provider.
-
If your router doesn’t support VPN natively, you may need to install VPN client software on a compatible USB device.
3. Configure Your VPN Connection
Now, configure your VPN connection:
-
Select your VPN protocol – OpenVPN and IKEv2 are good choices.
-
Enter the VPN server hostname/IP provided by your VPN provider.
-
Specify the account credentials to authenticate with the VPN server.
-
Make sure “Enable VPN” or similar is checked.
-
Save your VPN configuration.
4. Complete Setup and Connect
Almost done! Just a few more steps:
-
Reboot your router to load the new VPN configuration.
-
Connect a device to your home network and verify your new public IP matches your VPN provider’s location.
-
Check connection logs on the router admin page to confirm your traffic is routing properly.
And that’s it! Your home router is now sending all traffic through your VPN tunnel for secure remote access.
Choosing a VPN Provider for Home Use
To set up your home VPN, you’ll need to sign up for service with a provider that offers VPN server endpoints compatible with your router setup. Here are some things to look for in a home VPN provider:
-
Allows multiple simultaneous connections – You’ll want to connect all your home devices through the VPN tunnel.
-
No restrictive bandwidth caps – Streaming and downloads can eat up data fast so choose an unlimited plan.
-
Strong encryption – Make sure your provider offers OpenVPN encryption with AES-256 or stronger.
-
Owned servers – Providers that own all their servers typically offer better speeds and security.
-
Client support – Choose a provider that offers setup instructions and troubleshooting help for your router model.
-
No activity logs – To protect your privacy, pick a zero logging VPN that doesn’t record your usage or traffic.
Privacy-focused providers like NordVPN, ExpressVPN, and Private Internet Access are great options for home VPN services. Their large server networks provide fast speeds ideal for HD streaming.
Advanced Option: Build Your Own VPN Using a VPS
The router-based method above is the easiest way to get started with a secure home VPN tunnel. However, more advanced users may want to set up and manage their own VPN server on a rented VPS (virtual private server).
This method takes more effort but gives you full control to configure your VPN server however you like. You can fine-tune protocols and encryption settings for optimal security. Performance will be better too since your traffic doesn’t have to pass through the VPN provider’s network.
Here is an overview of how to deploy your own VPN on a VPS:
-
Rent a VPS from a provider like Amazon AWS, DigitalOcean, or Vultr. Choose at least 2 GB RAM and 40 GB SSD storage.
-
Install VPN server software like OpenVPN or SoftEther on the VPS. Configure user accounts and encryption settings.
-
Open required ports on the VPS like UDP port 1194 for OpenVPN traffic.
-
Install VPN client on your home router or devices and connect to your VPS IP and account credentials.
Maintaining your own VPS does require more technical expertise. But the flexibility and performance gains appeal to many home VPN enthusiasts. And you can implement additional security like rotating IP addresses or obfuscating VPN traffic.
Getting the Most from Your Home VPN
Once your home VPN is up and running, here are some tips to get the most protection and versatility:
-
Connect all your household smart devices like TVs and voice assistants to avoid tracking.
-
Use strong passwords, multi-factor authentication, and other security settings on accounts.
-
Always connect through the VPN on public WiFi or cellular hotspots.
-
Reduce VPN leaks by disabling WebRTC, IPv6, and DNS leaks in your browser.
-
If connecting a mobile device directly, enable the VPN kill switch setting to prevent leaks.
-
Consider using a commercial VPN provider for some connections if optimal speed, reliability, or security is needed.
-
Set up Dynamic DNS to access your home network remotely when traveling or working away from home.
A home VPN network provides an encrypted tunnel to keep your internet traffic secure from prying eyes. Once configured properly on your router, connecting is quick and easy while at home. And with your home network remotely accessible through the VPN, going online from anywhere stays safe and private.
What is a VPN router?
A VPN router works exactly like a normal VPN. Your traffic is redirected through a VPN’s servers, allowing you to browse online completely undisturbed. All your activity will be hidden from anyone trying to spy on you, whether it’s petty thieves to data-hoarding corporations.
The reason you’d want a VPN on your router is to provide network-wide online security. Once you set up a VPN on your router, all connected devices will be granted the benefits of VPN protection. That includes devices that may normally not have the ability to utilize VPN software to its fullest, like a lot of smart home devices. Here’s a video explaining exactly how a router VPN works.
Still don’t know how to install a VPN on your router?
If you’re experiencing issues and don’t know how to install a VPN, no problem. NordVPN has award-winning 24/7 live customer support in multiple languages. If these tips didn’t help you and you’re still lost, our support experts will help you find a way to put NordVPN on your router. Contact us at [email protected], through the live chat, or other means available.
How to Setup VPN on Your Router (easy, step-by-step tutorial!)
How to set up a VPN Server?
There are several ways you can set up your VPN server. This way, you can have remote access to your home network. You need to follow a series of steps for specific operating systems. The most straightforward method is to buy a router with VPN capabilities. The cheapest method is converting your personal computer into a home VPN server.
How to use a VPN on a Wi-Fi router?
To use your home VPN, log into your router by entering its IP address into your web browser. Find the option saying VPN or similar and add in your VPN username and password. You should be able to enable the VPN across your whole network from here. 3. How to Set Up a VPN by Installing VPN Software on Your Wi-Fi Router
How do I set up a VPN on a router?
Unlike many third-party VPNs, you can’t easily toggle between different VPN protocols on a router. To setup your home router as a VPN server: Open up your preferred browser. Enter your router’s LAN (internal) IP address into the search bar. Generally, manufacturers give routers either of the following IP addresses: 192.168.0.1 or 192.168.1.1.
How do I set up a VPN on Windows 10?
Head into “Settings.” Click on “Network and internet” and then choose “VPN.” Click “Add VPN.” Now, fill in the fields: select “Windows (built-in)” for your VPN provider, name your connection under “Connection name,” enter the server name or address, select the VPN type, and choose the type of sign-in info.
