Recovering Lost Word Documents: A Step-by-Step Guide
We’ve all experienced the stomach-sinking moment of realizing a Word document didn’t save properly. Hours of precious work can vanish in an instant.
But don’t panic! In most cases you can recover unsaved and deleted Word files.
This comprehensive guide will walk you through all the methods for retrieving lost documents in Word. Follow these steps to rescue your work and get back on track.
Check AutoRecovery Files
Word’s AutoRecovery feature saves temporary versions of open documents at regular intervals. So even if you forget to save, Word may have your back.
When you restart Word after a crash, it scans for any AutoRecover files. If found, it displays these unsaved documents in the Document Recovery pane so you can retrieve your work.
If the recovery pane doesn’t open automatically, go to File > Info > Manage Document > Recover Unsaved Documents. This surfaces available AutoRecovery files to restore.
You can also manually search for AutoRecovery files, which use the “.asd” file extension. Open File Explorer, search for “.asd” and browse for documents with today’s date. Double click to open in Word.
Increase the AutoRecovery frequency to every 1-2 minutes for maximum protection. (File > Options > Save)
Search for Temporary Files
Word uses temporary “.tmp” files to store shortcuts while editing documents. The contents get merged into unsaved changes upon closing.
If a crash occurs mid-edit, search for “.tmp” files in File Explorer. Look for files matching the date/time of your lost work. Open in Word and save properly to recover the contents.
Check the UnsavedFiles Folder
For Office 365 users, Word autosaves to OneDrive’s UnsavedFiles folder. Look in C:UsersUsernameAppDataRoamingMicrosoftWord and C:UsersUsernameAppDataLocalMicrosoftOfficeUnsavedFiles.
Open any documents matching your lost file’s name to restore your work. This integrates with AutoSave’s real-time cloud backup.
Find Backup Copies
Word creates “.wbk” backup files every 10 minutes by default. Search for these using File Explorer. Look for “Backup of [filename]” to identify your document’s backup.
Open the .wbk file in Word and save it with the original name to recover from the periodic backup. Reduce the backup frequency to 2-5 minutes for added safety.
Check Version History
If you were saving to OneDrive or SharePoint, check the file’s version history in the cloud. Right-click the file and select “Version History.” Roll back to an older auto-saved version if the latest is corrupted.
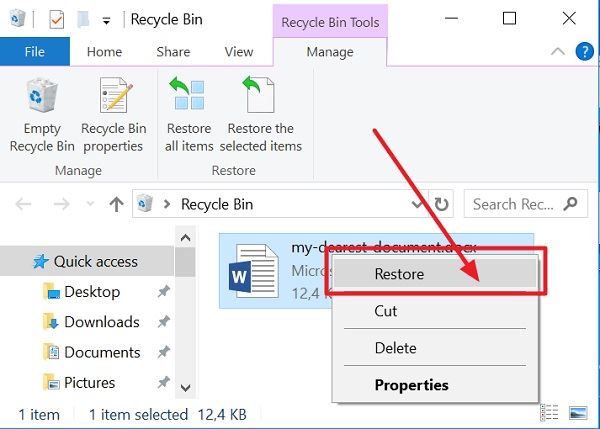
Cloud services also retain deleted files in the Recycle Bin for up to 90 days. Restore prior versions of improperly deleted documents.
Try Word File Recovery Tools
If previous versions aren’t available, try Word’s built-in file recovery tools. Go to File > Open > Recover Unsaved Documents to extract text from damaged files.
The Open and Repair utility also attempts to recover corrupt documents. This salvages any retrievable text and data.
Third-party tools like Stellar Repair for Word provide advanced Word doc recovery beyond what Office can handle. But built-in tools should work for most cases.
Reopen After a Crash
After a crash, quickly reopen Word. It will automatically scan for any recovered AutoSave versions and display them in the Document Recovery pane. This should restore your most recent edits prior to the abnormal shutdown.
Restarting Word essentially triggers the same process as AutoRecovery, giving you another opportunity to retrieve your work. Don’t wait too long, as temporary files get deleted over time.
Avoid Saving in Vulnerable Places
Avoid potential file corruption by saving documents directly to your local hard drive or OneDrive cloud storage. External devices, network locations, and folders with restricted permissions can disrupt the save process and increase risk. Stick to default, protected save locations.
Practice Proper File Management
Accidentally deleting or overwriting files is another common issue. Make copies before moving or renaming files. Close documents before interacting with the file location. Avoid working from folders like Downloads or Desktop where files get easily misplaced.
Enable AutoSave
AutoSave automatically backs up Word docs to OneDrive in real time. No manual saving required. Enable this via File > Options > Save to prevent data loss from failure to manually save.
Create Efficient Backup Routines
Regularly backing up your system and files provides redundancy against data loss. Automate backups to external drives or cloud services. Maintain current and historical snapshots of critical business documents.
The 5-Step Word Document Recovery Process
Follow this checklist when a document goes missing:
-
Check AutoRecover files for unsaved drafts.
-
Search for temporary “.tmp” files.
-
Look for backup “.wbk” copies.
-
Scan OneDrive Recycle Bin and version history.
-
Run Word’s repair and recovery tools.
With an understanding of how Word saves files, a bit of digging can resurrect documents from the digital graveyard in most cases.
Advanced Document Recovery Tactics
For tricky cases, consider these advanced troubleshooting techniques:
-
View hidden temporary files in File Explorer. These are normally hidden but contain unsaved changes.
-
Use third party tools like Stellar Phoenix to repair severely corrupted files.
-
Recover deleted files from your Recycle Bin’s hidden restore points.
-
Work from a restored system image or file backup to retrieve lost document versions.
-
Export the text from a corrupt document by copying/pasting into a new file. Formatting may be lost but text will be preserved.
-
If all else fails, retype missing sections using the last printed or emailed version as a reference. Tedious but better than starting over completely.
With persistence and creativity, you can recover and resurrect even the most mangled of Word documents. Don’t abandon hope at the first sign of trouble. Lost work can often be found with a bit of searching.
Preventing Lost Word Documents
An ounce of prevention is worth a pound of cure when it comes to data loss. Build good habits to avoid document mishaps:
-
Save frequently and in multiple locations like OneDrive or Dropbox
-
Enable AutoRecover at 1-2 minute intervals
-
Set Word to create automatic backup copies every 5 minutes
-
Work from protected cloud storage instead of local drives
-
Close documents before interacting with the file location
-
Avoid saving to external drives, networks, or unfamiliar locations
-
Keep storage media like flash drives in sync via cloud syncing tools
-
Maintain up-to-date backups of critical files and system images
-
Use version history in cloud storage to easily roll back to earlier copies
Adopting preventative measures will reduce dependence on post-disaster Word document recovery. But even responsible users encounter the occasional mishap. When that dreaded moment strikes, use the techniques in this guide to swiftly resuscitate your lost files.
With the right knowledge, you can rescue precious work and get right back to business. Don’t abandon hope if a document goes missing. Lost files leave recoverable footprints if you know where to look. Reconstruct your hard work by following the file’s digital breadcrumb trail back to its origin.