While Word® is traditionally thought of a word processor, you can make a flowchart in Word one of two ways:
Flowcharts are a handy way to visualize processes workflows organizational structures and more. The simple, graphical format allows you to break down complex systems into an easy-to-understand diagram.
While flowchart software exists, you don’t need any specialized programs to make a flowchart. Microsoft Word has all the tools you need build, customize and share flowcharts right within a Word document.
In this simple, step-by-step guide, you’ll learn how to create flowcharts of any complexity in Word using rectangles, arrows and SmartArt tools. Follow along to start documenting systems and processes in flowchart form.
Step 1: Enable the Developer Tab in Word
Before we can insert a flowchart, you need to enable the Developer tab in the Word ribbon. Here’s how:
- Click File > Options.
- Select Customize Ribbon on the left.
- Check the box next to Developer on the right.
- Click OK.
The Developer tab will now be available when editing a Word document,
Step 2: Add Flowchart Shapes
To build a flowchart, you need flowchart shapes. Click the Developer tab, then click the Insert button and select a flowchart shape:
- Process – Rectangles to contain steps
- Decision – Diamonds to indicate conditional steps
- Data – Parallelograms to show inputs/outputs
- Terminator – Circles or ovals to start/end
Click a shape, then click within your document to insert it. Repeat to add more shapes.
Use process shapes for standard steps, decisions for “if” steps, data for input/output, and terminators for start/stop.
Step 3: Customize the Look
Once your basic shapes are added, customize their look:
- Size – Click and drag the sizing handles to enlarge or shrink a shape.
- Color – Select a shape, go to Shape Fill and choose a color.
- Text – Click inside a shape and type text to add a label.
- Connectors – Click a shape’s connection nodes, then drag to an end node on another shape to connect them.
- Alignment – Select all shapes, go to Format > Align and distribute to align and space evenly.
Take time to organize and design your flowchart so it is clean and professional looking.
Step 4: Add Arrows to Connect Shapes
To indicate flow direction, add arrows between connected shapes:
- Go to Insert > Shapes > Lines > select an arrow style.
- Click and drag to draw an arrow between two nodes.
- Adjust length and direction as needed.
Make sure the arrowheads point the direction of flow from one step to the next. Add curved connectors for a more organic look.
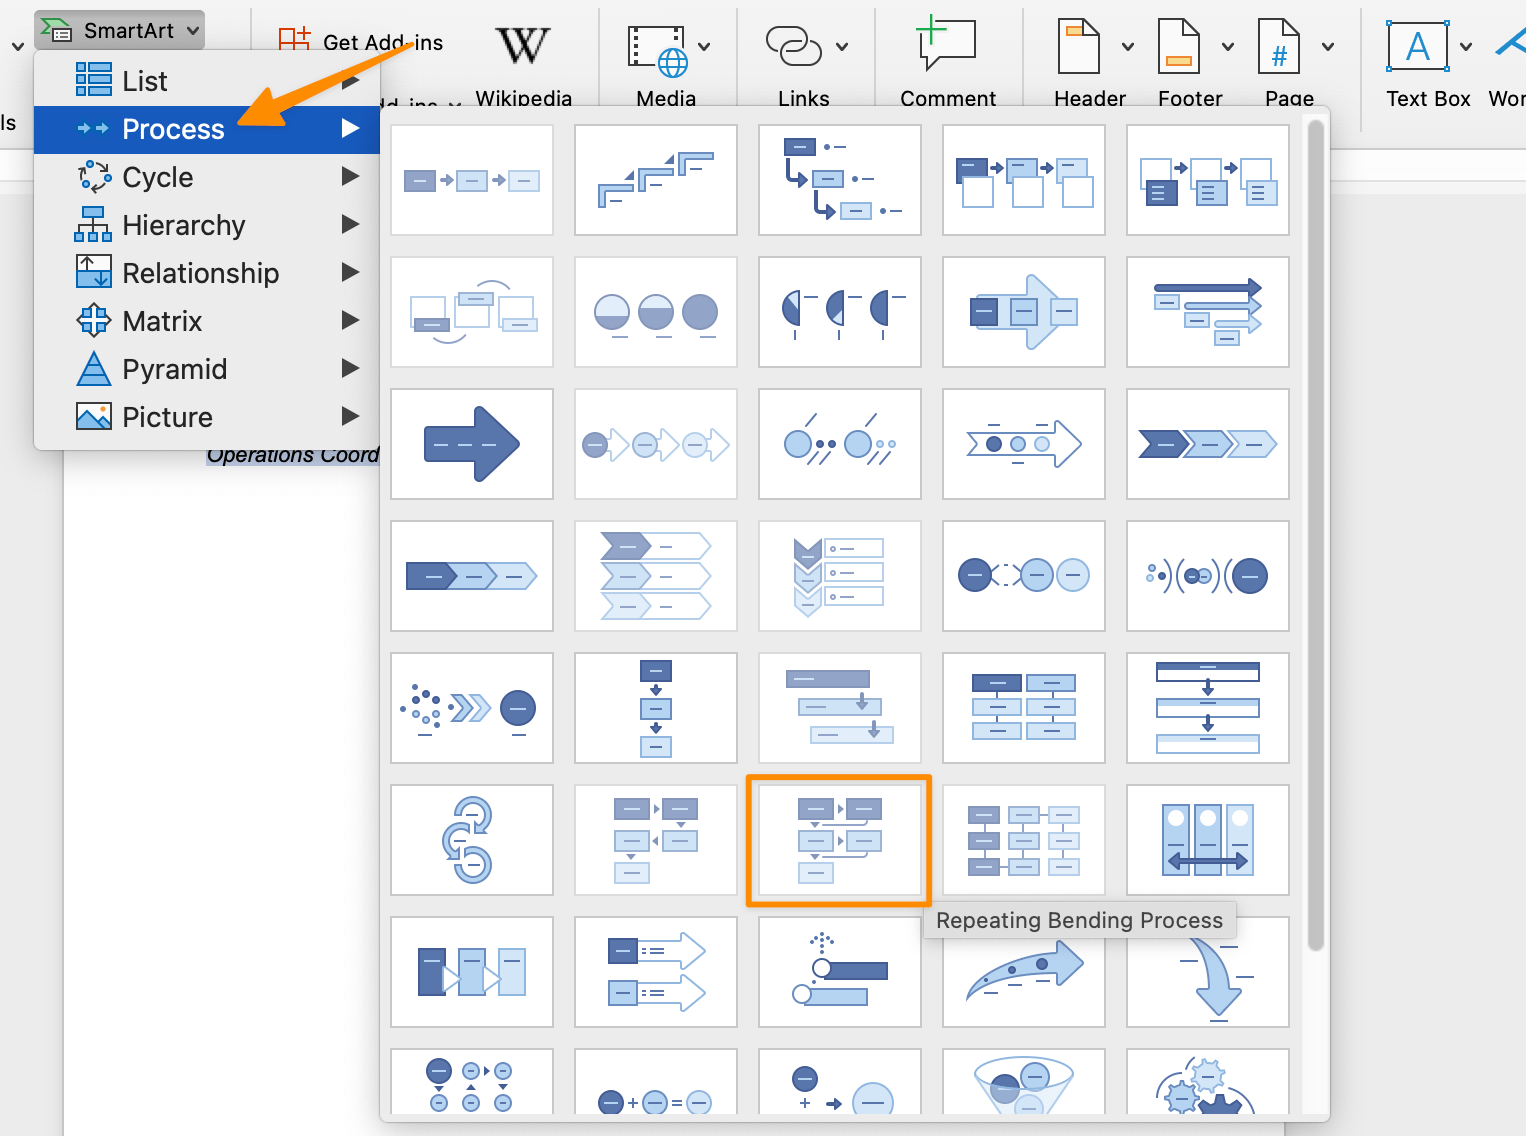
Step 5: Use SmartArt for Complex Flowcharts
For more complex flowcharts, use the SmartArt tool. Click the Insert tab, choose SmartArt, select “Process”:
- Add shapes – Click existing shapes to add new process steps, conditions etc.
- Connect – Hover over a shape and click the + sign to connect shapes.
- Arrange – Drag and drop shapes to reorder as needed.
SmartArt keeps everything aligned and connected automatically. You can still customize colors, text etc. Use it for advanced flowcharts.
Step 6: Finalize and Share Your Flowchart
When your flowchart is complete, finalize it:
- Add a title – Click above the flowchart and type a descriptive title.
- Print – Go to File > Print or save as PDF to print hardcopies.
- Share – Email the Word doc to colleagues or save as image to share online.
Now you have a professional-looking flowchart diagram created right in Word!
Tips for Structuring Flowcharts
When designing your flowchart, keep these tips in mind:
- Sequence top to bottom or left to right
- Put the beginning at the top/left
- Use arrows to indicate flow direction between steps
- Keep text short and concise within each shape
- Break processes into clear stages/columns
- Use callouts to highlight important info
- Minimize crossing lines if possible
Well-structured flowcharts are easy to follow at a glance. Organize the layout so it is logical and intuitive.
Common Flowchart Types
The basic flowchart structure can be adapted to any process or system. Some common types include:
- Business process – Models a business process from end to end.
- Workflow – Lays out consecutive tasks in a workflow.
- Organizational chart – Shows hierarchy and relationships in an organization.
- Decision flow – Displays conditional branches based on decisions.
- Dataflow – Maps how data moves through a system.
- IT architecture – Diagrams software systems and infrastructure.
Customize your flowcharts with specific shapes and layouts for the type of system or process you are documenting.
Simple Use Cases for Word Flowcharts
Flowcharts have a wide range of business and personal uses. Here are just a few ideas:
- Map out a new work process before implementation
- Document an existing process to train new hires
- Visualize a decision matrix for key business choices
- Break down a complicated research methodology
- Outline the workflow for an upcoming event/project
- Plan the overall structure of a long report/blog/essay
- Analyze causes and effects for problemsolving
Any complex process or system can benefit from visually mapping it as a flowchart. They help simplify and clarify relationships.
Advanced Features for Enhanced Flowcharts
Word provides additional features to create more detailed flowcharts:
- Hyperlink shapes – Link between pages or websites.
- Add comments – Annotate the flowchart with notes and callouts.
- Embed media – Insert photos, video or documents.
- Format painter – Quickly copy color schemes between shapes.
- Gridlines – View alignment lines while positioning shapes.
Take your Word flowcharts to the next level with these enhancements!
So next time you need to map out a process, workflow or structure, save yourself the hassle of complex flowchart software. Just open Word and start diagramming – it has all the tools you need to make professional flowcharts that clearly communicate relationships and sequence. Give it a try for your next process documentation project!
Adding a Decision Symbol and Other Shapes
By default, a SmartArt flowchart is very basic. You get a series of rectangular boxes or actions in a row. If you need to introduce different types of shapes to denote decisions, inputs, or some other common process steps, youll have to do a little more work.
Add the default rectangle shape and select it. From the right-click menu choose Change Shape or click the Format tab and select Change Shape to choose a new shape type like a diamond or parallelogram.
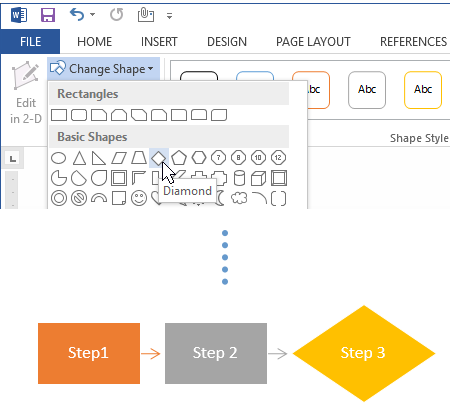
To a move a shape in your flowchart, grab its outline and move it to a new location. Notice that an arrow pointing to and from your shape will move with it.
Its fairly difficult to create a split path after a decision using this method.

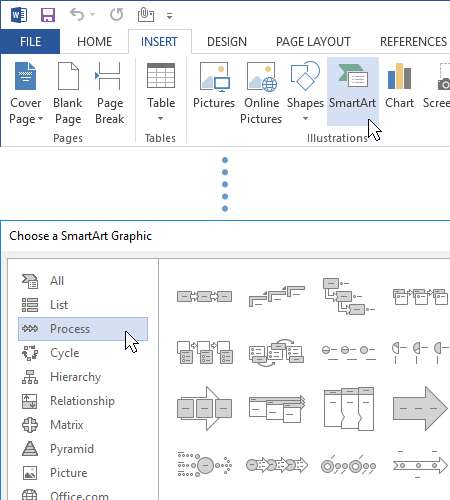
Add A Flowchart in Word using SmartArt
To make a flowchart in Word, start by selecting the Insert tab. Click SmartArt and choose “Process”. This will insert a basic three-step process into your document.
There are a few different styles to choose from. Pick one that best fits your presentation or reporting needs. You can always change your mind and change the style of your entire flowchart after the fact.
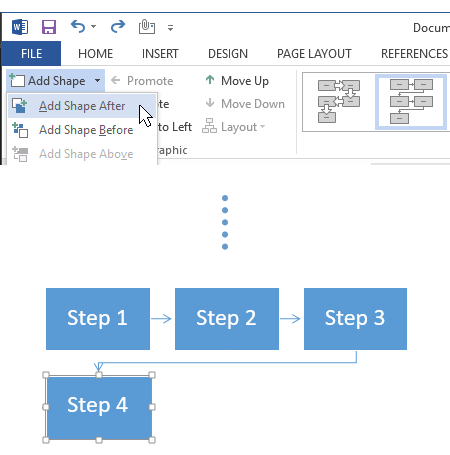
Add shapes by clicking the Add Shape button.
By default, Add Shape will just add a shape after the shape currently selected.
To add shapes in other directions, use the options in the drop down menu under Add Shape. You can add shapes, before, below, and above the currently selected shape.
How to Create Flowchart in Microsoft Word
How do I create a flowchart?
Start by navigating to the ‘Insert’ tab and selecting ‘Shapes’. Choose the right shape for each step in your flowchart. Label each process with the ‘Text Box’ feature. Connect shapes with ‘Lines’ or ‘Arrows’. Personalize these lines by changing their color, thickness, or style. Add colors and group similar steps together for a polished look.
How to create a flowchart in Office 365?
You can create your own flowchart by using different shapes and SmartArt. Here’s how to do it. When working with shapes in any Office application, it’s always useful to use gridlines to make sure everything is sized and placed correctly. To make the gridlines appears, head over to the “View” tab and tick the “Gridlines” checkbox.
How to format a flowchart in word?
Formatting a flowchart in Word should be the final stage after inserting, connecting, and labeling all the boxes. It is better to do it in bulk rather than putting the flourishes on individual boxes as you go along. So, select multiple shapes and format them together.
How do I create a flowchart using a drawing canvas?
Use the Drawing Canvas. Inserting any shape or “drawing” in a Word document automatically creates a drawing canvas. You will have to resize the canvas to frame your entire flowchart. Microsoft support says it is advantageous when using different shapes (as in a flowchart).
