If youre building a spreadsheet to share with others or simply one for your own tracking, using a checklist can make data entry a breeze in Microsoft Excel. Heres how to create a checklist in your spreadsheet and make it look like your own.
Why a checklist? You might use a checklist for tracking items to pack for a trip, products for your company, a holiday gift list, monthly bills, or keeping track of tasks. With a simple check box form control, you can create a checklist for anything you like in Excel.
Checklists are a great way to keep organized and track tasks, items, or steps in a process. With Microsoft Excel, you can easily create interactive checklists that allow you to check off completed items, see progress, and get automatic calculations.
In this comprehensive guide, I’ll walk you through how to make a checklist in Excel using checkboxes and some simple formulas. Follow these steps to build your own custom checklist that suits your needs.
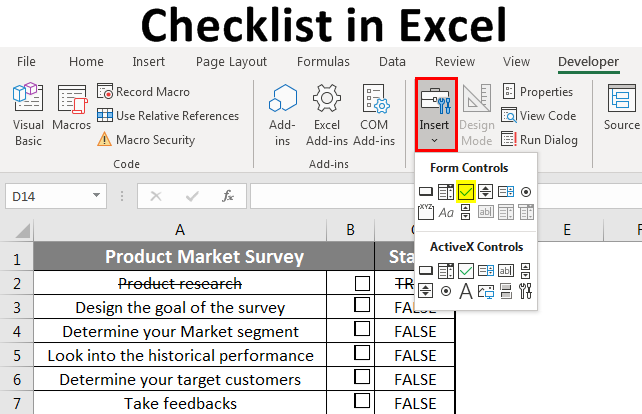
Access the Developer Tab
The first step is to make sure the Developer tab is enabled in Excel This tab contains the checkbox controls we need for our checklist
To add the Developer tab
- Click File > Options.
- Select Customize Ribbon on the left.
- Check the box next to Developer on the right under Main Tabs.
- Click OK.
The Developer tab will now be visible in the ribbon.
Set Up the List
Before adding checkboxes, start by creating your list of items or tasks. Enter these in a single column.
You can include additional columns for things like:
- Due dates
- Notes
- Priority levels
- Assignees
- Categories
Make your list as detailed as needed. The items will serve as the labels for each checkbox we add next.
Insert Check Boxes
With your list ready, it’s time to add checkboxes. Here’s how:
- Select the Developer tab.
- Click Insert > Check Box in the Controls group.
- The cursor will change to a crosshair symbol. Click and drag to draw the checkbox in the cell next to each list item.
- Right click each checkbox and choose Format Control.
- In the Control tab, link the checkbox to a cell. I recommend selecting an unused column for the linked cells to keep things tidy.
- Click OK.
Repeat these steps until you have a checkbox control next to each item. Now we’re ready to start using them!
Use Checkbox Values in Formulas
The key to an interactive checklist is linking the checkbox values to Excel formulas. Each box is linked to a cell that shows TRUE when checked and FALSE when unchecked.
You can base calculations and formatting off these values to track progress and priorities:
- Count or sum checked items
- Calculate percentage complete
- Apply conditional formatting
- Filter and sort based on status
- Show/hide other columns based on checkbox state
Here are a few examples of formulas to try:
Count checked items:
=COUNTIF(Range, TRUE)
Percentage complete:
=COUNTIF(Range, TRUE)/COUNTA(Range)
Apply formatting:
Use conditional formatting rules based on checkbox cells = TRUE
The possibilities are endless. Use the linked cells in any formulas needed for your specific checklist.
Add Visuals and Indicators
A few simple additions can make your checklist more visual and user-friendly:
- Progress bar based on percentage complete
- Color scale shading
- Icons to indicate priority or status
- Sparklines to view trends over time
- Charts or graphs for at-a-glance progress
Conditional formatting and shapes linked to cells are two easy ways to implement these.
Tips for Better Checklists
Follow these tips for creating functional, effective checklists in Excel:
- Link cells in a hidden column to avoid clutter
- Use Data Validation to limit entries to checked/unchecked
- Lock cells after formatting to prevent accidental changes
- Freeze panes so header row(s) remain visible when scrolling
- Sort items based on checkbox status
- Add drop-downs to category columns for consistency
- Use Print Titles to repeat headers on each printed page
- Include instructions or guidance in a header row
Example Checklist Templates
For a head start, you can download pre-made checklist templates for Excel. Some good uses are:
- To-do list
- Grocery list
- Packing list
- Project tasks
- Moving checklist
-College checklist - Wedding planning
- Home maintenance
- Inventory
The templates have checkboxes, conditional formatting, and example formulas built-in. Simply customize them for your specific needs.
Save as a Checklist Template
If you invest time building the perfect checklist, you may want to save it as a template to reuse. Here’s how:
- Finalize your checklist and delete any sample data.
- Click File > Save As.
- Change the file type to Excel Template (.xltx).
- Give it a name and save it.
To start new checklists using this template, open the .xltx file and save it with a new name.
Use Keyboard Shortcuts
Save time inserting and working with checkboxes using these handy keyboard shortcuts:
Ctrl + Shift + F3 – Open the Format Control dialog to manage cell links and properties.
Spacebar – Check/uncheck the selected box.
Tab/Shift+Tab – Move between checkboxes.
Alt + Down arrow – Open the checkbox drop-down menu.
In Excel, building a custom checklist is simple yet powerful. Follow the steps in this guide to create checklists for any purpose and make them as basic or advanced as needed.
The key is linking checkbox values to cells that feed your formulas. This allows for an interactive checklist with automatic calculations.
Use checklists in Excel to start tracking tasks, assignments, inventory, and any other lists in your work or personal life. The flexibility makes it easy to customize them for any situation.
So select that Developer tab, grab a checkbox, and start checking things off today!
Access the Developer Tab
Before you can use the check box form control in Microsoft Excel, you need to make sure that you have access to the Developer tab. If you dont see this tab at the top of Excel, it takes only a minute to add it.
Right-click anywhere on your Excel ribbon and select “Customize the Ribbon” from the drop-down list. Alternatively, you can click File > Options > Customize Ribbon from the menu.

On the right side of the window, under “Customize the Ribbon,” make sure “Main Tabs” is selected. Then in the list below it, check the box next to the “Developer” option.

Click “OK” and then close the Excel Options window.
Add Your List of Items in Excel
The best way to begin your checklist is to add the list items. Even though you can always add or remove items later, this gives you the start you need to add your checkboxes. And you can, of course, add any row or column headers that you need.

How To Create Checklist in Excel || Create an Interactive Checklist in Excel || Excel Tricks
FAQ
How to create a checkbox in Excel?
Is it better to create a checklist in Word or Excel?
How to insert a checkbox in Excel without a developer tab?
How to create a checklist in Excel?
To quickly get a selection of checklist templates for Excel, click File > New, type “checklist” in the search box, and press Enter. In fact, we have already done the major part of the job by adding check boxes and linking them to cells. Now, we will just write a few formulas to create a data summary for our Excel checklist.
How do I add a checkbox to an Excel checklist?
Adding checkboxes to your Excel checklist will make it easier to keep track of completed tasks. To add a checkbox, go to the “Developer” tab in Excel, click “Insert,” and then click the checkbox icon. Then, click and drag to draw a checkbox next to each item on your checklist.
How do I format a checklist in Excel?
You can format the checkboxes to match the rest of your checklist by right-clicking on them and selecting “Format Control.” Excel makes it easy to sort and filter your checklist based on different criteria. To do this, highlight the cells that contain your checklist items and click “Sort & Filter” in the “Home” tab.
How do I create a checklist / to-do list in Excel?
If you are creating an Excel checklist or to-do list, the first step is to make a list of tasks or other items for which the check boxes will be inserted. For this example, I’ve created the following Party Planning Checklist: 3. Add a check box
