If you’re doing statistical analysis, you may want to create a standard box plot to show distribution of a set of data. In a box plot, numerical data is divided into quartiles, and a box is drawn between the first and third quartiles, with an additional line drawn along the second quartile to mark the median. In some box plots, the minimums and maximums outside the first and third quartiles are depicted with lines, which are often called whiskers.
While Excel 2013 doesnt have a chart template for box plot, you can create box plots by doing the following steps:
In our example, the source data set contains three columns. Each column has 30 entries from the following ranges:
As a data analyst, I often need to visualize distributions of data sets. One of my favorite types of charts for this is the box plot (also known as a box and whisker chart). Box plots are great for seeing the shape of data distributions, spotting outliers, and comparing distributions between multiple data sets.
In this comprehensive guide, I’ll explain everything you need to know to make professional-quality box plots in Excel. I’ll cover:
- What box plots are and when to use them
- How to interpret the elements of a box plot
- Step-by-step instructions for making box plots in newer and older versions of Excel
- Tips for customizing the look of your box plots
- Limitations to be aware of
Let’s get started!
What Are Box Plots and When Should You Use Them?
A box plot divides a numerical data set into quartiles to visualize its distribution It shows the minimum, first quartile, median, third quartile, and maximum values Here’s an example
The key elements of a box plot are:
- Minimum – The smallest number in the data set, marked by the end of the lower whisker.
- First Quartile – The point below which 25% of the data lies, marked by the bottom of the box.
- Median – The middle number separating the higher half and lower half of the data, marked by the line in the box.
- Third Quartile – The point below which 75% of the data lies, marked by the top of the box.
- Maximum – The largest number in the data set, marked by the end of the upper whisker.
The box plot is great for visualizing distributions for 1 or more data sets. The width of the box shows the spread of the middle 50% of data. The whiskers show the spread of the upper and lower 25%. Any outliers are plotted as individual points.
I find box plots most useful for:
- Seeing the shape of data distributions (symmetrical, skewed, etc.)
- Identifying outliers in data sets
- Comparing distributions of multiple data sets
- Displaying a large number of data points concisely
In short, if I need to quickly visualize and compare distributions, box plots are my go-to chart type.
How to Interpret the Key Elements of a Box Plot
Before learning how to make box plots in Excel, it’s important to understand how to read them. Let’s walk through an example:

This box plot shows the distribution of employee salaries at a company. Here’s how to interpret the key elements:
- The upper whisker ends at $40,000, so this is the maximum salary.
- The upper edge of the box is at $30,000, so 75% of salaries are below this (the third quartile).
- The median line is around $20,000, so half of employees earn less than this and half earn more.
- The lower edge of the box is at $10,000, so 25% of salaries are below this (the first quartile).
- The lower whisker ends at $5,000, so this is the minimum salary.
- The spread of the middle 50% of data (between first and third quartiles) is 30,000 – 10,000 = $20,000.
- The upper whisker is longer than the lower whisker, indicating the distribution is right-skewed.
- There are no outliers plotted.
This example illustrates how the 5 elements of a box plot provide a concise summary of the distribution, center, spread, and shape of data.
Now let’s move on to actually creating box plots in Excel!
Step-by-Step Instructions for Making Box Plots in Excel
The process for making a box plot in Excel depends on which version you’re using. Newer versions have a built-in box plot chart type, while older versions require you to create a stacked column chart and convert it to a box plot.
Making Box Plots in Newer Versions of Excel (2016+)
In Excel 2016 and later, there is a built-in chart type to create box plots. Here are the steps:
-
Enter your data in a single column.
-
Select the data.
-
Go to Insert > Statistical Charts and select the Box & Whisker chart type.
-
The box plot will be created automatically from your data!
For example, here’s a box plot created for some sample data:
That’s really all there is to it! The main limitation is you can only create a box plot for a single data set at a time. But it’s super quick and easy.
Next let’s look at how to make box plots in older Excel versions.
Making Box Plots in Older Versions of Excel (2013 and Earlier)
In Excel 2013 and earlier, there is no built-in box plot chart type. But you can create one by building a stacked column chart and converting it to a box plot format. Here are the steps:
-
Calculate the min, max, median, and quartiles from your data set using Excel formulas like
=MIN(),=MAX(),=MEDIAN(), and=QUARTILE(). -
Calculate the differences between the min, quartiles, and max.
-
Create a stacked column chart using the difference values.
-
Convert the stacked columns into a box plot by: – Removing the bottom segment – Making the top and bottom segments into whiskers – Coloring the box area
For example, here is a stacked column chart being converted to a box plot:

This process takes more work but allows you to create multiple box plots for comparison.
Customizing and Formatting Your Box Plots
Once you’ve created a basic box plot in Excel, you can customize its appearance:
- Add data labels to show the values for the median, quartiles, and min/max.
- Change fill color to make the boxes stand out.
- Add a legend to distinguish multiple box plots.
- Rotate text labels on the vertical axis for readability.
Applying these formatting techniques results in polished, professional-looking box plots like this:

Take the time to format your box plots – it’s worth the effort!
Limitations to Keep in Mind
While box plots are a useful statistical tool, there are a few limitations to be aware of:
- They can hide multimodal or other non-standard distribution shapes.
- They aren’t as intuitive to interpret as histograms or density curves.
- In Excel, you can only create a single box plot at a time in newer versions.
- Creating multiple box plots for comparison in older Excel requires many steps.
However, used with caution, box plots remain one of the most effective ways to visualize data distributions. And as you can see, creating them in Excel is straight-forward once you know the steps!

Step 2: Calculate quartile differences
Next, calculate the differences between each phase. In effect, you have to calculate the differentials between the following:
- First quartile and minimum value
- Median and first quartile
- Third quartile and median
- Maximum value and third quartile
- To begin, create a third table, and copy the minimum values from the last table there directly.
- Calculate the quartile differences with the Excel subtraction formula (cell1 – cell2), and populate the third table with the differentials.
For the example data set, the third table looks like the following:
Step 1: Calculate the quartile values
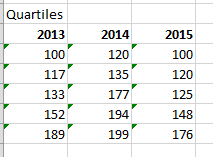
First you need to calculate the minimum, maximum and median values, as well as the first and third quartiles, from the data set.
- To do this, create a second table, and populate it with the following formulas:
Value Formula Minimum value MIN(cell range) First quartile QUARTILE.INC(cell range, 1) Median value QUARTILE.INC(cell range, 2) Third quartile QUARTILE.INC(cell range, 3) Maximum value MAX(cell range) - As a result, you should get a table containing the correct values. The following quartiles are calculated from the example data set:
How To Make a Box Plot in Excel 2022 | Windows and Mac
FAQ
How to construct a box plot?
How do I make a simple plot in Excel?
How do I create a box plot in Excel 2013?
While Excel 2013 doesn’t have a chart template for box plot, you can create box plots by doing the following steps: Calculate quartile values from the source data set. Calculate quartile differences. Create a stacked column chart type from the quartile ranges. Convert the stacked column chart to the box plot style.
How to create a vertical box plot in Excel?
We can also create a Vertical Box Plot in Excel as follows, select the “ Insert” tab > go to the “ Charts ” group > click on the “ Insert Statistic Chart ” drop-down > select the “ Box and Whisker” option. In the Box Plot in Excel, we see stacked boxes, each indicating a quartile. And the lines drawn at the end of the box look like whiskers.
How do I create a box and whisker plot in Excel?
Make sure your data is organized in columns or rows, with a clear heading for each. To insert a box and whisker plot in Excel, click on the Insert tab, and then click on Box and Whisker under the Statistical Charts section. Select the chart style you prefer from the dropdown menu. Next, you’ll need to select your data range.
How do I create a box plot chart?
Note: To see the video transcript, go to the Box Plot Chart Video page. To create your own box plot chart, the first step is to set up your data. In the screen shot below: The next step is to enter the formulas that will be used in the chart. Simple formulas calculate the minimum value, first Quartile, Median, 3rd Quartile, and the Maximum value.
