While this makes it convenient to create formulas in Excel, it comes with a few disadvantages as well.
You are going through a worksheet full of formulas, and you accidentally hit the delete key, or backspace key, or some other number/alphabet key.
Now you’ll be lucky if you’re able to spot the error and correct it. But if you are not, it may lead to some erroneous results.
And let me tell you this, errors in Excel have cost millions to companies (read this or this).
The chances of such errors increase multifold when you share a file with colleagues or managers or clients.
One of the ways to prevent this from happening is to lock the worksheet and all the cells. However, doing this would prevent the user from making any changes to the worksheet. For example, if you’re sending a workbook to your manager for review, you may want to allow him to add his comments or change some cells.
A better workaround to this is to lock only those cells that have formulas in it.
Formulas are the heart and soul of Excel. With formulas you can create powerful spreadsheet models to analyze data make calculations and draw insights.
But here is the problem with Excel formulas – they are super easy to break accidentally!
All it takes is a stray key press or a slip of hand and the formulas could get messed up leading to erroneous results
In this tutorial, I will cover all you need to know about locking formulas in Excel. You will learn:
- Why you should lock formulas in Excel
- How to lock cells with formulas
- How to lock all formulas on a worksheet
- How to hide formulas so they don’t show in formula bar
- How to lock formulas but allow editing inputs
- How to unlock and modify locked formulas
So let’s get started!
Why Lock Formulas in Excel
Here are some common scenarios where you may end up breaking formulas accidentally in Excel:
-
Typing over formulas: It’s easy to mistakenly type over a formula cell and convert it into a hard-coded value.
-
Deleting formulas: You could end up deleting formulas entirely while working on neighboring cells and columns. This is quite common.
-
Overwriting references: Formula references could get messed up when inserting/deleting rows and columns.
-
Sorting/Filtering: Sorting or filtering data can shuffle cell references leading to broken formulas.
All these accidental changes can lead to erroneous results and incorrect analysis.
The risks are even higher when multiple people are working on an Excel workbook.
To avoid these errors, the best practice is to lock the formula cells after entering these formulas.
A locked cell can not be modified and this prevents people from accidentally destroying your formulas.
In the next section, I will show you how to lock cells with formulas in Excel.
How to Lock Cells with Formulas in Excel
When protecting cells in Excel, you must remember this:
- By default, all cells are locked.
- To lock a cell, it should be both protected and locked.
- Locking does not restrict access to a cell. You need to protect the worksheet after locking cells.
Here are the steps to lock cells with formulas in Excel:
Step 1: Select all the cells in the worksheet (Ctrl + A)
Step 2: Right click and select Format Cells.
Step 3: In the Format Cells dialog box, go to the Protection tab and uncheck the Locked option.
Step 4: Click OK. This will unlock all the cells in the worksheet.
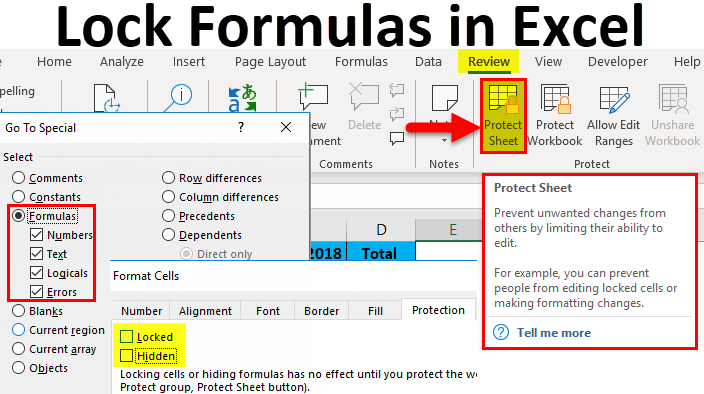
Step 5: Now select all the cells that have formulas in it. To do this, Go To Special (Ctrl + G) and select Formulas option.
Step 6: With the formula cells selected, right click and select Format Cells. In the Protection tab, check the Locked option.
Step 7: Click OK. This will lock all the formula cells.
Step 8: Go to Review tab and click on Protect Sheet. In the Protect Sheet dialog box, check the option ‘Protect worksheet and contents of locked cells’.
Step 9: Click OK.
This will lock all the formula cells and prevent accidental modifications.
Now if you try to edit a locked cell, Excel will show an alert that the cell is locked and read-only.
In case you want to modify a locked cell, you will have to unprotect the sheet first.
How to Lock All Formulas on the Worksheet
The steps covered above lock the formula cells one worksheet at a time.
If you have multiple worksheets in an Excel workbook, you will have to repeat the steps for each worksheet.
Instead of doing this manually, you can use a VBA macro code to lock formulas on all worksheets in one go.
Here is the VBA code that will lock formulas on all worksheets at one go:
Sub LockAllFormulas() Dim ws As Worksheet 'Loop through all worksheets For Each ws In Worksheets 'Unlock all cells ws.Unprotect ws.Cells.Locked = False 'Lock formula cells ws.Cells.SpecialCells(xlCellTypeFormulas).Locked = True 'Protect Sheet ws.Protect DrawingObjects:=False, Contents:=True _ , Scenarios:=False, AllowFormattingCells:=True Next ws End SubTo use this macro, follow these steps:
- Press Alt + F11 to open the Visual Basic Editor.
- Go to Insert > Module and paste the above code.
- Run the macro using F5 or the play button.
This will instantly lock all formula cells on all the worksheets in the workbook.
Hide Formulas so they Don’t Appear in Formula Bar
When you select a locked cell, the formula appears in the formula bar.
While this is not an issue mostly, you may want to hide formulas in some cases (such as sending the file to clients/third-parties).
Here are the steps to hide formulas in locked cells:
- Select only the formula cells (using Go to Special > Formulas)
- Press Ctrl + 1 to open the Format Cells dialog box.
- In the Protection tab, check the Hidden option.
- Click OK.
This will hide the formulas when a user selects the locked cells.
Allow Editing Inputs but Lock Formulas
In some cases, you may want to allow inputs to be edited but lock the formulas.
For example, consider the below expense report template:
![Allow Editing Inputs but Lock Formulas][]
Here you would want the users to be able to edit the amounts, but the formulas that calculate totals should remain locked.
To do this, follow these steps:
- Select the entire sheet and unlock all cells
- Select only the cells that have formulas and lock these cells
- While protecting the sheet, check the option – Allow all users of this worksheet to: Edit objects
Now when you protect the sheet, inputs would remain editable but formulas would be locked.
How to Unlock and Modify Locked Formulas
In case you need to modify a locked formula cell, you will have to unprotect the worksheet first.
Here are the steps to unlock and modify formulas:
- Go to Review tab and click Unprotect Sheet.
- If prompted, enter the password you had set while protecting the sheet.
- Once the sheet is unprotected, you can select any locked cell and edit it.
- After making the changes, remember to protect the sheet again.
Pro Tip: Apart from locking cells, you can also protect your workbook structure and windows in Excel. Here is a detailed tutorial on how to protect Excel workbook.
Best Practices for Locking Formulas in Excel
Here are some best practices you should follow when locking formulas in Excel:
- Beselective when locking cells and don’t go overboard. Lock only critical cells/columns.
- Make sure you convey it properly when sharing locked workbooks with others.
- Use worksheet and workbook protection features prudently.
- Keep your passwords safe. Don’t share protected Excel files with passwords.
- Unprotect before sorting or inserting/deleting rows/columns as it may break formulas.
- Use macros to automate locking on multiple sheets.
Additional Things You Can Do with Locked Cells
While the main purpose of locking cells is to prevent accidental modifications, there are a couple of additional things you can do:
- Add comments: Comments can still be added in locked cells to leave feedback.
- Format locked cells: Cells formatting such as fonts, colors can still be changed in locked cells. You can prevent this by disabling format cells option while protecting the sheet.
Locking cells that contain formulas is a great way to avoid erroneous results and unintended changes in Excel.
By following the tutorials covered in this guide, you would be able to efficiently lock formulas across worksheets and workbooks.
Here is a quick summary of what we learned:
- Locking prevents accidental modifications to formulas.
- Lock and protect cells with formulas to avoid errors.
- Unlock all cells before locking formula cells.
- Use Go To Special to select formula cells.
- Hide formulas in locked cells when sharing workbook.
- Allow inputs to be editable but lock only formulas.
- Add VBA code to lock cells on multiple sheets.
If you want additional information and examples, below are some good tutorials on locking cells and formulas in Excel:
Step 3: Lock the Cells with Formulas
Now that we have selected the cells with formulas, we need to go back and lock these cells (enable the lock property that we disabled in step 1).
Once we do this, protecting the worksheet would lock these cells that have formulas, but not the other cells.
Here are the steps to Lock Cells with Formulas:
- With the cells with formulas selected, press Control + 1 (hold the Control key and then press 1).
- In the format cells dialog box, select the Protection tab.

- Check the ‘Locked’ option.

- Click ok.
Step 2: Select All the Cells that Have Formulas
Now that all the cells have been unlocked, we need to make sure that the cells that have formulas are locked.
To do this, we need to first select all the cells with formulas.
Here are the steps to select all the cells that have formulas:
- Select all the cells in the worksheet (use Control + A).
- Go to Home and within the Editing group, click on Find & Select.

- From the drop-down, select Go to Special.

- In the Go To Special dialog box, select Formulas.
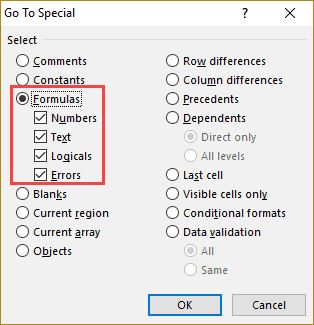
- Click OK.
This would select all the cells that have formulas in it.
How To Lock And Protect Formulas In Excel
How do I lock a cell in Excel?
Lock the selected cells. Use the Protect Sheet command to protect the locked cells. These steps will allow your users to view and edit all the cells except those with formulas. When you create a new sheet the default is that all cells are locked when you apply any protection options to the sheet.
What happens if you lock a formula in Excel?
When you lock formulas in Excel, the user can’t make any changes to the cells with formulas. However, if that cell is selected, the formula in the cell would be visible in the formula bar. While this isn’t an issue in most cases, but if you don’t want the formula to be visible, you need to hide it.
How to unlock formulas in Excel?
Select all the cells in the worksheet (use the keyboard shortcut Control + A). Use the keyboard shortcut Control + 1 (hold the Control key and then press 1). This will open the format cells dialog box. Uncheck the ‘Locked’ option. Click ok. Now that all the cells have been unlocked, we need to make sure that the cells that have formulas are locked.
How to unlock a cell in Excel?
Use the keyboard shortcut Control + 1 (hold the Control key and then press 1). This will open the format cells dialog box. Uncheck the ‘Locked’ option. Click ok. Now that all the cells have been unlocked, we need to make sure that the cells that have formulas are locked. To do this, we need to first select all the cells with formulas.
