Importing data from a text file into Excel is a common task many of us have to do regularly Whether you need to pull in data from another system, workspace with data from Python or R, or simply organize information from a text file, importing that data into Excel makes it easier to work with.
In this comprehensive guide, I’ll explain the most common ways to import text file data into Excel using the tools built into the software. I’ll also provide tips on refreshing imported data and troubleshooting any issues you may run into. By the end, you’ll have a clear understanding of the different methods so you can choose the right approach for your specific needs.
Why Import a Text File into Excel?
There are a few key reasons you may need to bring data from a text file into Excel:
-
Consolidate data sources: You may have data living in disparate text files that you want to bring together into one Excel workbook for easier analysis.
-
Interact with other software Pulling text file data into Excel allows you to access the information from statistical software like R or Python in a user-friendly spreadsheet
-
Organize unstructured data: Text files containing things like log data or output from other systems is often unorganized. Importing into Excel lets you structure the data.
-
Leverage Excel features: Once the data is in Excel, you can use all of its powerful data analysis tools, formulas, pivot tables, charts, etc.
Overview of Text File Import Methods
There are a few different ways to import a text file into Excel, depending on your specific needs:
- Open the text file directly in Excel
- Use the Get & Transform Data tool to import text
- Copy and paste from the text file
- Link the file to Excel as an external data source
Below, I’ll walk through each of these methods in detail, including step-by-step instructions and examples.
Method 1: Open the Text File Directly in Excel
The most straightforward way to import a text file is to simply open it directly in Excel. When you open a text file in Excel, the Text Import Wizard launches to help you ensure the data comes in properly.
Follow these steps:
- Open a new Excel workbook.
- Go to the File menu and select Open.
- Browse to the text file you want to import and select it.
- Choose to open the file as Text format.
- Walk through the Text Import Wizard to ensure the data imports properly:
- Choose Delimited or Fixed Width layout for the data.
- Select the delimiter that separates the data columns. Comma is common for CSV files.
- Format the data columns if Excel doesn’t automatically pick the right format.
- Choose where to place the imported data.
- Finish importing the text file.
The text file will open in a new Excel workbook, with each data column separated into its own column.
The benefit of this method is it gives you full control through the Text Import Wizard to validate the data imports correctly. The downside is that it won’t update automatically if the source text file changes.
Method 2: Import Text File Data with Get & Transform
The Get & Transform Data tool in Excel provides another straightforward way to import text file data. Get & Transform launces the Power Query editor, which lets you import the text file, shape the data as needed, and load it directly into your workbook.
Here are the steps to use Get & Transform to import a text file:
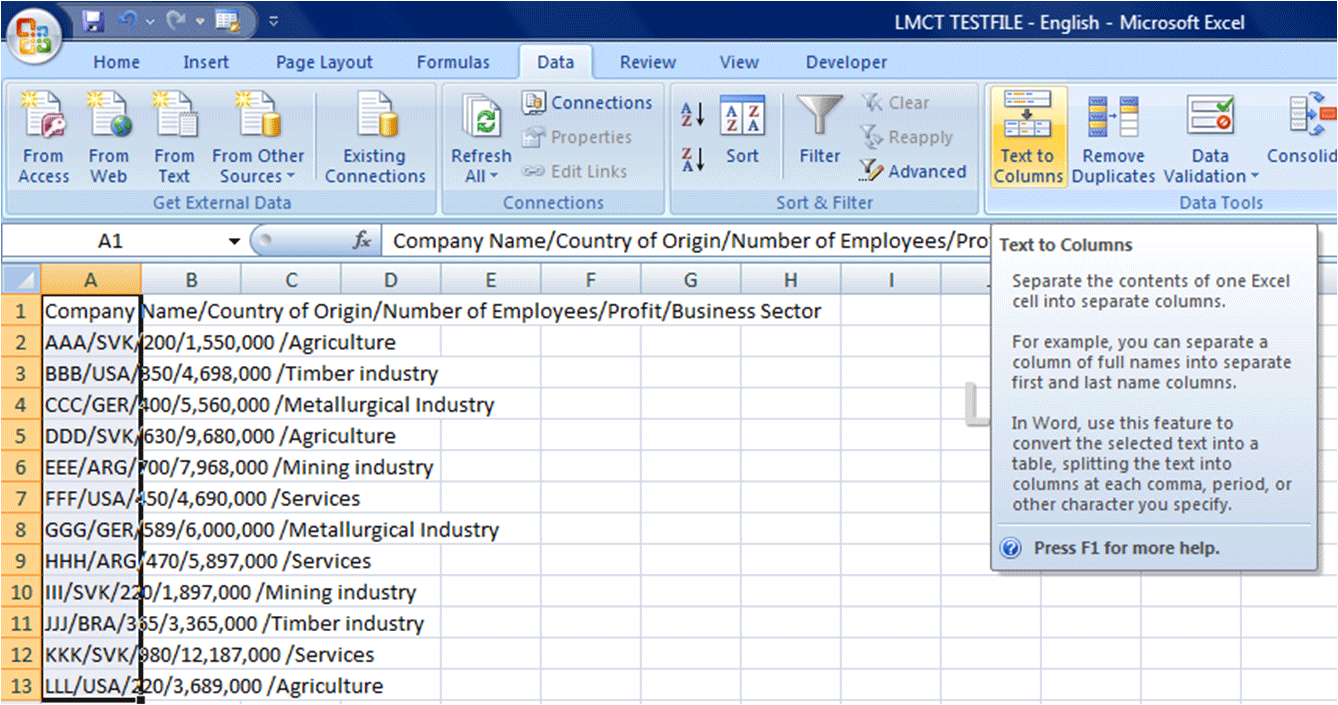
- In the Excel workbook where you want the data, go to the Data tab.
- Select Get Data > From Text/CSV.
- Browse to and select the text file to import.
- In the preview window, you can transform the data if needed.
- Choose to Load the data into your workbook, selecting a new sheet or existing sheet.
- The text file data will now be imported into the selected location.
The main advantages of using Get & Transform are that you can preview and transform the data before loading, and you can refresh the query to pull in updated data easily. Just right click on the loaded data and choose Refresh.
Method 3: Copy and Paste Text File Data
For quick, one-time text file imports, copying and pasting the data may be the easiest approach. Here’s how to do it:
- Open both the text file and the Excel workbook where you want to import the data.
- Select and copy all of the data from the text file.
- Click on the worksheet cell where you want the top-left corner of the data to land.
- Paste the copied text file data into the worksheet.
This lets you quickly grab data from a text file and drop it into Excel. But the limitation is that there is no connection back to the original text file.
Method 4: Link the Text File into Excel
Linking a text file into Excel creates a connection that imports the data and lets you refresh it whenever the source file changes. Here are the steps:
- In the Excel workbook, go to the Data tab and select Get Data > From File > From Text.
- Browse to and select the text file you want to link to.
- In the Navigator window, select the worksheet where you want the data to go.
- Choose to Load the text file as a link, rather than directly importing the data.
- The text file data will now be linked. You can refresh it by right clicking and choosing Refresh.
This gives you an ongoing connection to that text file. The limitation is that any changes in the source text file structure may break the link connection.
Refreshing Imported Text File Data
For the methods that support it, refreshing imported text file data allows you to pull in any updates made to the original text file.
-
For text files opened directly in Excel, you’ll need to re-import the updated file.
-
For Get & Transform queries and linked text files, right click on the imported data and choose Refresh.
-
Copied and pasted data can’t be refreshed. You’ll need to copy and paste again to update.
Setting up refresh on a schedule or enabling it for workbook open/close lets you automate the refresh process.
Troubleshooting Import Issues
There are a few common issues that can come up when importing text file data into Excel:
-
Data comes through in one column instead of multiple – the delimiter may be incorrect
-
Formatting like leading zeros is lost – the column format needs to be changed to text
-
Date formats aren’t correct – default format may need to be changed
-
Errors on refresh – structure of text file may have changed
-
Blank rows/columns – check for inconsistent delimiters in text file
Luckily, the Text Import Wizard in the open file method and Power Query editor in Get & Transform give you the tools to diagnose and fix many of these issues. Proactively checking column data types and formats can also avoid import problems.
Putting It All Together
Importing a text file into Excel is quick and easy using the built in tools like the Text Import Wizard or Get & Transform.
For one-time imports, opening or copying data from the text file works well. For recurring imports, Get & Transform or linking the file provides ways to refresh the data.
Following the methods outlined here will help you reliably bring text file data into Excel, regardless of the format or structure. Taking the time to understand the options will let you choose the optimal approach based on your specific needs.
With clean and consistent text file data imported into Excel, you can take full advantage of all of its powerful analysis and reporting capabilities. The flexibility Excel provides enables you to work with data from nearly any source.
So next time you need to pull information into Excel from a text document, CSV, log file, or other text-based format, leverage one of these proven techniques. They’ll have you up and running with structured text file data in Excel in no time. The productive analysis can then begin!
Step 2 of 3 (Fixed width data)
Data preview Set field widths in this section. Click the preview window to set a column break, which is represented by a vertical line. Double-click a column break to remove it, or drag a column break to move it.
Step 3 of 3
Click the Advanced button to do one or more of the following:
- Specify the type of decimal and thousands separators that are used in the text file. When the data is imported into Excel, the separators will match those that are specified for your location in Regional and Language Options or Regional Settings (Windows Control Panel).
- Specify that one or more numeric values may contain a trailing minus sign.
Column data format Click the data format of the column that is selected in the Data preview section. If you do not want to import the selected column, click Do not import column (skip).
After you select a data format option for the selected column, the column heading under Data preview displays the format. If you select Date, select a date format in the Date box.
Choose the data format that closely matches the preview data so that Excel can convert the imported data correctly. For example:
- To convert a column of all currency number characters to the Excel Currency format, select General.
- To convert a column of all number characters to the Excel Text format, select Text.
- To convert a column of all date characters, each date in the order of year, month, and day, to the Excel Date format, select Date, and then select the date type of YMD in the Date box.
Excel will import the column as General if the conversion could yield unintended results. For example:
- If the column contains a mix of formats, such as alphabetical and numeric characters, Excel converts the column to General.
- If, in a column of dates, each date is in the order of year, month, and date, and you select Date along with a date type of MDY, Excel converts the column to General format. A column that contains date characters must closely match an Excel built-in date or custom date formats.
If Excel does not convert a column to the format that you want, you can convert the data after you import it.
When you have selected the options you want, click Finish to open the Import Data dialog and choose where to place your data.
Set these options to control how the data import process runs, including what data connection properties to use and what file and range to populate with the imported data.
- The options under Select how you want to view this data in your workbook are only available if you have a Data Model prepared and select the option to add this import to that model (see the third item in this list).
- Specify a target workbook:
- If you choose Existing Worksheet, click a cell in the sheet to place the first cell of imported data, or click and drag to select a range.
- Choose New Worksheet to import into a new worksheet (starting at cell A1)
- If you have a Data Model in place, click Add this data to the Data Model to include this import in the model. For more information, see Create a Data Model in Excel. Note that selecting this option unlocks the options under Select how you want to view this data in your workbook.
- Click Properties to set any External Data Range properties you want. For more information, see Manage external data ranges and their properties.
- Click OK when youre ready to finish importing your data.
Notes: The Text Import Wizard is a legacy feature, which may need to be enabled. If you havent already done so, then:
- Click File > Options > Data.
- Under Show legacy data import wizards, select From Text (Legacy).
Once enabled, go to the Data tab > Get & Transform Data > Get Data > Legacy Wizards > From Text (Legacy). Then, in the Import Text File dialog box, double-click the text file that you want to import, and the Text Import Wizard will open.
How to Import a Text file into Excel – Office 365
What is the best way to import a text file into Excel?
Here’s how to import a text file into Excel by connecting to it: Select the cell where you’d like the data to appear. Navigate to the “Data” tab. Under “Get External Data” click on the “From Text” button. Excel opens the Import Data dialogue box. Find the text file you plan to import and click the “Import” button.
What is the best way to convert text files to Excel?
The best way to convert a Text File into an Excel spreadsheet or file is to open the Text File directly from the Excel File. Let’s go through the process below. Then select the option Open from the green bar. Select Browse. You will see the Open window appear. Select the Text File from its location and click on Open in the Open
How do you select a text file to import into Excel using VBA?
To import text files into Excel, we need to open and write VBA code in the visual basic editor. Follow the steps to open the visual basic editor and write some code there. Go to the Developer tab from the Excel Ribbon. Click the Visual Basic option. Now put your code inside the visual code editor and press F5 to run it.
Can you delimit text in Excel?
To export data from Excel to a text file, use the Save As command and change the file type from the drop-down menu. Delimited text files (.txt), in which the TAB character (ASCII character code 009) typically separates each field of text.
