Grouping objects, slides, and other elements in PowerPoint can be an incredibly useful skill for creating sleek, organized presentations. With PowerPoint’s grouping functionality, you can combine multiple objects so they move and reformat together as one unit, categorize slides into sections for better organization and printing, and more
In this comprehensive guide, I’ll explain all the ins and outs of grouping in PowerPoint so you can take your presentations to the next level.
What is Grouping in PowerPoint?
Grouping allows you to combine multiple objects like shapes pictures, icons and more into one single object. When objects are grouped together, they act as one unit – so if you move the group, all the grouped objects move together.
This makes grouping handy for quickly rearranging complex layouts without having to move each object individually. It also lets you apply formatting like shape styles, shape effects, and animations to the group as a whole.
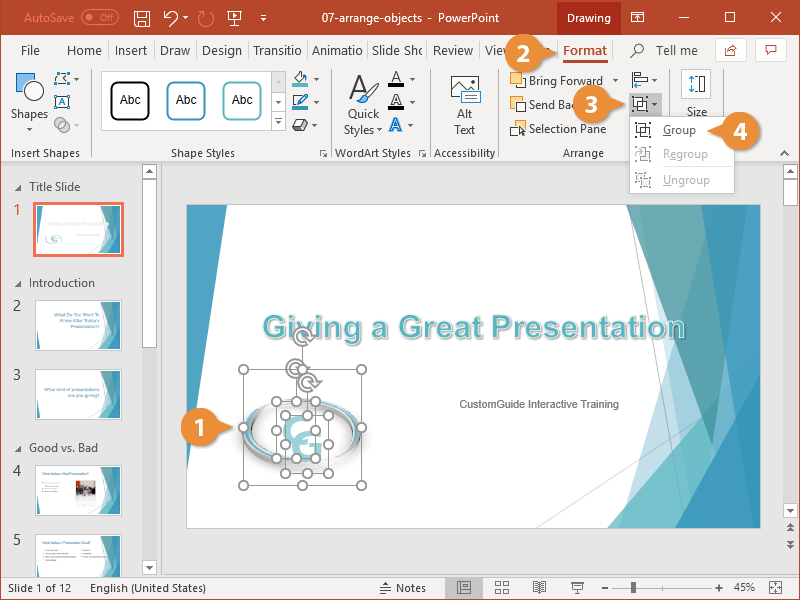
To group objects in PowerPoint
- Hold down CTRL and click each object you want to group.
- Right click and select “Group” from the menu.
- Or use the keyboard shortcut CTRL+G.
Once objects are grouped, a single bounding box will appear around them indicating they’re now one object.
Ungrouping Objects in PowerPoint
Ungrouping reverses the grouping process – it separates a grouped object back into individual pieces. This lets you work with each object independently again.
To ungroup:
- Right click the grouped object and choose “Ungroup”
- Use the keyboard shortcut CTRL+SHIFT+G
You may need to ungroup multiple times to get an object fully broken down into individual pieces.
What Can Be Grouped in PowerPoint?
Nearly every object in PowerPoint can be grouped, including:
- Shapes
- Pictures
- Clip art
- WordArt
- Charts
- Graphic elements (must first convert to a shape)
- Other groups of objects
However, there are some exceptions:
- Tables cannot be grouped at all. You’ll need to convert a table to shapes first using Paste Special to group it.
- SmartArt graphics and charts also can’t be directly grouped. Convert to shapes first.
- Content placeholders, like title slides and footer elements, are not groupable.
Advanced Grouping Techniques
With some clever tricks, you can take grouping beyond just combining objects. Here are some more advanced uses:
Rename Groups
In the Selection Pane (Ctrl+F10 to open), you can double click a group’s default name to rename it something more descriptive. This makes complex slides with lots of groups easier to work with.
Regroup Objects
If you ungroup an object then want to re-form the group, regrouping is faster than re-selecting every object. Just select one former member of the group, right click, and “Regroup”.
Ungroup Complex Objects
You can ungroup more than just groups – tables, charts, SmartArt, and vector graphics can be broken down into individual objects by ungrouping. This lets you customize them further.
Invert Layouts
Grouping and rotating objects in the right order lets you quickly mirror or invert layouts. Group objects, rotate the group, ungroup, then rotate individuals as needed.
Organizing Slides into Sections
In addition to grouping objects, you can also group slides together into sections. This is great for organizing and printing parts of a large presentation.
To make sections:
- Right click a slide and select “Add Section”
- Rename sections to something descriptive
- Collapse sections to only show their names
Sections can be reordered, and you can print individual sections by selecting them in the print window.
When to Use Grouping in PowerPoint
Here are some of the most common uses cases for leveraging PowerPoint’s powerful grouping capabilities:
Moving Related Objects Together
Grouping objects like shapes that comprise a single unit makes it easy to quickly move them around while maintaining their position relative to each other.
Applying Consistent Formatting
Reformatting grouped shapes, pictures, and other objects ensures they all change at the same time. You can instantly restyle all grouped objects together.
Animating Visuals as One
Animating grouped objects as a unit can create cool slide transitions. Grouped objects enter, exit, or move on the slide together.
Rearranging Detailed Layouts
Grouping enables easy layout changes for graphics with lots of objects. Just drag grouped objects to new positions instead of each individual piece.
Organizing Large Presentations
Sections allow you to categorize slides for better organization in sprawling decks. Print specific sections for focused reviews.
Building a Custom Visual
Ungrouping tables, charts, SmartArt, and other elements lets you completely customize the look to your branding by breaking it down into individual shapes and text.
Mastering grouping in PowerPoint unlocks new presentation possibilities. You can streamline working with complex layouts, organize massive decks, apply animated transitions, create custom visuals, and more.
Grouping seems simple on the surface, but with creative thinking you can use it to transform the design and effectiveness of your slides.
I encourage you to explore the grouping strategies covered here and discover new ways it can enhance your next presentation. Proper grouping can mean the difference between a disorganized, cluttered slide and a sleek, cohesive visual that captures attention.
Now that you know all the ins and outs of this underused tool, you can take your PowerPoint skills to new heights and stand out from the crowd with more polished, professional presentations. The only limit is your imagination – start grouping today!
How to Group Objects in Powerpoint
How do you send a PowerPoint presentation to multiple people?
Open your PowerPoint presentation, and choose Share in the top-right corner of the ribbon when you’re ready to collaborate. If you haven’t saved your presentation to OneDrive or SharePoint in Microsoft 365, PowerPoint prompts you to do so now. After you do that, the email invitation will be sent.
What are the different methods to group objects in PowerPoint?
You can group and ungroup objects in PowerPoint using keyboard shortcuts, the context menu or the Ribbon. If you group pictures, shapes or other objects, you can format, move, resize and animate those objects as one object. You can also ungroup objects that have been grouped and regroup objects. If you have grouped objects, you can ungroup them.
What are the advantages of grouping objects in PowerPoint?
When creating a Microsoft PowerPoint presentation, it can be helpful to group objects. Creating groups lets you manipulate all of them as a single group. The ribbon options described may display differently in different versions, but the process is the same.
What is the easiest way to ungroup objects in PowerPoint?
To ungroup objects in PowerPoint using a keyboard shortcut: In Normal View or Slide Master View, click the grouped object. Press Ctrl + Shift + G. The selected objects will be ungrouped. Click in an area outside of the grouped objects. You will now be able to select each object.
