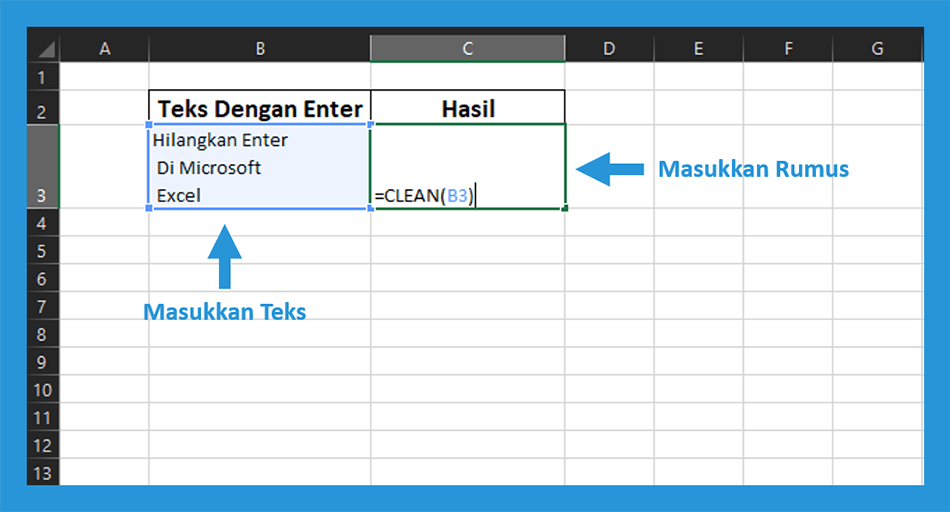
The tutorial will teach you three quick and easy ways to add a line break in Excel cell: use a shortcut to type multiple lines, Find & Replace feature to add a carriage return after a specific character, and a formula to combine text pieces from several cells each starting in a new line.
When using Excel for storing and manipulating text entries, you may sometimes want a certain part of a text string to start in a new line. A good example of multi-line text could be mailing labels or some personal details entered in one cell.
In most Office applications, starting a new paragraph is not a problem – you simply press Enter on your keyboard. In Microsoft Excel, however, this work differently – pressing the Enter key completes the entry and moves the cursor to the next cell. So, how do you create a new line in Excel? There are three swift ways to do this.
Microsoft Excel spreadsheets provide a versatile workspace for organizing, calculating, and analyzing data. But before you can do anything useful, you need to know how to properly enter and edit data in Excel.
Whether you’re a complete beginner or an experienced Excel user, this guide will cover everything you need to know about inputting data into cells, rows, and columns.
We’ll explore basic data entry, tips for efficiency pasting information special characters and symbols, text formatting, and more. Let’s get started!
Excel Data Entry Basics
At its core entering data into Excel simply involves selecting a cell and typing in text numbers, dates, or formulas. Here are the fundamentals
- Click on the desired cell to make it active
- Type the data value, text, date, etc.
- Press Enter or Tab when finished to move to the next cell
By default, text is left-aligned while numbers are right-aligned in cells Data you type will remain selected until you select another cell.
You can also insert line breaks within a cell using Alt + Enter to spread text over multiple lines if needed.
Pro Tip: You can fill a selected cell range with the same data by entering it once and using Ctrl + Enter instead of standard Enter or Tab.
Input Modes in Excel
Excel actually has several different input modes that change how data is entered:
- Edit mode – The default mode for typing into cells
- Enter mode – Input formula and press Enter to finish
- Point mode – Select cells visually instead of typing references
- Extend mode – Expand cell selection with arrow keys
- Insert mode – Insert cells vs overwrite existing ones
You can toggle these modes through shortcuts like F2, F4, Esc etc. based on what task you’re trying to accomplish. Getting familiar with modes will optimize your data entry workflow.
Data Types in Excel
Excel supports various data types for specialized purposes:
- Numbers – Numeric values for math. Stored as double precision floating point numbers.
- Text – Plain text strings. Useful for labels and notes.
- Dates – Calendar dates and times. Easier to analyze chronological data.
- Formulas – Equations that perform calculations using cell values.
- Boolean – TRUE or FALSE logical values. Often in conditional functions.
- Errors – Display error messages like #DIV/0! for mistakes.
Excel automatically detects and formats most data types, but you can also convert between types manually.
Keyboard Shortcuts for Faster Data Entry
Typing everything manually into large spreadsheets can become tedious. Master these handy keyboard shortcuts to save time on routine data tasks:
-
Ctrl + Enter – Inserts same value into multiple selected cells
-
Ctrl + D – Fills selected cell down into adjoining cells
-
Ctrl + R – Fills selected cell to the right into adjoining cells
-
Ctrl + C – Copy selected cell(s)
-
Ctrl + V – Pastes copied cells
-
Ctrl + Z – Undo recent changes
-
Ctrl + F – Open Find & Select tool to search cells
-
Ctrl + P – Open Print dialog to print selected cells
Many common spreadsheet operations have shortcut keys to expedite the process.
Entering Long Text Values
Cells containing lengthy text may overflow to neighboring blank cells automatically. However, you can manually insert line breaks within a cell using:
Alt + Enter – Start a new line of text within the same cell
You can also adjust row heights or column widths to fit more text into a cell. Just double click the row/column header boundary to auto-fit.
For very long text, consider linking to another worksheet or text document rather than stuffing everything into one cell.
Copying and Pasting Data in Excel
You don’t have to retype repetitive information. Use these techniques to copy and paste data:
-
Ctrl + C – Copy selected cell(s)
-
Ctrl + V – Paste to another cell or range
-
Right click > Copy (or Cut)
-
Right click > Paste
-
Drag & drop cells by selecting and moving to new position
When pasting, you can paste as values only, formulas only, or everything. Pick the option that meets your needs.
Inserting Special Symbols and Characters
Don’t limit yourself to regular alphanumeric keys. Excel supports special characters like:
-
Currency symbols – $, ¥, €
-
Math operators – +, -, ×, ÷, %, (=, )
-
Statistical – σ, Σ
-
Geometry – ∠, ±, ∞
-
Brackets – [ ], { }, ( )
To insert special characters:
-
Click Insert > Symbol and select from list
-
Copy/paste from Character Map
-
Use Alt + keyboard codes
Special symbols allow you to add useful visual indicators in Excel.
Formatting Numbers and Text
The default formatting for values may not always meet your presentation needs. Use Excel’s formatting options to customize:
Numbers:
- Thousands separators
- Decimal places
- Currency symbols
- Percentages
- Scientific notation
- Date formats
- Custom number formats
Text:
- Font & size
- Bold, italic, underline
- Font color & fill color
- Alignment
- Text wrap
- Borders and shading
Take time to properly format important metrics for improved spreadsheet clarity.
Setting Column Widths and Row Heights
By default, column widths and row heights size automatically based on their content. But you can set exact dimensions to control layout and fit more data:
Column widths
- Drag right border to expand column width
- Double-click right border to auto-fit
- Right-click column > Column Width to set precise width
Row heights
- Drag bottom border down to increase height
- Double click bottom border to auto-fit
- Right-click row > Row Height to set precise height
Allowing rows and columns to size automatically is generally best, but manual adjustments do provide extra control.
Data Validation for Error Prevention
You may want to restrict data entered into certain Excel ranges to reduce bad or invalid values. Data validation is useful to:
- Allow only specified data types like numbers or dates
- Set allowable value limits like 1-5 or min/max
- Create a dropdown list of approved entries
- Require entries match a custom formula
- Select cells to validate
- Go to Data > Data Validation
- Set desired validation rules and alerts
Adding input restrictions helps minimize errors and keep data clean.
Converting Text to Columns
Pasting data from external sources often mashes everything into one column. Use Text to Columns to split text:
- Select the combined data column
- Go to Data > Text to Columns
- Pick Delimited and the separator character like comma or space
- Check parsed columns look correct
- Finish splitting text
With a few clicks, you can divide pasted data into multiple organized columns.
Linking Data Across Workbooks
Rather than duplicating information in multiple files, you can link cells and ranges across workbooks. Click a cell, enter =, select the other workbook file and desired cell reference. The link will pull data dynamically from the source.
Use links to centralize common data like lookup tables, rates, and other reference information to avoid inconsistencies.
Recording Macros to Automate Data Entry
If you need to repeat the same manual data entry tasks frequently, consider recording and running macros to automate the work.
- On the Developer tab, click Record Macro
- Complete the data entry steps to record
- Click Stop Recording, name the macro
- Run the saved macro anytime to recreate the steps
Macros eliminate repetitive drudgery so you can focus on more important spreadsheet work.
Quick Data Entry Recap
Entering and editing data is foundational to creating functional Excel sheets. Here’s a quick summary of key points:
- Select a cell, type content, press Enter to input data
- Toggle input modes like Edit, Enter or Point as needed
- Use shortcuts to copy/paste values, fill ranges, undo, etc.
- Special characters, symbols, and text formatting help polish sheets
- Set column widths and row height for optimal layout
- Data validation and conversion ensure quality
- Macros automate repetitive data tasks
Follow these data entry best practices to build efficient, error-free Excel workbooks.
With the basics covered, it’s time to transform your empty worksheet into a data goldmine. Happy Excel data entry! Let us know in the comments if you have any other tips or shortcuts for mastering Excel data entry.
Create a new line in formula to make it easier to read
Sometimes, it may be helpful to show lengthy formulas in multiple lines to make them easier to understand and debug. The Excel line break shortcut can do this too. In a cell or in the formula bar, place the cursor before the argument that you want to move to a new line and press Ctrl + Alt. After that, press Enter to complete the formula and exit the edit mode. 
How to start a new line in Excel cell
The fastest way to create a new line within a cell is by using a keyboard shortcut:
- Windows shortcut for line break: Alt + Enter
- Mac shortcut for line feed: Control + Option + Return or Control + Command + Return
In Excel 365 for Mac, you can also use Option + Return. Option is the equivalent of the Alt key on Windows, so it seems the original Windows shortcut (Alt + Enter) now works for Mac too. If it does not work for you, then try the traditional Mac shortcuts above.
If you are accessing Excel for Mac via Citrix, you can make a new line with the Command + Option + Return key combination.
To add a new line in Excel cell with a shortcut, please follow these steps:
- Double-click the cell where you want to enter a line break.
- Type the first part of the text. If the text is already in the cell, place the cursor where you want to break the line.
- On Windows, hold Alt while pressing the Enter key. In Excel for Mac, hold Control and Option while pressing the Return key.
- Press Enter to finish up and exit the edit mode.
As the result, you will get multiple lines in Excel cell. If the text still shows up in one line, make sure the Wrap text feature is turned on. 
Excel Tips 31 – Add Multiple Lines to Text within Cells – Use the Enter key within a cell
How to add a dollar sign in Excel?
1. Select the numbers you want to add the dollar sign, and right click to select Format Cells in the context menu. 2. Then in the Format Cells dialog, click Custom from the Category list, and type $# into the textbox under Type. See screenshot: 3. Click OK. Now the dollar sign has been added to the front of each number. 1.
How do I enter a formula in Excel?
To enter numbers, type in the numbers directly, or use the number keypad. To enter formulas, use the Insert Function feature or type in the formula directly into the cell. It is important to note that when entering formulas, you must start with an equal sign (=) to indicate that you are entering a formula.
How do I write a char in Excel?
Select the active cell you want your results. Ensure the cell has “Wrap Text” enabled. Start your formula with the “=” sign. Select the cell reference of your text, or type your text in quotations. Add an “&” sign after your text. Type in “CHAR (10)” followed by another “&” sign if you’re using a computer with a Windows operating system.
