Track Changes is a feature built into Microsoft Word that keeps track of all the edits made to your document and lets you make comments. When Track Changes is turned on, the edit you make are highlighted, appearing in different colors or styles to separate them from the original text.
This is particularly useful for documents with multiple authors or editors, who can review and approve (or reject) each others changes.
Track Changes is an invaluable feature in Microsoft Word that allows you to keep track of all edits made to a document It highlights any insertions, deletions, or formatting changes, so you can review and accept or reject the edits as needed
Enabling Track Changes is easy – this comprehensive guide will show you how to turn on Track Changes in Word on Windows, Mac, and the web
Overview of Track Changes
Track Changes visually marks up the document with any alterations made after toggling the feature on. Here’s what gets highlighted:
-
Insertions: Any new text added is displayed with an underline.
-
Deletions: Any text removed is shown with a strikethrough.
-
Formatting changes: Changes made to text formatting like font, size, color etc. are also tracked.
-
Editing comments: Any comments inserted in the document appear in the right margin.
This allows collaborators to see precisely what edits other reviewers have made. You can then choose to accept or reject each change.
Why Use Track Changes in Word?
Here are some common scenarios where Track Changes becomes indispensable:
- Collaborating with co-authors on a shared document
- Reviewing a submitted report or proposal
- Editing a draft prepared by an assistant or intern
- Getting feedback from editors, stakeholders, clients etc.
Track Changes enables systematic document review workflows. You can also use it to track your own edits as you refine a draft.
Now let’s see how to toggle on this useful feature.
How to Enable Track Changes in Word on Windows
Enabling Track Changes in Word on Windows is very straightforward:
-
Open the Word document you want to track edits in.
-
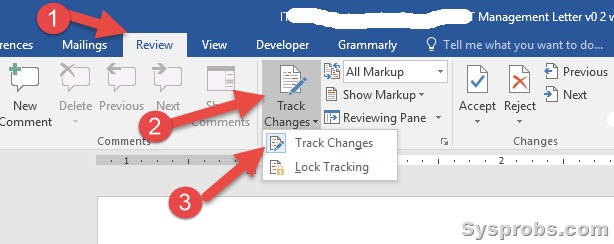
On the Review tab, click Track Changes.
-
In the dropdown, select Track Changes. This turns on tracking for the entire document.
![Enable Track Changes in Word on Windows]
Once enabled, you’ll notice any new edits are instantly marked up with underlines, strikethroughs, and comments.
You can also choose specific Track Change options like:
-
Track Changes While Editing: Only highlights edits as you make them.
-
Highlight Changes: Choose how formatting, insertions, and deletions appear.
-
Track Changes Options: Configure author name, color, visibility etc.
Now let’s see how to enable tracking in the Mac version.
How to Turn On Track Changes in Word on Mac
The steps to toggle Track Changes on Word for Mac are very similar:
-
Open the Word document.
-
In the Review tab, click Track Changes.
-
Check Track Changes in the dropdown menu.
-
You can also pick Track Changes While Editing to only view your own edits.
![How to enable Track Changes on Word for Mac]
The key things like changed lines, inserted text, deleted text, and comments will now get highlighted in the document.
Next, we’ll look at enabling tracking in Word on the web.
How to Turn on Track Changes in Word Online
Microsoft Word on the web also includes full Track Changes functionality:
-
Open the Word web document.
-
Click Review > Track Changes.
-
In the menu, choose Track Changes to toggle it on.
![Enable Track Changes in Microsoft Word online]
Now any edits by collaborators will show up marked in the document.
Track Changes Step-by-Step Example
Let’s take an example to understand Track Changes better.
Consider a document originally containing this sentence:
The quick brown fox jumps over the lazy dog.
Now I edit this text as follows:
- Delete “quick brown”
- Change “jumps” to “leaped”
- Insert “sleepy” before “dog”
After I finish editing, here is how the sentence will appear with Track Changes on:
The quick brown fox jumps leaped over the lazy dogsleepy dog.
So you can clearly see what text was removed, edited, and inserted. This helps understand the evolution of the document.
How to Use Other Track Changes Features
Apart from just toggling Track Changes on/off, Word provides additional options:
- Next/Previous: Navigate between individual changes.
- Accept/Reject: Selectively keep or discard edits.
- Show Markup: Choose what markup to display.
- Lock Tracking: Prevent other users from turning tracking off.
- Compare Versions: View document differences side-by-side.
Make sure to review and incorporate changes before finalizing the document.
Tips for Using Track Changes Effectively
Here are some tips to use Track Changes efficiently:
- Turn Track Changes on at start of doc review/editing.
- Clarify who made each change via user profiles.
- Review changes one by one instead of accepting all changes.
- Add comments for complex changes and suggestions.
- Control visibility of markup for cleaner view.
- Merge revisions after completing all reviews.
- Share a final version with all edits accepted.
Track Changes is an indispensable Word feature for collaborating and reviewing documents. This guide showed you how to easily turn on tracking in Word across Windows, Mac, and the web.
Start using Track Changes for your team projects, client reviews, and even personal drafts. It will save you enormous time and effort in document preparation.
How to accept or reject changes
After changes have been made to your document, you can either accept or reject the changes. To do this, right-click on the part of the document thats been changed. In the menu that appears, click on “Accept” if you want to keep the change, or “Reject” if you want to reject it.
The appearance of the section may change depending on your choice, but it will be consistent with the rest of the document once youre finished working and turn Track Changes off.
How to make and remove Track Changes comments
To make comments in the document without adding to the text, use your mouse to highlight the text you want to comment on, and then click “New Comment” in the “Review” tab. A bubble will appear in the margin of the document, containing your name and a color assigned to you. Once the comment bubble appears, type your comment.
To reply to a comment, just click “Reply” on the comment you want to respond to, and type your response. You can click anywhere outside of the comment bubble when youre finished.
There are two ways to remove a comment. Click on the comment you want to remove. If you want to keep the comment in the document for the time being, but want to indicate that its already been addressed, click “Resolve” in the comment bubble. The comment will still be visible in the documents margin, but will now appear grayed out, distinguishing it from other comments.
If you want to remove a comment completely, leaving no trace of it in the document, click on the comment and then click the icon above “Delete” in the “Review” tab. Its located right next to the “New Comment” icon.
Track changes and show markup in Microsoft Word
How do I track changes in Microsoft Word?
It’s in the blue section at the top of the document’s page. Doing so will open a new set of options related to editing your document. Click Track Changes. This option is at the top of the Word page, near the middle of the screen. Clicking it will enable Microsoft Word’s “Track Changes” feature. Click the drop-down box next to Track Changes.
How do I enable tracking changes in Microsoft Word?
Open the document: Begin by opening the Microsoft Word document that you want to enable the tracking changes feature for. Enable track changes: Navigate to the “Review” tab on the Word toolbar and click on the “Track Changes” button to turn on the tracking changes feature. This will initiate the recording of modifications made to the document.
Why should you use track changes in word?
Using track changes, you can see which changes have been made to your document by the collaborators. It also helps you visualize each edit and individual change so that you can make the final call on whether to keep or reject them. Anyone using Word for document editing will find this feature to be extremely beneficial.
How do I edit a document without tracking changes?
If you want to edit the document without tracking changes, you’ll need to either save a copy or ask the person who sent it to you to share it again with review mode turned off. Go to Review > Track Changes. When Track Changes is on, the section is highlighted. Deletions are marked with a strikethrough, and additions are marked with an underline.
