Available inking features depend on the type of device youre using and which version of Office youre using.
Microsoft Word is so much more than a text document program. With the drawing and illustration tools, you can add visually engaging elements like shapes, diagrams, and freehand sketches to augment your documents.
In this simple, easy-to-follow guide, we’ll walk through everything you need to know to start drawing directly within Word on Windows or Mac.
Here’s what we’ll cover
- Enabling the drawing toolbar
- Inserting lines, shapes, and icons
- Customizing with color, styles, and effects
- Using text boxes and WordArt
- Freehand drawing with digital ink
- Working with layers
- Saving and exporting drawings
After following these tips, you’ll be able to bring your Word documents to life with customized illustrations and graphics. No design experience required! Let’s dive in.
Accessing the Drawing Toolbar
The drawing toolbar contains all the central illustration tools, so the first step is making sure it’s enabled:
- Open the “View” tab on the ribbon
- Check the box for “Toolbars > Drawing”
This will display the drawing toolbar along the top with shortcuts for inserting and editing graphic elements
Inserting Lines, Shapes, and Icons
To insert a drawing object like a shape, icon, text box, or line:
- Go to the “Insert” tab
- Click the desired object button
- Click and drag your mouse on the page to size and place it
You can choose from lines, basic shapes, flowchart elements, stars and banners, callouts, and various icons.
Tip: Hold Shift while dragging to draw a perfectly proportioned shape.
Customizing Drawings with Color, Styles, and Effects
Make your drawings stand out by adding color, depth, and visual flair:
- Color: Select the object, go to “Format” tab, pick fill and outline colors
- Styles: Apply styles like gradients, 3-D rotation, shadows
- Effects: Choose cool effects like glow, reflection, or 3D
Don’t be afraid to experiment until you find the perfect look.
Incorporating Text with Text Boxes and WordArt
Integrate text into your illustrations using text boxes and WordArt:
- Text boxes: Insert a text box, click inside to add text
- WordArt: Select a WordArt style, enter text to transform
Format the text with colors, font styles, alignment, and more for impact.
Freehand Drawing with Digital Ink
For a hand-drawn look, use the digital ink scribble tool:
- Select “Scribble” from the shapes menu
- Draw freehand using your mouse or trackpad
- Change thickness, smoothness, color, and effects
You can blend scribbles and shapes together in creative ways.
Working with Layers
To organize complex drawings, use layers:
- Open the “Format” tab and “Layers” panel
- Click “New Layer” to stack components
- Click a layer to select/edit objects within it
- Drag layers up/down to reorder
Layers allow you to easily manipulate individual drawing elements.
Saving and Exporting Your Drawings
When finished, be sure to save your document as a DOCX to preserve drawings intact:
- Export as PDF if you need a non-editable version to share
- Use “Save as Picture” to extract just the drawing as an image file
Now you have a handy illustrated Word doc to use any way you like!
Drawing in Word unlocks creative possibilities that can take your documents to the next level visually. Follow the techniques in this guide to add a little pizzazz to your Word projects! With practice, you’ll be able to craft compelling custom illustrations that bring your ideas to life.
So tap into your inner artist today – the toolbar is waiting for you! Let us know if you have any other Word drawing tips or tricks to share.
![]()
Switch tools with the new Apple Pencil
|
|
 This feature is available only to
 Office for iOS supports the 2nd-generation Apple Pencil and its double-tap gesture. By default, the double-tap gesture switches from the current tool to the eraser, but the System settings on your device allow you to choose a different behavior for this gesture. This feature is available to Microsoft 365 subscribers in Word, Excel, and PowerPoint on iPad version 2.22.19020201 and later.
Convert ink to text or shapes
Word or Excel: See Convert ink to shapes in Office
PowerPoint: See Convert ink to text or shapes in PowerPoint for Microsoft 365.
Select a heading below to open it and see the detailed instructions.
- Under Draw > Tools, tap the Eraser. (In PowerPoint for Microsoft 365, you can choose from different sizes of erasers. Word has three eraser options. Tap the down arrow on the Eraser button to pick the eraser that you want.)
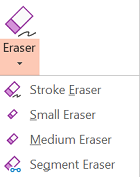
- With your pen or finger, drag the eraser over the ink you want to remove. With the Segment Eraser in PowerPoint, you can simply tap a segment of ink or drag across it to remove it (rather than having to thoroughly wipe away the entire segment). Dragging across segments is an easy way to erase several at once.
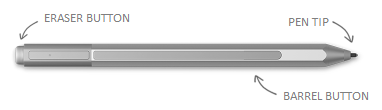
Some active pens, such as the Surface pen, have an eraser that you can also use to erase digital ink.
All apps include a Draw tool 
There is also an ink selection tool, Lasso Select,  or
or  for specifically for selecting objects drawn with ink. Its most useful when you have a mixture of standard and ink objects and you only want to select an ink object.
Applies only to Word, PowerPoint, and Excel:
To select part of a drawing or words written in ink, use the Lasso Select tool. (This tool cant select non-ink objects—that is, shapes, pictures, etc.)
- Under Draw > Tools on the Ribbon, tap Lasso Select or .
- With your pen or finger, drag to draw a circle around the part of the drawing or word that you want to select. A faded, dashed selection region appears around it, and when youre done, the portion you lassoed is selected. Then you can manipulate that object as you wish: move it, change its color, and so on.

In both Excel and PowerPoint, with a digital pen, you can select an area without even tapping the selection tool on the ribbon. Use the supported digital pen button to Lasso Select ink without visiting the ribbon. Then you can use the pen to move, resize, or rotate the ink object.
- On the File menu, select Options, and then select Advanced.
- In the Pen section, select the box next to Use pen to select and interact with content by default.
This setting only applies to the app in which you make it, so, for example, you can have automatic inking turned on in Visio and turned off in Word.
|
If your device is touch-enabled, the Draw tab is turned on automatically. Otherwise, turn it on by selecting File > Options > Customize Ribbon > Draw. |
How to draw on a word document
Can you draw in Microsoft Word?
For simple drawings, you can draw in Word directly using shapes, lines, or pen tools. If you want to draw in Microsoft Word, here’s what you’ll need to do. These instructions have been designed with Microsoft Office 2019 in mind. Note that Microsoft 365 (formerly O365) is the Office suite with 1 TB of OneDrive per user.
How to draw a shape in word?
Step 1: Open your Word document and place your cursor where you want the shape. Step 2: Go to the Insert tab and click the Shapes drop-down arrow. Step 3: You’ll see a large variety of shapes you can insert. From lines and arrows to rectangles and stars, you’ll find the most common shapes in the list. Select the shape you want to draw.
How to draw on Microsoft Word 6?
How to draw on Microsoft Word 6, Select whichever tool you want to draw freely on your Word document. 1. Open an existing document or create a blank document in Word. 2. In the Word ribbon, click the “Review” tab and choose “Start Inking.” 3. Under “Ink Tools,” select “Pens” and then choose “Pen” again. 4.
How do I draw on a Word document?
Use lines to draw on a Word document Open your Word document. Make sure your cursor is near the area you would like to start your Word drawing. Click the “Insert” ribbon toolbar located at the top, then select the down caret on the “Shapes” button to open shape options.
