In this tutorial, you will learn a few different ways of copying formulas in Excel – how to copy formula down a column, to all of the selected cells, copy a formula exactly without changing cell references or formatting, and more.
Copying formulas in Excel is one of the easiest tasks that is usually done in a mouse click. I say “usually” because there can be very specific cases that require special tricks, like copying a range of formulas without changing cell references or entering the same formula in multiple non-adjacent cells.
Luckily, Microsoft Excel offers many ways to do the same task, and it is true for copying formulas. In this tutorial, we are going to discuss different ways to copy formulas in Excel so that you could choose the one best suited for your task.
One of the handiest time-saving tricks in Excel is the ability to drag formulas down or across cells to autofill a range. Rather than manually typing the same formula over and over again you can copy it just once then drag the fill handle to instantly apply it to multiple adjacent cells.
This allows you to apply calculations and analysis seamlessly across entire datasets with just a few clicks. Especially when working with large tables of data dragging formulas makes your workflows much more efficient.
In this post, I’ll go over all the ins and outs of autofilling formulas by dragging in Excel. You’ll learn:
- How to drag a formula down an entire column or across a row
- Tips for precise control when filling formulas
- How to apply non-standard fill behaviors like series or custom patterns
- How to lock cell references when dragging to prevent adjustments
- When you may want to use the fill command vs dragging
Knowing these tricks will help you level up your Excel skills and get your spreadsheets set up in no time. Let’s dive in!
How to Drag and Autofill Formulas in Excel
Dragging to autofill formulas follows the same general steps in all recent versions of Excel:
-
Select the cell with the formula you want to fill.
-
Hover over the small square in the bottom-right corner of the cell. This is called the fill handle.
-
Click and drag the fill handle down or across the cells where you want to apply the formula.
-
Release the mouse button when your range is selected.
The original formula will be automatically copied to the full selected range. The cell references in the formulas will shift accordingly based on the new locations.
By default, Excel will increment cell references when autofilling. For example, if your original formula was =A1+B1, it would become =A2+B2 in the next row. Relative and absolute references are maintained.
Autofilling Formula for Entire Column or Row
To quickly drag a formula down an entire column or across an entire row, double-click the fill handle after dragging your initial range. This will automatically select all occupied cells to the end of the dataset and fill the formula into each one.
Displaying the Fill Handle if Hidden
In some cases, you won’t see the fill handle box in the cell corner. Excel hides it after certain actions, but you can easily re-enable it:
-
Select any cell.
-
Go to File > Options > Advanced.
-
Under Editing Options, check the box for “Show fill handle on selection.”
-
Click OK to apply.
Now you should see the fill handle rectangle again when selecting cells.
Controlling Formula Autofill Behavior
When dragging formulas, Excel does a pretty good job of guessing how you want cell references handled in the filled cells. But you can manually control the autofill behavior to ensure it does exactly what you intend.
1. Set Cell Increment
By default, Excel will increment cell references by 1 row or column when filling. To change the increment amount:
-
Drag to fill the first few cells where you want the formula applied.
-
Click the Auto Fill Options button (little blue square) that appears.
-
Select Series…
-
In the Series dialog, change the Step Value field to set the increment.
-
Click OK.
-
Drag the fill handle again to complete the fill range based on your defined step value.
2. Apply Linear Series
To fill using a linear series (incrementing or decrementing values) instead of a fixed step value:
-
Drag to fill the first few destination cells.
-
Click the Auto Fill Options button.
-
Select Linear Trend.
This will detect the series pattern in your initial cells and continue the trend.
3. Copy Values Without Formula
If you just want to copy the values rather than the formula, use the Auto Fill Options button and select Copy Cells.
4. Repeat Fill Pattern X Times
To repeat a specific fill pattern:
-
Manually fill out at least 2 iterations of the pattern.
-
Select both filled iterations and drag across the full range to repeat the pattern.
Locking Cell References When Filling
One thing to watch out for when dragging formulas is relative references shifting when you don’t want them to. For example, if you are calculating a sum relative to Cell A1, you probably don’t want that reference changing when filling additional rows.
There are a couple ways to lock the references:
-
Lock specific references with $ (absolute reference) – Use dollar signs in a cell reference like $A$1 to always refer to that exact cell regardless of drag filling.
-
Set a range reference as absolute – Select a range of cells before filling and press F4 to toggle the reference to absolute.
-
Name cells/ranges – Define a named range like “InputValues” to refer to specific cells in formulas. The name won’t change when filling.
Taking the time to properly lock references will save you errors and headaches when autofilling large sets of formulas!
Dragging vs Filling for Formulas
Besides dragging, you can also use the Fill command on the Home tab to autofill formulas and other repeating data:
Fill Handle Dragging
- Good for quickly filling adjacent cells
- More control with fill behaviors
- Easy multi-selection filling
Fill Command
- Can fill arbitrary cell ranges
- More flexible than dragging
- Good for filling vertical ranges
- Doesn’t require starting from formula cell
The fill handle is best for straightforward horizontal or vertical fills. But the fill command gives you more flexibility to apply autofill across non-contiguous cell ranges.
Common Formula Autofill Uses
Here are some of the most common ways to use autofill for formulas in Excel:
-
Number sequences – Fill sequential or repeating numbers for numbering tables, visualizations, etc.
-
Mathematical series – Fill rows or columns with formulas based on linear, exponential, or other series.
-
Accounting/finance calculations – Drag calculations like sums or growth rates across rows and down columns.
-
Date series – Automatically populate a set of evenly spaced dates using autofill.
-
Dashboards/reports – Replicate conditional formatting, charts, and other elements across rows or columns.
-
Engineering/science – Copy formulas applying physical, chemical, or other scientific principles across datasets.
The beauty of Excel formula autofill is it adapts to so many different contexts and use cases!
Autofilling by dragging formulas and other repeating content is one of the handiest Excel techniques to master. It can save you tons of time compared to manual data entry cell-by-cell.
Copy or move a single formula without changing cell references
If you need to copy or move just one formula, making an exact copy is easy.
- Select the cell with the formula you want to copy.
- Select the formula in the formula bar using the mouse, and press Ctrl + C to copy it. If you want to move the formula, press Ctrl + X to cut it.
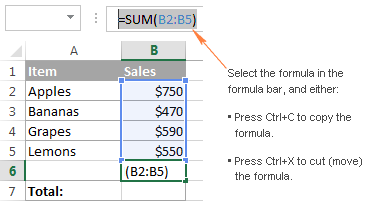
- Press the Esc key to exit the formula bar.
- Select the destination cell and press Ctl + V to paste the formula there.
Alternatively, you can enter the editing mode and copy the formula in the cell as text:
- Select a cell with the formula.
- Press F2 (or double-click the cell) to enter the editing mode.
- Select the formula in the cell using the mouse, and press Ctrl + C to copy it.
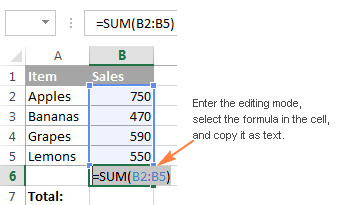
- Select the destination cell, and press Ctl+V. This will paste the formula exactly, without changing the cell references, because the formula was copied as text.
Tip. To quickly copy a formula from the above cell with no reference changed, select the cell where you want to paste the formula and press Ctrl + .
How to copy an Excel formula but not formatting
As you already know, when copying a formula down a column in Excel, you can use the Fill Without Formatting option that lets you copy the formula but keep the existing formatting of the destination cells. Excels Copy & Paste feature offers even more flexibility with regard to paste options.
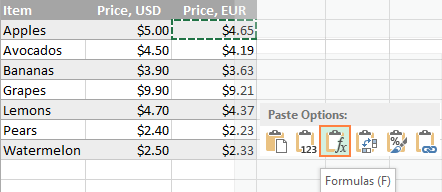
- Select the sell containing the formula.
- Copy that cell by pressing Ctrl + C. Alternatively, right click the cell and select Copy from the context menu, or click the Copy button on the Home tab > Clipboard.
- Select all the cells to which you want to copy the formula.
- Right-click the selected cells and choose Formulas under Paste Options:
For more paste options, click the arrow below the Paste button on the ribbon. For example, you can select Formulas & Number Formatting to paste only the formula and the number formatting such as percent format, currency format, and the like: 
Tip. If you are not sure which paste option works best for you, hover the mouse over different icons to see a preview of this or that paste option.
