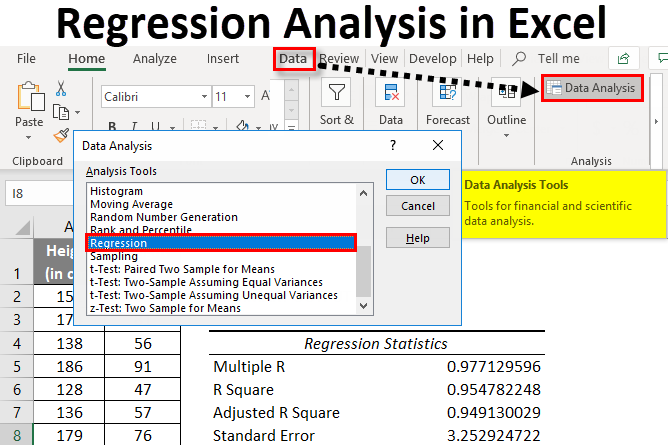
The tutorial explains the basics of regression analysis and shows a few different ways to do linear regression in Excel.
Imagine this: you are provided with a whole lot of different data and are asked to predict next years sales numbers for your company. You have discovered dozens, perhaps even hundreds, of factors that can possibly affect the numbers. But how do you know which ones are really important? Run regression analysis in Excel. It will give you an answer to this and many more questions: Which factors matter and which can be ignored? How closely are these factors related to each other? And how certain can you be about the predictions?
Regression analysis is a useful statistical method to understand the relationship between two or more variables. It can be used to predict a continuous dependent variable from a number of independent variables Excel has a built-in regression analysis tool that makes it easy to carry out linear regression analysis. In this comprehensive guide, I’ll walk you through the step-by-step process of running regression analysis in Excel.
Why Use Excel for Regression Analysis
There are several reasons why Excel is a great choice for regression analysis
-
Excel is widely available and familiar to most data analysts and students. You don’t need access to expensive statistical software.
-
The data analysis toolkit is pre-installed with Excel. There are no additional packages to install or learn.
-
The regression tool in Excel is powerful enough for most common regression tasks. It can handle multiple independent variables.
-
Excel makes it easy to visualize your regression results with scatter plots and add trendlines.
-
You can use Excel’s functions like LINEST for more customized regression analysis.
For straightforward regression with a reasonable amount of data, Excel has you covered. Let’s look at how to use it.
Step 1: Enter Your Data into Excel
The first step is to organize your data in an Excel worksheet. Place each variable in its own column:
-
The dependent variable should be in the leftmost column. This is the outcome variable you want to predict.
-
The independent variables should be in columns to the right of the dependent variable. These are the predictor variables you’ll use to model the dependent variable.
Make sure your data does not contain any empty cells. Excel’s regression tool cannot handle gaps in the data.
Also, remove any columns that do not contain useful data. Excel may unintentionally include them in your regression analysis. Keep your data clean and well-organized from the start.
Step 2: Install the Data Analysis ToolPak
This add-in provides access to Excel’s regression analysis tool. If it is not already installed:
- Click File > Options > Add-ins.
- In the Manage box, select Excel Add-ins and click Go.
- Check the Analysis ToolPak box and click OK.
With the Data Analysis ToolPak enabled, you can access regression and other statistical tools in Excel.
Step 3: Open the Data Analysis Dialog Box
- Click the Data tab in the Excel ribbon.
- Click the Data Analysis button in the Analyze group.
The Data Analysis dialog box will open. This is where you will specify all the options and run your regression analysis.
Step 4: Enter Your Variable Data
In the Data Analysis dialog:
-
Select Regression from the list and click OK.
-
For the Input Y Range, select your dependent variable data – the values you want to predict.
-
For the Input X Range, select your independent variables – the predictors.
That’s all the data you need to input! The rest of the steps focus on analyzing the results.
Step 5: Select Output Options
The output options allow you to customize your regression results.
-
Check the Labels box if you have headers in Row 1 to make the output easier to interpret.
-
Check the Residuals box to include a table of residuals and residual plots. Always examine residuals!
-
Select where you want the results outputted. I recommend outputting to a new worksheet.
When you’re ready, click OK to perform the regression analysis.
Step 6: Analyze Your Regression Results
The output includes a summary table, ANOVA table, coefficients table, and residual plots if selected.
Key things to analyze:
-
R-squared and adjusted R-squared tell you how much variance is explained.
-
P-values test the significance of coefficients.
-
Examine residuals plots for patterns indicating model problems.
I have a detailed guide on interpreting Excel’s regression output here.
Step 7: Create a Scatter Plot with a Trendline
Visualizing the relationship between your variables is also important.
-
Create a scatter plot with your independent variable on the x-axis and dependent variable on the y-axis.
-
Right click your graph, select Add Trendline and display the R-squared value on the chart.
This allows you to easily see the regression line fitted to your data. The trendline can be edited to polynomial or other types if necessary.
Step 8: Improve Your Regression Model
Regression analysis is an iterative process. If your initial results are inadequate, you can take steps to improve your model:
-
Remove unnecessary variables
-
Test interaction effects between variables
-
Try transforming variables like logging skewed data
-
Check for influential outliers biasing your model
Don’t accept a flawed model. Try different options until you obtain the best fit!
Performing More Advanced Regression in Excel
While Excel’s regression tool is quick and easy, it lacks some advanced configuration options. For example:
-
Excel always uses least squares regression. Other methods like robust regression require more advanced software.
-
Interaction terms between variables must be manually created as additional columns.
-
Limited options for model diagnostics like collinearity and residual analysis.
For advanced regression, statistical software like R or Python is recommended. But for basic needs, Excel’s built-in tool gets the job done!
Common Regression Analysis Uses
To apply what you’ve learned, here are some examples of using regression analysis in Excel:
-
Marketing – Predict sales based on ad spending, promotions, etc.
-
Finance – Forecast stock prices using leading economic indicators.
-
Science – Relate concentration levels of compounds to observed reactions.
-
Social Science – Understand how income, age, and education affect health.
Anywhere you want to statistically model a continuous dependent variable from other observed factors, regression analysis is the technique of choice. Excel provides an accessible way to get started.
Key Takeaways for Regression Analysis in Excel
Running regression analysis in Excel is straightforward when you follow these key steps:
-
Enter clean, well-organized data into a worksheet
-
Install the Data Analysis ToolPak add-in
-
Open the Data Analysis dialog box
-
Input your dependent and independent variable ranges
-
Choose your output options
-
Analyze regression statistics like R-squared and residuals
-
Visualize relationships with scatter plots and trendlines
-
Refine your model by adding/removing variables if needed
For those new to statistics, Excel provides an easy on-ramp into regression analysis. The data analysis add-in equips you with powerful statistical tools using Excel’s familiar interface. Master the fundamentals, and you’ll be equipped to do basic regression analysis across many applications.

Regression analysis in Excel – the basics
In statistical modeling, regression analysis is used to estimate the relationships between two or more variables:
Dependent variable (aka criterion variable) is the main factor you are trying to understand and predict.
Independent variables (aka explanatory variables, or predictors) are the factors that might influence the dependent variable.
Regression analysis helps you understand how the dependent variable changes when one of the independent variables varies and allows to mathematically determine which of those variables really has an impact.
Technically, a regression analysis model is based on the sum of squares, which is a mathematical way to find the dispersion of data points. The goal of a model is to get the smallest possible sum of squares and draw a line that comes closest to the data.
In statistics, they differentiate between a simple and multiple linear regression. Simple linear regression models the relationship between a dependent variable and one independent variables using a linear function. If you use two or more explanatory variables to predict the dependent variable, you deal with multiple linear regression. If the dependent variable is modeled as a non-linear function because the data relationships do not follow a straight line, use nonlinear regression instead. The focus of this tutorial will be on a simple linear regression.
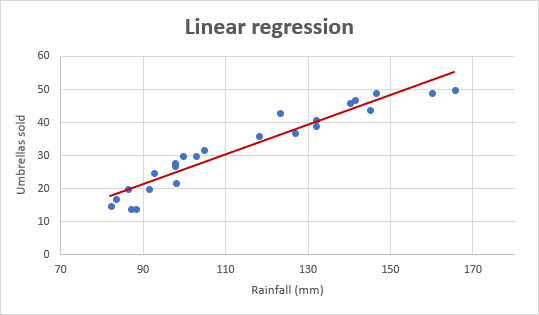
As an example, lets take sales numbers for umbrellas for the last 24 months and find out the average monthly rainfall for the same period. Plot this information on a chart, and the regression line will demonstrate the relationship between the independent variable (rainfall) and dependent variable (umbrella sales): 
Linear regression equation
Mathematically, a linear regression is defined by this equation:
y = bx + a + ε
Where:
- x is an independent variable.
- y is a dependent variable.
- a is the Y-intercept, which is the expected mean value of y when all x variables are equal to 0. On a regression graph, its the point where the line crosses the Y axis.
- b is the slope of a regression line, which is the rate of change for y as x changes.
- ε is the random error term, which is the difference between the actual value of a dependent variable and its predicted value.
The linear regression equation always has an error term because, in real life, predictors are never perfectly precise. However, some programs, including Excel, do the error term calculation behind the scenes. So, in Excel, you do linear regression using the least squares method and seek coefficients a and b such that:
y = bx + a
For our example, the linear regression equation takes the following shape:
Umbrellas sold = b * rainfall + a
There exist a handful of different ways to find a and b. The three main methods to perform linear regression analysis in Excel are:
- Regression tool included with Analysis ToolPak
- Scatter chart with a trendline
- Linear regression formula
Below you will find the detailed instructions on using each method.
How to do linear regression in Excel with Analysis ToolPak
This example shows how to run regression in Excel by using a special tool included with the Analysis ToolPak add-in.
Using Excel for Regression Analysis
FAQ
How do you write a regression analysis?
How to calculate regression analysis?
How to perform regression analysis in Excel?
With Analysis Toolpak added enabled, carry out these steps to perform regression analysis in Excel: On the Data tab, in the Analysis group, click the Data Analysis button. Select Regression and click OK . Select the Input Y Range, which is your dependent variable. In our case, it’s umbrella sales (C1:C25).
What is linear regression in Excel?
Linear regression is an easy way of evaluating the relationship between two variables. Previously, performing linear regression in Excel was nothing less than a complex task. But with advanced Excel data analysis tools, it is now only a matter of a few clicks.
How do I run a regression analysis on a dataset?
Ensure that the Labels box is checked, as this will help Excel recognize the headers and treat the remaining rows as numeric data. In the Output options section, select New Worksheet Ply to see the results displayed in a new worksheet. Then, click OK to run the regression analysis on the dataset.
Is Excel a good tool for regression analysis?
While Excel is a valuable tool for performing regression analysis, it does have certain limitations. One of the main limitations is the assumption of linearity, which means that the relationship between the independent and dependent variables must be linear in order for regression analysis to be accurate.