Cấp độ lập trình: Cơ bản Thời lượng: 10 phút Loại dự án: Tự động hoá bằng trình đơn tuỳ chỉnh
Need to send personalized emails, letters, or labels to a large contact list? Mail merge is the perfect feature for creating customized bulk documents in Microsoft Word.
With mail merge, you can pull data from an Excel spreadsheet or other data source into a Word template document. You’ll end up with a set of documents personalized for each recipient.
Mail merge may sound intimidating, but it’s actually quite simple to set up once you know the steps In this comprehensive guide, we’ll walk through how to perform a mail merge in Word using Excel.
Mail Merge 101
Before diving in, let’s review some key mail merge terminology:
-
Main document: The core Word document that contains the text and layout. This is also called the form letter.
-
Data source The file containing the contact data, such as an Excel spreadsheet or Access database
-
Merge fields: Placeholder fields in the main document that pull data from the data source. They are designated with double chevrons like <<AddressBlock>>.
-
Merged documents: The output of the mail merge. The final set of personalized documents for each recipient.
That covers the basics! Now let’s look at the step-by-step process for merging data into Word.
Step 1: Set Up the Data Source File
Our data source will be an Excel spreadsheet with contact names, emails, addresses, and other details we want to merge.
In Excel create a spreadsheet with column headers matching the fields you want to use. For a mail merge focused on physical addresses you may have columns like
- First Name
- Last Name
- Address 1
- Address 2
- City
- State
- Zip Code
Enter your contact data in the rows below the column headers. Make sure to include the specific fields that will populate your main merge document.
Save this Excel file somewhere easily accessible. You’ll connect it to Word later.
Step 2: Create Your Main Merge Document
Open a new blank Word document. This will become the main form letter or template for your mail merge.
Design the page layout and styles you want for your merged documents. You can include text, images, logos – anything you want on the final output.
Leave blank spaces where you want the recipient data to populate from Excel.
Step 3: Select Recipients
Next, you’ll set up the mail merge wizard in Word to connect your Excel data.
Go to the Mailings tab and click Start Mail Merge > Step-by-Step Mail Merge Wizard.
Select the document type you want to create like letters, emails, labels, etc. Then choose your data source – in our case, Excel spreadsheet.
Browse and select the Excel file you prepared. Click OK.
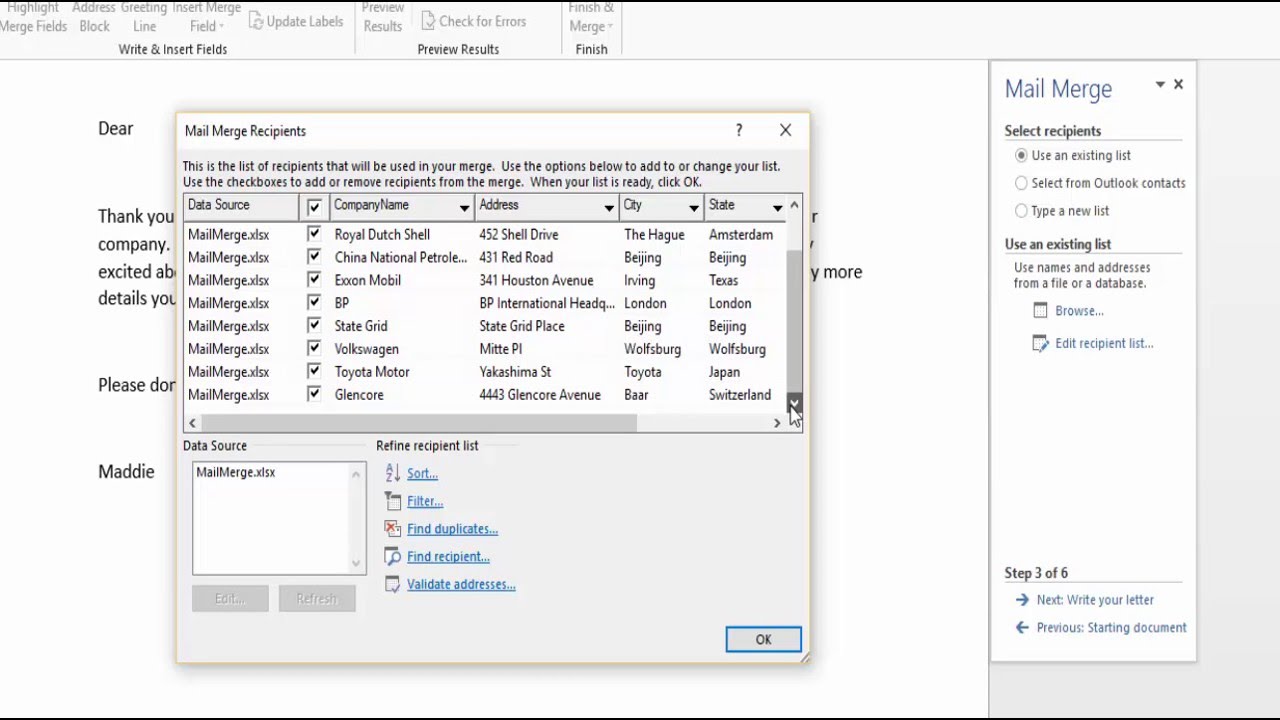
A window will open allowing you to filter rows if you don’t want to include all contacts. Select the rows you wish to use and click OK.
Step 4: Insert Merge Fields
Here’s where the Excel data gets pulled into the Word doc.
Place your cursor where you want a recipient’s first name to appear.
On the Mailings tab, click Insert Merge Field and select the First Name field. The <<FirstName>> merge field will populate.
Repeat this to insert all desired merge fields like name, address, city, etc. into your doc.
Fields like <<AddressBlock>> will contain formatted output with multiple lines for the address.
Step 5: Preview and Complete the Merge
Almost done! To preview how the merge will look, go to the preview results section.
Here you can browse each document with data populated from your different Excel rows. Check for any issues with formatting or spacing around your fields.
If everything looks accurate, you’re ready to complete the mail merge.
Under Finish, click the merge option you want like Print, Send Email or Export to save the documents individually with merged data.
And that’s it! With these steps you can swiftly merge hundreds of Excel contacts into personalized Word documents.
Mail Merge Pro Tips
Now that you know the basics, here are some pro tips for advanced mail merging:
-
Use rules and filters: Refine your recipient list based on rules like location, purchase history etc.
-
Add conditionals: Personalize further by showing or hiding content based on data values.
-
Use DOCX for emails: Merge to email-friendly DOCX attachments rather than inline text.
-
Check formatting: View each record to catch any spacing or styling issues.
-
Clean data beforehand: Fix any data inconsistencies in Excel first for less frustration.
-
Confirm merge fields: Double check field tags match your header names in Excel.
-
Preview a sample: Test a few records to confirm the merge works as expected before sending all.
Common Mail Merge Troubleshooting
If you run into issues, here are solutions for some common mail merge problems:
-
Error message: Confirm your data source file is closed and not currently open in another program.
-
Blank fields in output: The merge field name doesn’t exactly match the data source column header. Update for consistency.
-
Spaces around fields: Adjust spacing by selecting the merge field and deleting extra paragraph marks.
-
Inaccurate data: Correct any data errors, deletions or inconsistencies in the Excel spreadsheet before merging again.
-
Slow performance: Limit your data source to the rows needed rather than the whole spreadsheet to boost speed.
With attention to detail, your mail merge process will go off without a hitch!
Key Takeaways
The mail merge feature of Word is invaluable for creating customized bulk documents or communications. Here are the key tips to remember:
- Set up your recipient data in Excel with column headings that match merge fields
- Build your main Word document template with placeholders for data
- Use the Mail Merge wizard to connect Excel and filter rows
- Insert merge fields that match column headers in Excel
- Preview results and complete the merge to desired output
- Refine the process with rules, conditionals and other advanced options
With these steps, you’ll be prepared to complete simple or complex mail merges in Word like a pro. No more manual copying and pasting–let automation and mail merge do the work!
What other Word features help you work more efficiently? Share your favorite tips and tricks below.
Điều kiện tiên quyết
Để sử dụng mẫu này, bạn cần có các điều kiện tiên quyết sau:
- Tài khoản Google (các tài khoản Google Workspace có thể yêu cầu quản trị viên phê duyệt).
- Một trình duyệt web có quyền truy cập vào Internet.
Giới thiệu về giải pháp này
Tự động điền dữ liệu từ Google Trang tính vào mẫu email. Email được gửi từ tài khoản Gmail của bạn để bạn có thể trả lời thư trả lời của người nhận.
Lưu ý quan trọng: Mẫu hợp nhất thư này phải tuân thủ các giới hạn email được mô tả trong phần Hạn mức cho các dịch vụ của Google.
Bạn tạo một mẫu nháp trong Gmail với phần giữ chỗ tương ứng với dữ liệu trong bảng tính Trang tính. Mỗi tiêu đề cột trong trang tính đại diện cho một thẻ giữ chỗ. Tập lệnh sẽ gửi thông tin cho từng phần giữ chỗ trong bảng tính đến vị trí của thẻ phần giữ chỗ tương ứng trong thư nháp.
How to Mail Merge in Word, Excel & Outlook
How do I add a mail merge field?
Click in your document where you want to add the mail merge field. Click the arrow next to Insert Merge Field, and then click the field name. If you don’t see your field name in the list, click the Insert Merge Field button. Click Database Fields to see the list of fields that are in your data source. Click the field you want to add. Click Insert.
How do I merge a letter in Microsoft Word?
Create a Word document. If you have already composed your letter, you can open an existing document, otherwise create a new one. Choose what kind of merge you want to run. On the Mailings tab, in the Start Mail Merge group, click Start Mail Merge and pick the mail merge type – letters, email messages, labels, envelopes or documents.
How does mail merge work?
To show how mail merge works, let’s start with an email message. You start with a main document, attach a list of recipient information, and add mail merge fields. Then Word automatically fills in the fields with recipient information and generates all the individual documents. Insert mail merge fields
How do I start a mail merge?
You’ll see a sidebar open on the right which walks you through the mail merge process. Mark the Email Messages option at the top and click “Next: Starting Document” at the bottom. Next, choose the Use the Current Document option. If you do want to start fresh with a template or from a different document, choose that option instead.
