A network diagram serves as the blueprint of a company’s communication framework, detailing the intricate web of connections that enable business operations. For IT professionals, system administrators, and network architects, the diagram is not just a representation; its an essential tool for planning, managing, and troubleshooting the network infrastructure. Understanding how to create a network diagram is a fundamental skill that underpins effective network design and management.
This guide is crafted to provide you with a comprehensive understanding of the network diagrams role and construction. Whether you’re an experienced network engineer looking to refine your skills or a newcomer aiming to grasp the basics, the forthcoming sections will take you through the critical steps and considerations in creating a precise and informative network diagram.
Creating a network diagram can seem daunting, but it doesn’t have to be! With the right tools and a step-by-step approach, anyone can create a professional-looking network diagram. In this article, I’ll walk you through the entire process of making a network diagram from start to finish using easy-to-follow steps By the end, you’ll have the knowledge to make a network diagram for any type of network
What is a Network Diagram?
Before we get into the steps for making one, let’s quickly go over what exactly a network diagram is.
A network diagram is a visual representation of a computer or telecommunications network. It shows how different components like devices, connections, and networks relate to each other. The purpose of a network diagram is to provide a high-level overview of a network’s architecture and topology.
Network diagrams are commonly used by IT professionals to document the logical and physical layout of networks. They help simplify complex networks so they are easier to understand and manage. Network diagrams are also useful communication tools for explaining networks to non-technical stakeholders.
Some common examples of networks shown in network diagrams include:
- Local Area Networks (LANs) like office networks
- Wide Area Networks (WANs) like corporate networks
- Computer networks like home networks
- Telecommunication networks like telephone systems
Now that we’ve covered the basics, let’s go step-by-step through creating a network diagram.
Step 1: Select a Network Diagram Template
The first step is choosing a pre-made network diagram template to build your diagram on top of. Using a template saves you time and effort compared to creating a network diagram from scratch.
There are many free network diagram templates available online you can download. I recommend using a vector-based template from a site like Lucidchart or Gliffy as they allow for easy customization.
Some things to look for in a good network diagram template:
- Symbols for common network components – Devices like routers, switches, servers, firewalls, and connections like wireless, wired.
- Flexible sizing and positioning – Ability to adjust the placement and size of symbols.
- Intuitive editing features – Easy to use editor for adding text, coloring, changing shapes.
- Professional appearance – Clean, visually appealing template design.
Once you’ve selected a suitable network diagram template, you can import it into your diagram software of choice to start building your diagram.
Step 2: Name the Network Diagram
Give your new network diagram a descriptive name based on the network you’ll be documenting.
For example, if you’re diagramming your home network, you could give it a name like “Smith Family Home Network”.
Naming your diagram makes it easy to identify and find later on. It also helps others understand what the diagram represents if you end up sharing or publishing it.
Step 3: Remove Unneeded Template Elements
Some network diagram templates come loaded with generic elements you won’t need for your specific diagram.
Take a few minutes to remove any unnecessary devices, connections, and text boxes from the template. This declutters the canvas and prevents confusion down the road.
Don’t worry about removing absolutely everything because we’ll be adding components back in the next steps. Just focus on getting rid of the main template elements that aren’t relevant.
Step 4: Add Network Components
Now it’s time to add symbols representing the different devices, servers, and connections in your network.
Use the palette of network symbols provided in your diagram software to drag and drop components onto the canvas. Arrange them into a layout matching your real network topology as closely as possible.
Common network components to include are:
- Clients – Computers, laptops, tablets, phones
- Servers – Web servers, database servers, application servers
- Network hardware – Modems, routers, switches, firewalls, access points
- Connections – Ethernet (wired), WiFi, LAN, WAN
Build up your diagram by adding all the relevant components needed to represent your actual network. Leave space between elements for connecting them together later.
Step 5: Name the Items in your Network Diagram
With all the main components in place, you should name each one to indicate its role in your network.
For example, you could have elements like:
- “Domain Controller Server”
- “Front Desk Workstation PC”
- “Internet Router”
- “CEO Laptop”
Naming things clearly is important for overall understanding of the network. It also helps identify specific components when maintaining the real network.
Aim to use descriptive, yet concise names. Being too wordy can clutter the diagram.
Step 6: Draw Connections Between Components
The next step is connecting together the components to illustrate the flows of data within the network.
Use the connection tools in your diagram software to link devices and servers to one another. Common examples:
- Ethernet cables connecting PCs to switches
- Lines connecting switches to routers and firewalls
- Wireless links between access points and endpoints
Make sure your connection lines accurately match the real physical or wireless connections present in the network you’re diagramming.
Tip: Use solid lines for wired connections and dashed lines for wireless.
Step 7: Add a Title and Share your Network Diagram
Finally, give your network diagram a title at the top such as “ABC Company Network” to indicate the overall network it represents.
Once complete, you can export your diagram as an image file or PDF to distribute to others. Some ways to share it:
- Email it to colleagues and stakeholders
- Print it out and post in the office
- Add it to documentation or reports
- Publish it on a website or intranet
And that’s it! Following these seven steps will get you from blank page to finished network diagram. Now you have a professional network diagram to help manage, maintain, and communicate about your network.
Network Diagram Examples
To help visualize what a finished network diagram looks like, here are a few examples:
Home Network Diagram
This diagram shows a simple home network with devices, connections, an internet router and modem:
![Home Network Diagram][]
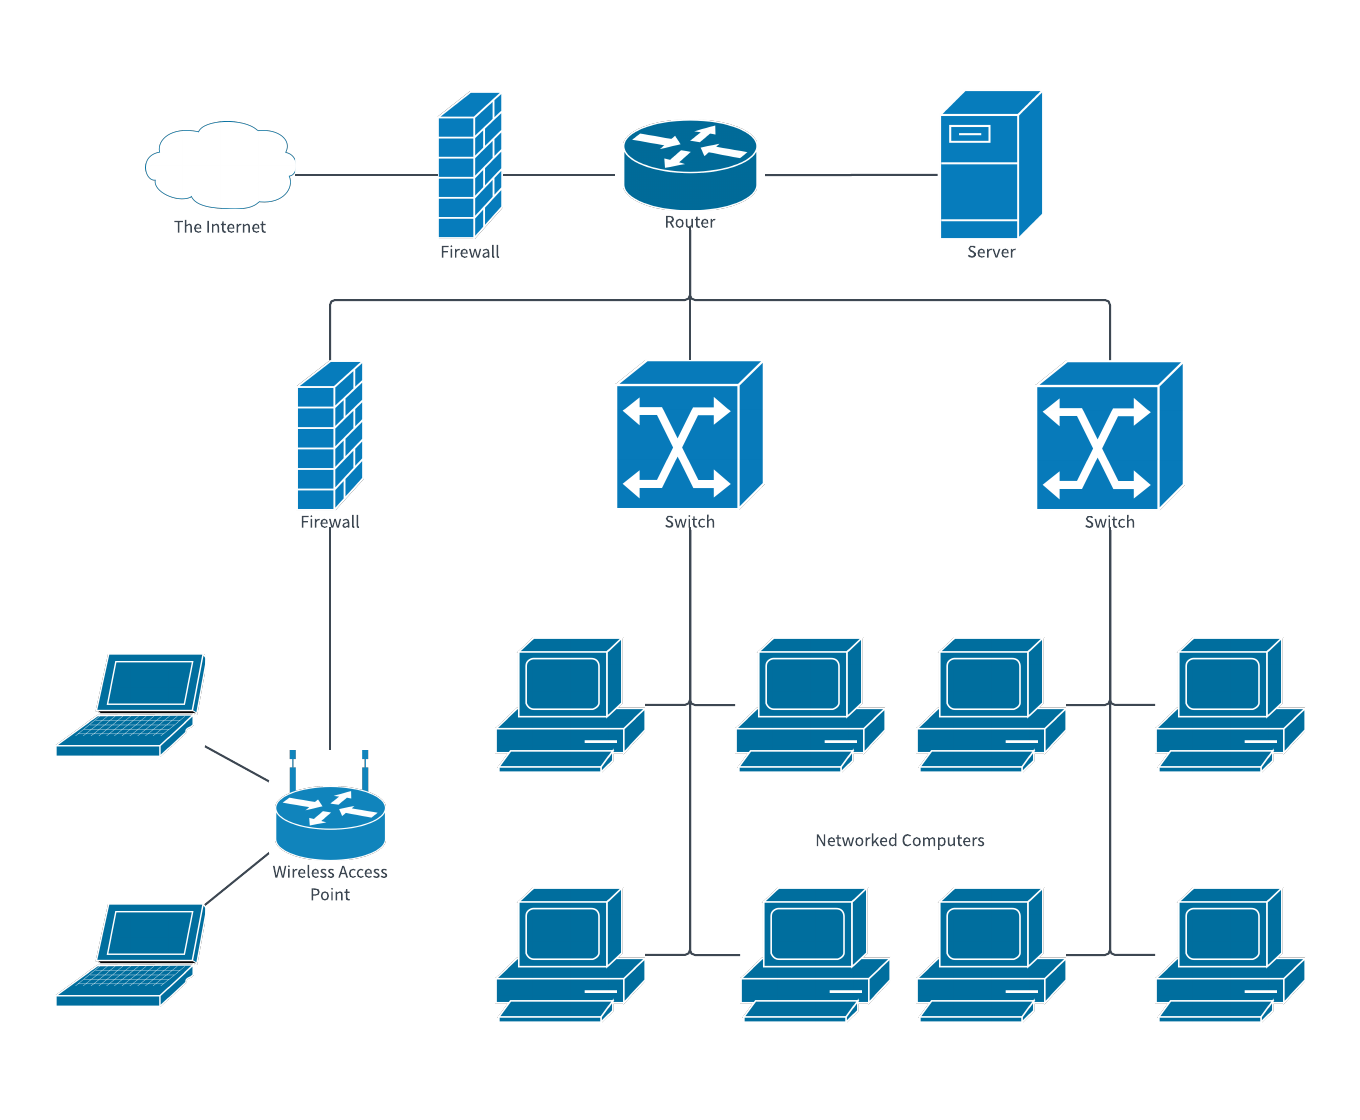
Office Network Diagram
A typical office setup with multiple wired and wireless networks:![Office Network Diagram][]
Worldwide Network Diagram
An international company’s global WAN connecting multiple sites:![Worldwide Network Diagram][]
As you can see, network diagrams can take many forms depending on the complexity and geo-distribution of the network. The steps outlined in this article will help you create a professional network diagram suitable for any type of network.
Benefits of Network Diagrams
Before we wrap up, let’s recap why network diagrams are so valuable:
- Simplify complexity – Makes even large, complex networks easy to visualize and understand at a glance.
- Documentation – Provides a detailed, up-to-date record of the network’s architecture, components, and connectivity.
- Communication – Allows IT to explain the network design to executives and other less technical stakeholders.
- Network management – Assists with managing, monitoring, and troubleshooting the real-world network.
- Planning – Aids in designing and rolling out future network upgrades and changes.
- Onboarding – Helps new employees quickly come up to speed on the company’s network environment.
Adopting the habit of creating network diagrams saves headaches down the road and keeps everyone on the same page with regards to your network infrastructure.
- Use a template to save time starting from scratch
- Remove unnecessary template elements
- Add and name devices, servers, and connections
- Draw lines representing network connectivity
- Give the finished diagram an informative title
- Share the diagram with stakeholders
With these steps, you can create professional-quality network diagrams to document any type of wired or wireless network. Network diagrams bring clarity to complexity and are an indispensable network management tool.
Creating layers for complexity
For more complex networks, creating layers can help in managing and organizing the information effectively.
Information Collection for Diagramming
Hardware and Software Inventory: Gathering a detailed inventory of the networks hardware and software is pivotal for creating a comprehensive network diagram.
Network topology: Understanding the layout and design of your network topology will influence how you represent the network in your diagram.
How to Create a Schedule Network Diagram in Excel
How do I create a network diagram?
Try Lucidchart. It’s quick, easy, and completely free. Just like networks, a network diagram can have a lot of elements depending on the complexity. It’s helpful to draw a network diagram on paper first. Start by listing all the components (cloud, servers, clients, mainframes, peripherals, hubs, routers, etc.) that will be part of the diagram.
Should I use a basic network diagram or a detailed network diagram?
You might find that it’s better to use the Detailed Network Diagram template instead of the basic network template, because it includes many more shapes for a larger variety of devices. Use connectors to show how the devices are linked. Use AutoConnect for basic connections and the Comm-link shape for wireless connections.
What is a basic network diagram template?
The basic network diagram template includes standard shapes for servers, computers, and other parts of your network. Use this template to document a network so people understand it, or to plan a network you’re going to build. To find the right template to start from, go to File > New and, in the search box, type Basic Network Diagram.
How do I create a network diagram in Visio?
Create a detailed network diagram in Visio linked to external data The Basic Network Diagram template includes shapes for computers, servers, routers, and other parts of a network. Use them to document existing networks and to plan new ones. Also run the Label Shapes add-on to show IP addresses in your network diagram.
