Accounting ledgers are an essential aspect of small business bookkeeping. As a small business owner, you need to be aware of all the transactions your business has completed in an accounting period. That’s where the general ledger comes into play.
A general ledger is one of the most important accounting tools for any business. It contains a comprehensive record of all financial transactions over the lifetime of a company. From cash receipts and payments to sales and purchases a general ledger provides a big picture overview of a business’s financial health.
With a general ledger, you can track money coming in and going out. You can analyze profits and losses You can spot trends and inconsistencies And you can generate financial statements like balance sheets and income statements. Essentially, a general ledger helps you manage your business’s entire financial ecosystem in one place.
While all businesses should maintain a general ledger, the process of creating one can seem daunting Luckily, it’s not as difficult as you might think In this guide, we’ll break down step-by-step how to make a general ledger template in Excel or Google Sheets using accounts you already have.
Let’s get started!
Step 1: Set Up Your Accounts
The foundation of a general ledger is the chart of accounts – a list of all the accounts that will be recorded in the ledger.
Start by making a table with the following columns:
- Account Number
- Account Name
- Normal Balance
The account number is a numeric code assigned to each account. The account name clearly identifies the account. The normal balance indicates if the account is typically debited or credited.
Next, set up each row with the necessary accounts. Here are some common ones:
- Assets (debit normal balance)
- Cash
- Accounts Receivable
- Inventory
- Equipment
- Liabilities (credit normal balance)
- Accounts Payable
- Credit Cards
- Loans
- Equity (credit normal balance)
- Common Stock
- Retained Earnings
- Revenue (credit normal balance)
- Sales
- Interest Income
- Expenses (debit normal balance)
- Rent
- Wages
- Utilities
Make sure to include all balance sheet and income statement accounts relevant to your business. You can always add or delete accounts later if needed.
Step 2: Add Columns for Recording Transactions
Once your chart of accounts is set up, you need to add columns to record transactions in each account over time. Add the following columns:
- Date
- Description
- Journal Entry #
- Debit
- Credit
- Balance
The date, description, and journal entry # columns will contain the transaction details. The debit and credit columns will show if the account was debited or credited. And the balance column will calculate the ongoing balance in each account.
You should also add rows between each account for entering transactions. Make sure to properly label the header row, dates, journal entry numbers, etc.
Step 3: Determine a Reporting Period
What reporting period do you want your general ledger to cover? A month? A quarter? A year? The period you choose depends on your preference and business needs.
Once you decide on a reporting period, enter it in the header along with the start and end dates. For example, your first general ledger could cover January 1, 2023 to January 31, 2023.
You can always add columns later to include additional periods. Having different sheets or tabs for each reporting period helps keep things organized.
Step 4: Enter Opening Balances
Before recording any transactions, you need to enter opening balances for each account. The opening balance is the amount in each account at the start of the reporting period.
For asset accounts with debit normal balances, the opening balance will be the debit amount carried over. For liability, equity, and revenue accounts with credit normal balances, the opening balance will be the credit amount.
Make sure you enter opening balances for every account, even if the amount is zero. This establishes the account baseline before any activity occurs.
Step 5: Record Transactions as They Occur
Now you’re ready to post transactions into the ledger! Record every business transaction in the appropriate account and column.
For each transaction:
- Enter the date of the transaction
- Provide a brief description (e.g. Utility payment, Accounts Receivable deposit)
- Assign a journal entry number for reference
- Input the debit amount(s)
- Input the credit amount(s)
- The balance column will auto-calculate
Double check that the debits equal the credits for each journal entry. They must balance to properly record the transaction.
Recording transactions takes diligence, but is vital. The more detail you provide, the better financial insights you’ll get from your ledger.
Step 6: Add Accounts as Needed
As your business evolves, you may find the need to add or remove accounts from your general ledger.
For example, if you take out a new term loan, you’ll need to add a “Notes Payable” account. Or if you paid off an equipment lease, you can delete that account.
Adjust the chart of accounts and ledger to match your current accounts. Just be sure to enter an opening balance if you add any new accounts.
Step 7: Reconcile Ending Balances to Sub-ledgers
To ensure accuracy, you need to tie-out your general ledger account ending balances to related sub-ledgers, like A/R and A/P. The amounts should match – if not, you have an error somewhere.
For example, at the end of the month, your Accounts Receivable balance per the A/R sub-ledger should equal the A/R balance in your general ledger.
If you find any discrepancies between your general ledger and sub-ledgers, dig into the details to determine where the error originated. Then make correcting entries as needed.
Step 8: Prepare Financial Statements
Your general ledger provides the raw data to generate critical financial statements, like an income statement and balance sheet.
To prepare financial statements:
- The income statement sums up revenue and expense accounts.
- The balance sheet summarizes asset, liability, and equity accounts.
Based on account classification and ending balances, you can easily pull in the totals. If using Excel, you can link cells to auto-populate for each reporting period.
Analyzing financial statements helps assess profitability and financial position. Your general ledger enables you to efficiently produce these statements.
Step 9: Close Out Accounts at Period End
After completing all end of period reconciliations, transactions, and statements, close out revenue and expense accounts.
Closing entries involve transferring net income or loss to retained earnings. This resets the revenue and expense balances to zero and prepares them for the next reporting period.
You’ll debit all expense accounts and credit all revenue accounts. You’ll also credit or debit net income from the income statement to retained earnings.
asset and liability accounts remain open and retain their balances. Only temporary accounts close.
Once you post closing entries, new transactions and activity will begin for the subsequent reporting period.
And that’s it! By following these 9 steps, you can create a complete general ledger template tailored to your business’s needs. A general ledger provides invaluable financial intel and serves as the foundation of your company’s accounting system. Taking the time to set it up properly will benefit your business for years to come.
Template Examples
If creating your own general ledger template from scratch seems too complex, start with a pre-built template. Here are a few easy-to-use options:
-
Simple General Ledger Template – Basic Excel template with columns for date, account, description, debit, credit, and balance.
-
Accounting General Ledger Template – Detailed Excel template with sections for assets, liabilities, equity, revenue, and expenses.
-
Small Business Ledger Template – Straightforward Google Sheets template designed for small business needs.
-
Monthly Ledger Template – Excel template that aggregates transactions by month for reporting.
Use these templates as a guide when constructing your own custom general ledger. They provide a pre-made structure while allowing flexibility to tailor to your exact business requirements. The templates above are all free to download and use!
Continue Tracking Finances Beyond the Ledger
A general ledger provides the core foundation for your business’s financial data. But supplementing it with additional tools can take your financial management to the next level.
For a bird’s eye view of your finances, try an Excel dashboard that displays metrics like:
- Cash balance
- Accounts receivable vs. accounts payable
- Sales and profitability metrics
- Budget vs. actuals
Other useful Excel tools include:
- Cash flow statement template
- Breakeven analysis
- Profit and loss template
- Budget variance analysis
- Payables and receivables aging reports
If Excel isn’t cutting it, upgrade to more robust accounting software like QuickBooks or Sage. Features like invoicing, reporting, and inventory management integrate directly with your central general ledger.
No matter what additional tools you use, always maintain a general ledger as the key source of truth for your finances. If you ever have questions on where money came from or went to,
Accounting ledgers defined
An accounting ledger is part of the bookkeeping system where a business records all its financial transactions. A business will create separate categories for such transactions – these are known as accounts. All account records of a company will be listed and contained within the general ledger, or principal book of accounts.
Chart of Accounts
A general ledger contains a chart of accounts. This chart is a list of all accounts that can be found within the ledger, and that are used by the business. Below is an example of the different accounts that are contained within a general ledger

By no means are these the only accounts that will show up in the ledger. As a business has an expansive list of accounts, you will need to make as many as required to track all types of transactions. For example, the asset accounts could contain cash in hand, cash in the bank, accounts receivable, prepaid expenses, real estate, machinery, inventory, and more.
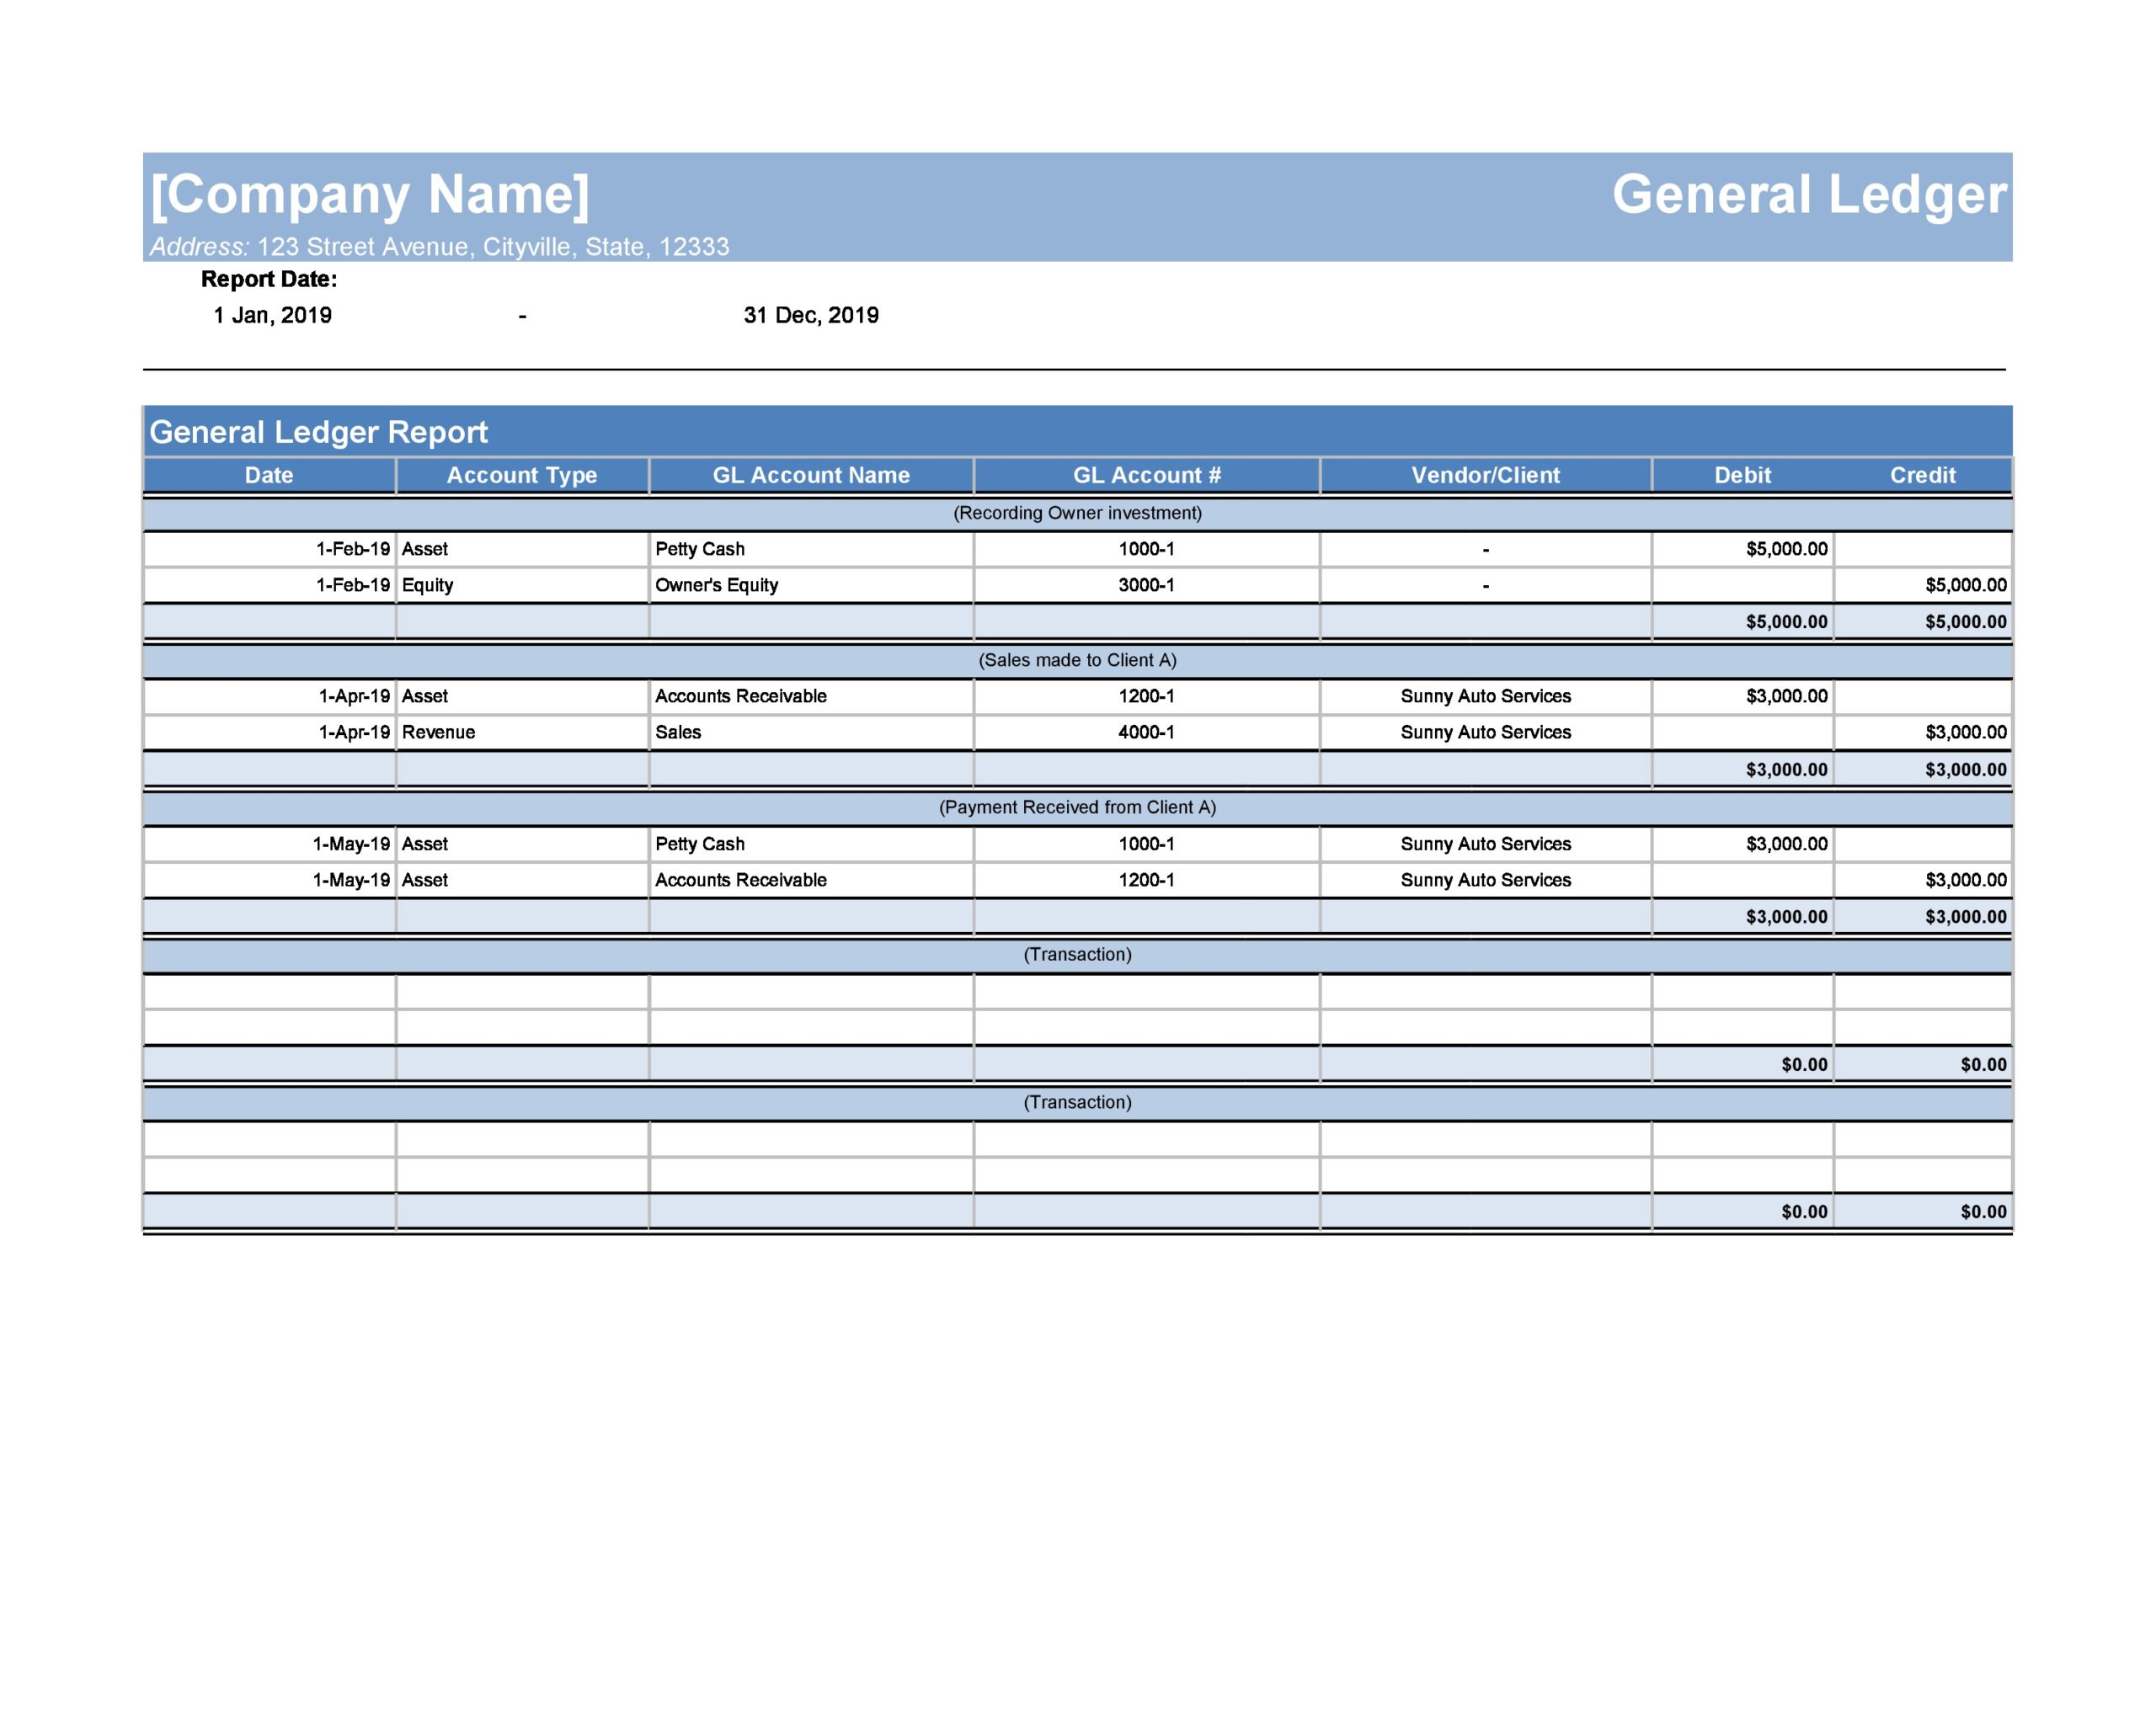
GENERAL LEDGER: Visual Guide to Posting Journals
How to create a ledger template?
The first step in creating a ledger template is the design phase. In this step, you need to make an outline or format for each page or ledger account. This design or structure is usually consistent for all accounts, so that they can easily be referenced and retrieved when needed.
What information should be included in a general ledger template?
To ensure that your company accounts for all of your debits and expenditures, a general ledger template should include the following details: Account Name: The name of the account for the line-item credit or debit figure. Account Number: The unique account number for the line-item credit or debit figure.
Where can I download a general ledger template?
Download free general ledger templates in Microsoft Excel and Word, Google Sheets and Docs, and Adobe PDF formats.
How do I create a general ledger sheet?
Create your general ledger sheet in seconds with the downloadable template from FreshBooks. Download your free general ledger template from FreshBooks. Pull all business records that contain the information you need to create your general ledger. Organize the data that you need to log in your general ledger sheet.
