Having an Excel customer feedback form will tell you how tasty and spicy ️ your sauce is. Beats asking people individually, any day, right?
So whether you want to survey customers, take client feedback, or collect data from employees, Excel forms can be handy.
We’ll also go over its limitations and suggest an alternative tool to create forms easily.This Article Contains:
Forms are a great way to collect structured data in Excel. Rather than having people manually fill out rows or cells, you can create custom forms with text boxes, checkboxes, dropdowns, and other intuitive form controls.
In this comprehensive guide, I’ll show you how to build forms of any kind using Excel’s built-in form controls
Why Use Forms in Excel?
Excel forms provide several key benefits:
- Make data entry simpler and more visual
- Reduce errors from manual data input
- Standardize data collection across teams
- Gather info through digital forms rather than paper
- Allow collecting data without Excel knowledge
- Enable collecting data from anyone via email
- Streamline the data analysis process
Whether you want to survey people, capture sales leads, or gather any other structured data, Excel forms are perfect for turning rigid spreadsheets into flexible data collection tools.
Designing Your Excel Form
The first step in building an Excel form is planning out what you want it to contain.
- What types of questions or fields do you need?
- Will questions allow open text, multiple choice, ratings, or other input types?
- How should fields be laid out visually?
- What custom formatting or design elements can improve clarity and appeal?
Sketch your ideal form on paper first so you have a template for recreating it in Excel.
Think through what spreadsheet data the form will populate and how it will be used downstream. Map out how form fields should write data into specific cells for easy analysis.
With your Excel form fully designed you’re ready to start building it.
Enabling the Developer Tab
To access Excel’s form controls, you first need to enable the Developer tab on the ribbon:
- File > Options > Customize Ribbon
- Check ‘Developer’ to display the tab
- Click OK
The Developer tab contains the controls to add forms to any worksheet.
Inserting Form Controls
All of Excel’s form controls are found on the Developer tab under Insert:
- Text Box – For text, numbers, dates, etc.
- Combo Box – Like a text box with dropdown menu.
- List Box – A dropdown list that allows multiple selections.
- Check Box – For binary yes/no or true/false choices.
- Option Button – Select one option from a group.
- Toggle Button – An on/off switch.
- Spin Button – Click up/down arrows to increase/decrease a number.
- Scroll Bar – Drag slider to choose within a set range.
- Label – Text labels for describing fields.
- Button – Triggers actions like clearing or submitting the form.
To add a form control to your sheet:
- Developer > Insert
- Select desired control
- Draw the control’s shape and size on the sheet
Repeat inserting controls until you have all needed form elements.
Configuring Control Settings
After inserting a form control, you can customize it via the right-click menu:
- Format Control – Colors, fonts, borders, alignment etc.
- Properties – Data linking, input types, limits, dynamic resizing etc.
- Size/Move – Precise positioning and dimensions.
Format Controls sets visual design like colors and text formatting. This menu makes controls stand out and match any theme.
Properties relates to control functionality – like linking a text box to a cell and limiting values. Properties ensures your controls gather and input data correctly.
The Size/Move menu finely tunes placement and dimensions as needed.
Linking Controls to Cells
The key step in building Excel forms is linking controls to cells so their inputs write to the sheet.
For example, you might link a text box to cell B3 so any text typed into it appears in B3. This lives updates the sheet through the form.
To link a control to a cell:
- Right-click the control > Properties
- Click in the cell link field
- Select the target cell on the sheet
- Click OK
Now this control will populate the linked cell. Repeat this linking for every form element to compile submissions into your sheet.
Protecting Cells and the Sheet
Once your form controls are linked to cells, best practice is locking down the sheet:
- Select all cells not linked to controls
- Right click > Format Cells
- Enable locked and hidden
- Repeat for the whole sheet
- Review Review > Protect Sheet
- Enable locking
This protects your actual data cells from manual changes so only the form controls update the sheet.
Testing and Adjusting the Form
Don’t assume your Excel form works perfectly right away. Thoroughly test it yourself to catch any errors:
- Try filling out each control and verify correct cell population
- Check for any overlap or formatting issues
- Confirm all data writes to the intended cells without issues
- Make sure your sheet protection is configured correctly
Refine both form design and functionality until everything works precisely as intended every time.
Collecting Form Data From Users
Once your Excel form is completed and thoroughly tested, it’s ready for real data collection. There are two main ways to gather submissions:
1. Share the Form File
Have users directly open the Excel workbook and fill in the form sheet. This works well for internal data collection across a team or department.
You can compile submissions in one master workbook or have people submit separate form copies and consolidate data later.
2. Embed in a Web Page
Insert your form sheet into an HTML web page that users access online to submit data. This can collect info from anyone across a company or the general public.
Use page logic to compile submissions into a master Excel file on the backend.
The method depends on your use case. Both options allow efficiently gathering structured data at scale through Excel forms.
Analyzing Form Data
The payoff for building Excel forms comes when you actually start collecting and analyzing real data.
With submissions compiling on the backend, you can leverage all of Excel’s powers – formulas, pivot tables, charts, etc. – to gain insights.
For example, you might:
- Track submission volumes and trends over time
- Create leaderboards of top performers if collecting rankings
- Pull quick stats like counts, averages, max, min etc.
- Build dashboards to monitor submissions and results
- Apply conditional formatting for easy visual analysis
- Filter, sort, and slice the data any way you need
And much more. The options for analyzing form data are virtually endless!
Expanding Form Impact with VBA
For even more control and customization, you can use VBA macros to further enhance your Excel forms:
- Add logic to manipulate data on submit
- Create dependent dropdown lists
- Pre-validate entries before submitting
- Pull in data from external sources
- Apply calculations not possible in plain Excel
- Set up multi-step form workflows
- Auto-email someone each time a form is submitted
The macro possibilities are wide open. Power users can truly customize and supercharge forms with VBA.
Form Options and Alternatives
Excel forms provide a quick, easy way to gather data directly into spreadsheets. But they aren’t the only option:
- Microsoft Forms – Part of Office 365, great for simple surveys and quizzes.
- Google Forms – Free and easy but data lives in Google Sheets.
- SurveyMonkey – Feature-rich paid online surveys.
- Wufoo, JotForm – Online form builders, some free plans available.
Evaluate if these dedicated form tools may suit your use case better. But for maximum Excel integration, Excel’s own forms can’t be beat.
Top Form Tips and Tricks
Here are a few pro tips for creating even more powerful Excel forms:
- Splash in color, fonts, images to make forms appealing.
- Float controls over data cells so inputs appear nicely merged.
- Name controls for easy selection with the Name Box.
- UseSpin Buttonsfor number ranges like rankings.
- Limitinput lengthand numeric rangesto prevent errors.
- Add data validationto alert improper entries.
- UtilizeList Boxes andCheck Boxes for multi-select options.
- Allow option buttons ina group for mutual exclusivity.
- Resize form elementsto be large and finger-friendly.
- Provide clear Label descriptionfor each control.
- Use Buttoncontrols for multi-page form navigation.
- Link submit buttons to clear or email actions with macros.
The more you experiment, the more capabilities you’ll discover.
Unleash the Power of Excel Forms
On their own, Excel forms provide a simple yet powerful way to make data collection painless. Combined with VBA macros for advanced logic plus all of Excel’s native analysis tools, they become an unbeatable data powerhouse.
So next time you need to gather standardized data, skip the paper and unleash the potential of Excel forms. Just follow the steps in this guide to start building out the exact forms you need.
In no time, you can deploy custom Excel forms that provide immense flexibility. Forms unlock simple data collection from anyone while integrating
What are the benefits of using an Excel data entry form?
Now Excel isn’t easy.
Its endless cells make it difficult to know where to feed what data.
Like trying to understand what ‘mild’ means when all you know and love is spicy sauces!
This is why people use Excel forms to make quick data entries in the right fields without scrolling up and down the whole worksheet.
No more entering data into an Excel spreadsheet row after row after row after row…
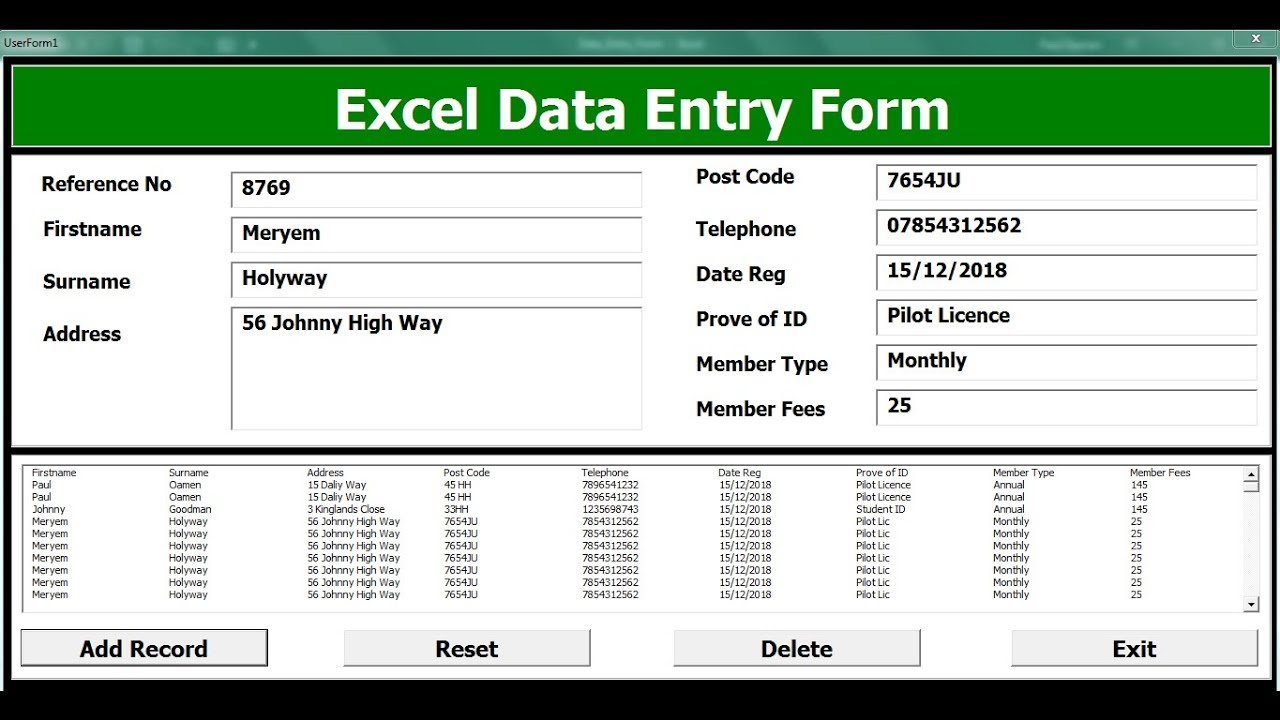
An Excel data entry form lets you:
- View more data without scrolling up and down
- Include data validation
- Reduce chances of human errors
Sounds quite helpful. So let’s learn how to create an Excel form.
![]()
Step 5: Start collecting data
You can now collect data using any of these options:
- Ask customers to fill the form by sharing the Excel file with them. Invite them using their email address or copy and share the spreadsheet link
- Send a copy of the form as an email attachment
- Fill in the data yourself as the customers give you feedback
You’ll find all these options by clicking on share on the top right corner of your sheet.

Note: This process is different from creating a custom form using Excel VBA (Visual Basics for Application). Excel VBA is a Microsoft Excel programming language used to automate tasks and perform other functions such as create a text box, userform, etc.
The Excel VBA user form isn’t an ideal option since it’s even more complicated to set up.
Bonus: Use Jotform to create forms!
![]()
