The tutorial shows how to use data tables for What-If analysis in Excel. Learn how to create a one-variable and two-variable table to see the effects of one or two input values on your formula, and how to set up a data table to evaluate multiple formulas at once.
You have built a complex formula dependent on multiple variables and want to know how changing those inputs changes the results. Instead of testing each variable individually, make a What-if analysis data table and observe all possible outcomes with a quick glance!
As an Excel user you likely handle tons of data on a regular basis. Excel is a powerful tool for organizing, calculating and analyzing data. One great feature that you may not be taking full advantage of is Excel data tables.
Data tables allow you to perform what-if analysis on your data sets By inputting different values in the data table, you can simulate how those changes will affect the calculations in your spreadsheet. This allows you to model different scenarios without altering your original data set
Data tables are extremely useful for financial and scientific modeling, forecasting, and any other applications where you need to test the impact of variable inputs. They make it easy to see how different values affect the bottom line results.
In this post, I’ll walk you through the quick and easy steps to create a data table in Excel. I’ll also demonstrate some examples so you can see just how helpful data tables can be. Let’s get started!
How to Make a Data Table in Excel in 5 Simple Steps
Here is a step-by-step guide to creating a data table in Excel:
1. Select a Cell Within Your Data
Start by selecting a blank cell where you want the results of your data table to appear. This cell should be within your existing data set.
For example, if you want to see how different sales projections affect your total profit, select a blank cell in your profits column.
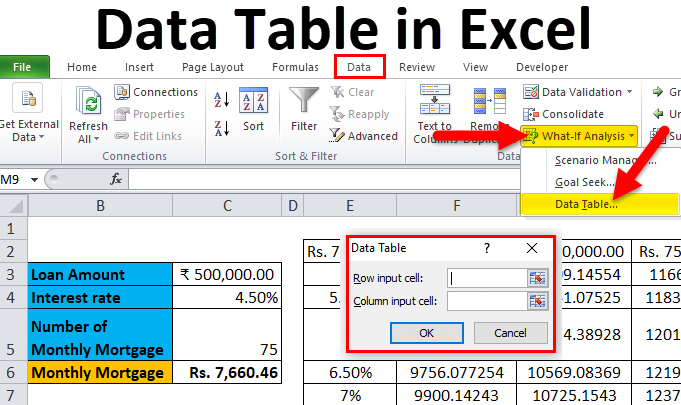
2. Go to the Formulas Tab and Click ‘What-If Analysis’
Go to the Formulas tab in the Excel ribbon. In the Data Tools section, click the ‘What-If Analysis’ button and select ‘Data Table’ from the drop down menu.
3. Input the Cell References for Your Data Table
In the Data Table dialog box, you’ll input your variable cell references.
The Row Input Cell is the cell containing the value you want to change in your scenario. The Column Input Cell is the formula cell you want to determine the outcome for based on the row value.
So for our sales projection example, the Row Input Cell would be a cell containing the sales amount. The Column Input Cell would be the formula calculating total profit based on sales.
4. Designate if the Table Has Column or Row Headers
Check the box for whether your data table has column headers, row headers, or both. Headers help identify the variables and scenarios.
5. Confirm the Cell Range and Click OK.
Verify the cell range for your data table includes all the cells you want to include. Then click OK to generate the data table.
And that’s it! By following those 5 steps you can quickly create a data table in Excel to model different scenarios for your data.
Next, let’s look at some specific examples of how to use data tables for financial and scientific modeling.
Financial Modeling with Data Tables
Data tables are extremely useful for financial modeling and sensitivity analysis. By testing different input values in your financial models, you can gain valuable insights into business performance under different conditions.
Here’s an example of using a one-variable data table to analyze profit for different sales projections.
First, we’ll input a base sales number and use formulas to calculate profit. In this case, profit is equal to revenue (which is based on sales volume) minus fixed and variable costs.
Next, we’ll select the cell where we want the results of our scenario projections to appear. Then we’ll create the data table, inputting the sales volume cell for the row input, and the profit formula cell for the column input.

Now we can easily see the potential profit for sales volumes ranging from $100,000 to $500,000. This allows us to model optimistic, pessimistic, and most likely scenarios. We could also add conditional formatting to visualize the results.
By toggling different input values, you can instantly see updated profit projections and determine break-even points. This is much faster than manually creating separate models for each scenario.
Data tables make it easy to assess the impact of multiple variables too. For example, you could add pricing along with sales volume to model how profit would be affected by changes in both of those key drivers.
Scientific and Engineering Modeling with Data Tables
Data tables aren’t just for financial models. They also lend themselves well to scientific, engineering, and other technical modeling applications.
For example, let’s say we have an engineering model that calculates the stress on a structural joint based on width, thickness, and yield strength of the materials.
We could input baseline values for each of those parameters and then use a data table to see how the stress level changes as we alter the dimensions and material properties.
To do this, we would designate cells containing the width, thickness, and yield strength values as the row input cells. The cell containing the formula to calculate stress would be the column input.
The data table would then allow us to simulate the effects of using different materials and dimensions to see which design options keep stress within safe operating limits.

This approach facilitates design optimization and sensitivity analysis to identify which inputs have the greatest impact on performance.
Tips for Effective Data Tables
Here are some tips to help you get the most out of Excel data tables:
- Use descriptive headers – Include headers to label your row and column variables for easy interpretation of the data table results.
- Check formulas and formatting – Ensure your base formulas are correct before generating the data table, and format the results for easy visualization.
- Focus on key inputs – Keep your data tables simple by only including the most essential input variables. Too many variables can muddle the analysis.
- Compare multiple scenarios – Create separate data tables to model both best and worst case scenarios to get a robust view of potential outcomes.
- Combine with goal seek – Use Excel’s Goal Seek feature alongside data tables to hone in on specific target output values.
Common Data Table Applications
To summarize, here are some of the most common uses of data tables for simulation modeling:
- Sales forecasting and profitability analysis
- Budgeting and financial projections
- Cost-benefit analysis
- Product pricing analysis
- Engineering design optimization
- Process improvement analysis
- Scientific modeling and predictions
- Economic and statistical analysis
- Mathematical modeling
Any context where you need to assess the impact of changing input assumptions can benefit from data table simulation.
Data tables are a dynamic tool for interrogating how different variable inputs influence your models and projections. By letting you instantly generate results for multiple scenarios, data tables enable robust what-if analysis.
The next time you’re working with an Excel model, give data tables a try. The quick set-up steps make it easy to start testing assumptions and identifying sweet spots in your models. Data tables bring your models to life by allowing interactive simulation that would be difficult through manual scenario building.
How to make a two variable data table in Excel
A two-variable data table shows how various combinations of 2 sets of variable values affect the formula result. In other words, it shows how changing two input values of the same formula changes the output.
The steps to create a two-variable data table in Excel are basically the same as in the above example, except that you enter two ranges of possible input values, one in a row and another in a column.
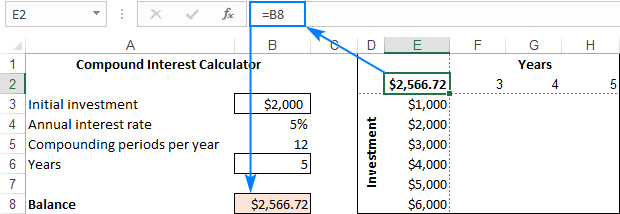
To see how it works, lets use the same compound interest calculator and examine the effects of the size of the initial investment and the number of years on the balance. To have it done, set up your data table in this way:
- Enter your formula in a blank cell or link that cell to your original formula. Make sure you have enough empty columns to the right and empty rows below to accommodate your variable values. As before, we link the cell E2 to the original FV formula that calculates the balance:
=B8 - Type one set of input values below the formula, in the same column (investment values in E3:E8).
- Enter the other set of variable values to the right of the formula, in the same row (number of years in F2:H2). At this point, your two variable data table should look similar to this:
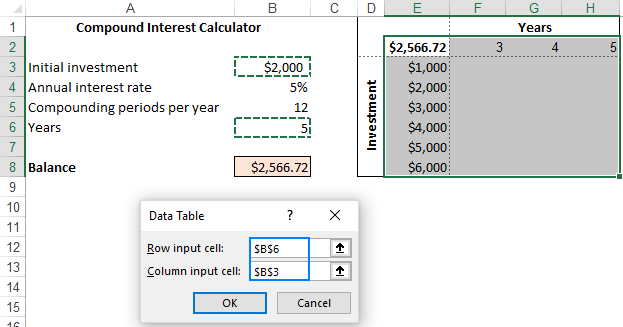
- Select the entire data table range including the formula, the row and column of the variable values, and the cells in which the calculated values will appear. We select the range E2:H8.
- Create a data table in the already familiar way: Data tab > What-If Analysis button > Data Table…
- In the Row input cell box, enter the reference to the input cell for the variable values in the row (in this example, its B6 containing the Years value).
- In the Column input cell box, enter the reference to the input cell for the variable values in the column (B3 containing the Initial Investment value).
- Click OK.
- Optionally, format the outputs the way you need (by applying the Currency format in our case), and analyze the results:

What is a data table in Excel?
In Microsoft Excel, a data table is one of the What-If Analysis tools that allows you to try out different input values for formulas and see how changes in those values affect the formulas output.
Data tables are especially useful when a formula depends on several values, and youd like to experiment with different combinations of inputs and compare the results.
Currently, there exist one variable data table and two variable data table. Although limited to a maximum of two different input cells, a data table enables you to test as many variable values as you want.
Note. A data table isnt the same thing as an Excel table, which is purposed for managing a group of related data. If you are looking to learn about many possible ways to create, clear and format a regular Excel table, not data table, please check out this tutorial: How to make and use a table in Excel.
How to use the Data Table in Excel
How to create a two variable data table in Excel?
To create a two variable data table, execute the following steps. 1. Select cell A12 and type =D10 (refer to the total profit cell). 2. Type the different unit profits (highest price) in row 12. 3. Type the different percentages in column A. 4. Select the range A12:D17.
How to create a table in Excel?
Find the ‘Insert’ tab at the top of Excel. This is where you’ll find the option to create your table. The ‘Insert’ tab is like the magic wand of Excel – it’s where a lot of the cool features are hidden! After clicking on ‘Insert’, you’ll see an option for ‘Table’. Click on it, and a dialog box will appear. This is where things start taking shape.
What is a data table in Excel?
An Excel Data table is a What-if Analysis tool. It allows users to use different input values for a variable and assess the changes to the output value. These are especially of help if you are operating a formula in Excel where the output depends on several variables. And you are keen to compare the results for different inputs to the formula.
How do I add data to a table in Excel?
You’ll be able to add your data in a table from the Insert tab. Follow these steps to get your data into a table! Select a cell inside your data. Select the Table command in the Tables section. This is going to open the Create Table menu with your data range selected.
