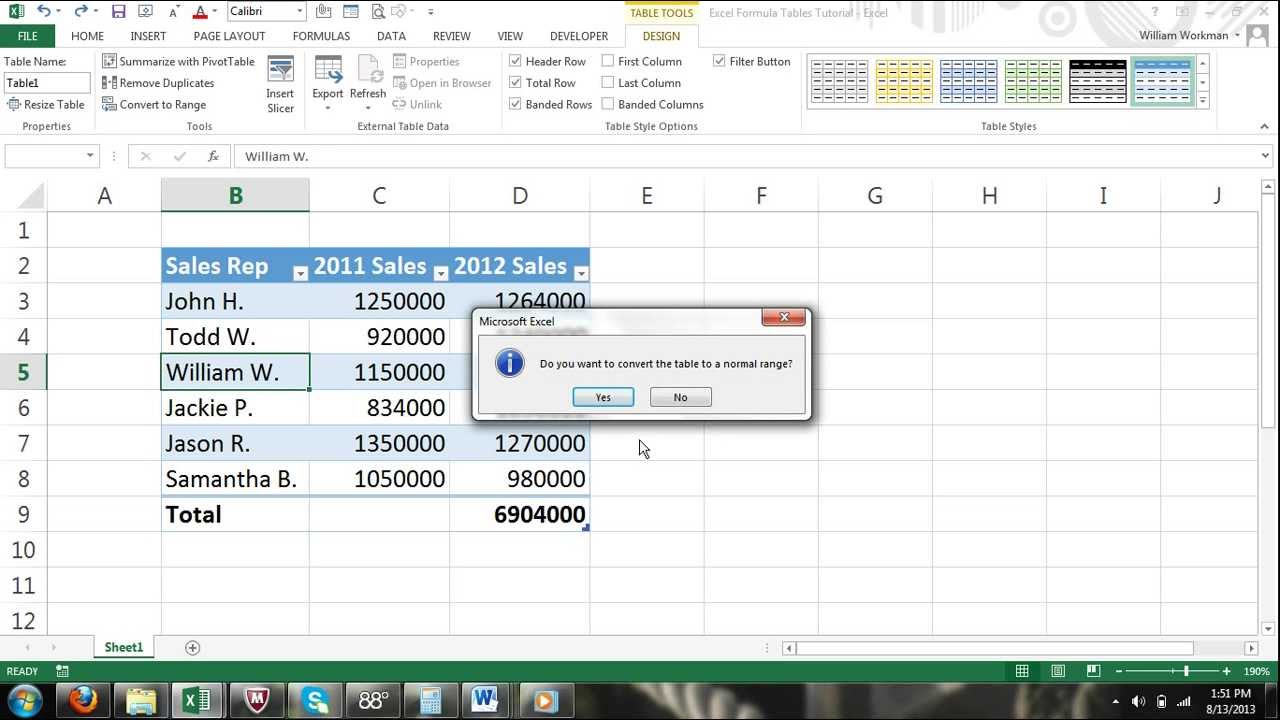
Tables can be converted to ranges by selecting a cell in the table range and clicking on the Convert to Range command.
The command to convert to range is found in the Table Design tab, in the Tools group.
Working with data in Excel? You’ve probably used Excel’s table feature before Tables make it easy to manage, analyze, and visualize your datasets.
But sometimes, you may want to convert a table back to a normal range. Why? Here are some common reasons:
-
You no longer need the table features like filtering and don’t want to deal with structured references in formulas.
-
You want to perform advanced operations like array formulas which don’t work in tables.
-
You need to link Excel data to other applications and tables often cause issues,
-
You simply want more control and flexibility over your data formatting
Fortunately, converting a table to range in Excel is easy. In this step-by-step guide, I’ll show you exactly how to do it in Excel for Windows and Mac.
When Should You Convert a Table to a Range in Excel?
Before jumping into the conversion steps, let’s first go over a few cases when you may want to ditch the table and convert it to a regular range:
1. You Need More Flexibility with Data Formatting
One major limitation of Excel tables is – you can’t freely modify formatting of individual cells. The table style formatting applies to the entire dataset.
For example, if you apply bold formatting to a cell, the entire column adapts that same bold formatting.
This can be annoying if you want more control over customizing certain parts of your data. Converting to a range gives you that flexibility.
2. You Want to Use Formulas Like Array Formulas
Some formulas like array formulas don’t work in Excel tables. Since tables auto-expand when new data is added, array formulas may return unexpected results.
So if you need to use array formulas or other volatile formulas, consider converting your dataset to a range first.
3. Linking Table Data to Other Applications Causes Problems
Trying to link your Excel table data to other applications like Word or PowerPoint? It often creates issues with refreshing the linked data.
The problem happens because the table references change as you add or remove data from the table. Converting it to a normal range fixes this.
4. You No Longer Require Table Features Like Filtering
Excel table features like filtering, total rows, banded columns are great time-savers.
But if you no longer need them, converting your table to range removes those additional features and gives you a compact dataset.
Step-by-Step Guide to Convert a Table to Range in Excel
Without further ado, let’s go through the step-by-step process to convert your data from an Excel table to a normal range.
The exact steps are slightly different in the Windows and Mac versions. So be sure to follow the specific instructions for your Excel version.
Convert Table to Range in Excel for Windows
-
Select any cell within your Excel Table.
-
Go to the Table Design tab on the ribbon.
-
In the Tools group, click on the ‘Convert to Range’ button.
Alternatively, you can right-click on the table and select ‘Table’ > ‘Convert to Range’ from the context menu.
-
A confirmation popup will appear. Click ‘Yes’ to convert the table to range.
That’s it! Your Excel table is now a normal data range.
Let’s also quickly see how to convert a range to table in Excel for Windows:
-
Select the data range that you want to convert to a table (including headers).
-
Go to the Insert tab on the ribbon.
-
Click on the Table button and select a table format.
Easy, right? Now let’s see how to convert tables in the Mac version.
Convert Table to Range in Excel for Mac
The steps for Mac users are quite similar:
-
Select any cell within your Excel table.
-
Click on the Table tab in the ribbon.
-
Click on ‘Convert to Range’ button to change the table to range.
-
A confirmation dialog will appear. Click ‘Yes’.
To convert a range to table, here are the quick steps:
-
Select the data range including headers.
-
Go to the Table tab and click the ‘Format as Table’ button.
-
Pick a table format from the gallery.
That’s all you need to convert tables and ranges on Excel for Mac!
Convert Table to Range in Excel Online
If you’re using the online browser version – Excel Online, here are the steps to convert table to range:
-
Right-click any cell within the Excel table.
-
Select ‘Table’ from the context menu and click on ‘Convert to Range’.
-
Done! Your table is now a normal range in Excel Online.
What Happens When You Convert a Table to Range in Excel?
When you convert table to range, a few things happen:
-
The table style formatting like banded rows, headers is retained. But you now have more control.
-
The Total Row if any will be removed.
-
Filter buttons on headers go away. You’ll have to add filters manually.
-
Structured references used in formulas convert back to regular cell references.
-
The table name is removed so you can’t use it in formulas or references.
-
The table AutoCorrect options for headers turn off.
-
The Table Design and Tools contextual tabs disappear from the ribbon.
In essence, converting a table back to range removes all the special table features like filtering, totals, and structured references. But your data and some of the formatting is retained.
Keep, Remove, or Change Formatting When Converting Table to Range
By default, Excel keeps the table style formatting like banded rows and header styles when you convert it to a range.
But you have options:
-
To remove all formatting, select the entire range and choose ‘Normal’ style from the Home tab.
-
To remove just the banded rows, go to the Table Design tab and turn off Banded Rows.
-
To keep most formatting but change certain elements like font sizes or colors, use the Format Painter to copy over selective formatting.
Things to Remember When Converting Tables to Ranges
Here are some key points to keep in mind:
-
Converting a table to range cannot be undone. You’ll have to re-create the table from scratch.
-
It’s a good idea to create a backup of your data before converting tables.
-
Be prepared to re-apply filters, totals, column formatting after the conversion. The table features will be permanently removed.
-
All structured references will change to regular cell references, so double check formulas using table names.
-
Linked data from a table may need to be re-established after converting to range.
Common Issues with Converting Tables to Ranges
Though the conversion process is usually smooth, here are some hiccups that may happen:
-
You may get a circular dependency warning after conversion if there are formulas referring to the table name.
-
Some table formatting like font colors may remain only in the header row and not the entire range.
-
Number formatting like Accounting style can sometimes get changed back to the default General format.
-
Occasionally you may see #REF! errors in formulas referring to table name ranges like TableName[Column1].
-
External links with the Excel table can break and may require re-linking after conversion.
Fortunately, these are easy to fix. Just be vigilant about data validation, formatting, and formulas when you convert tables to ranges in large complex workbooks.
Convert Range to Table Again After Conversion
Made a mistake converting your Excel table to range? Don’t worry, you can easily convert it back!
To convert a range to table again, just follow these simple steps:
On Windows:
- Select your entire dataset including column headers
- On the Insert tab, click the Table button
- Pick a table format
On Mac:
- Select your entire dataset including column headers
- On the Table tab, click Format as Table
- Choose a table style
And your Excel range will now become a table again!
Just be warned, any table formatting that was deleted like banded rows, filters will need to be reapplied after this point.
Alternatives to Converting Tables to Ranges
Instead of fully converting tables to ranges, you also have a couple of alternative options:
-
Convert table to range but keep the formatting intact using ‘Paste Special’ > ‘Values and Number Formatting’ option.
-
Remove the filter buttons but keep the table structure using table AutoCorrect options.
These allow you to retain some of the table benefits while still being able to freely edit and format the dataset.
Expert Tips for Working with Tables and Ranges
As a power Excel user, mastering both tables and ranges will improve your data analysis skills.
Here are a few expert tips:
- Use ranges when you need precision formatting or formulas like arrays. Switch to tables for quick insights.
Tutorials Tutorials filter input
W3Schools offers a wide range of services and products for beginners and professionals, helping millions of people everyday to learn and master new skills.
Excel Data Analysis
Tables can be reversed and converted back to range.
Tables can be converted to ranges by selecting a cell in the table range and clicking on the Convert to Range command.
The command to convert to range is found in the Table Design tab, in the Tools group.
How to Convert a Table to a Normal Range in Excel
How to convert a data table to a normal range in Excel?
Convert a data table (Excel table) to a normal cell range in Excel. There are two necessary steps for changing your table to a normal range (the numbers are corresponding to the picture): Click on a cell within the Data Table. The yellow Table Tools (“Design”) ribbon is now visible. Click on it.
How do I convert a table to a range?
Click anywhere in the table and then go to Table Tools > Design on the Ribbon. In the Tools group, click Convert to Range. Right-click the table, then in the shortcut menu, click Table > Convert to Range. Note: Table features are no longer available after you convert the table back to a range.
How do I convert a cell to a range in Excel?
Select any cell within the table, and you can then do one of two things. Your first option is to, on the Table Design tab that displays, click “Convert to Range” in the Tools section of the ribbon. The second method is to right-click, move your cursor to Table in the shortcut menu, and select “Convert to Range.”
How do I convert sales data to a range in Excel?
Say you have the following table with sales data and want to convert it to a normal range. To convert this table to a data range, first click anywhere in the table. In the Ribbon, go to the Table Design tab, and click on Convert to Range. As a result, you have the same data, but it’s no longer set up as an Excel table.
