In this tutorial, you will learn a variety of methods to compare Excel files and identify differences between them. See how to open two Excel windows side by side, how to use Excel formulas to create a difference report, highlight differences with conditional formatting, and more.
When you have two similar Excel workbooks, or better say two versions of the same workbook, whats the first thing you usually want to do with them? Right, compare those files for differences, and then probably merge them into a single file. In addition, workbook comparison can help you spot potential problems like broken links, duplicate records, inconsistent formulas or wrong formatting.
So, lets have a closer look at various methods to compare two Excel sheets or entire workbooks and identify differences between them.
As an Excel power user, you likely need to compare Excel spreadsheets and identify differences on a regular basis. Whether it’s comparing budget drafts, sales projections or data analysis, efficiently spotting changes between Excel files is a crucial skill.
In this comprehensive guide, I’ll share numerous tips, tricks, and techniques to compare two or more Excel spreadsheets quickly and accurately. You’ll learn how to:
- Visually compare sheets side by side
- Use Excel’s Spreadsheet Compare tool
- Identify differences with conditional formatting
- Compare files with VLOOKUP and IF formulas
- Find and highlight changes and discrepancies
Let’s dive in!
Why Compare Excel Spreadsheets?
Here are some of the top reasons you’ll want to compare Excel workbooks and sheets:
- Spot changes between sheet versions and drafts
- Identify data inconsistencies
- Check for errors and formula differences
- Analyze project status and progress
- Validate data imports and exports
- Ensure data is copied correctly between files
Catching differences early accelerates your analysis and decision making
Prepare Files for Comparison
Before comparing spreadsheets, take a few minutes to prepare your files:
-
Put files side-by-side – Open all files so you can toggle between them.
-
Check for blank rows/columns – Add or remove blank rows so data aligns between sheets.
-
Verify cell formatting – Use consistent formatting and layouts between sheets.
-
Show all hidden sheets – Unhide any hidden sheets since they’ll impact comparisons.
-
Save backups – Save a backup copy of files before making any changes.
Visually Compare in Excel
The simplest way to compare Excel sheets is to place them side-by-side and visually scan for differences.
View Side-by-Side
Excel’s View Side-by-Side mode lets you view two sheets from different files at the same time.
To use it:
-
Open one spreadsheet normally and the second file in a new window (Window > New Window).
-
Go to View > View Side-by-Side.
-
Select the Arrange All button to organize the windows horizontally or vertically.
-
Toggle through sheets and scroll while inspecting for differences.
Split the Window
To compare two sheets in the same file, use Window > Split to divide the window into two panes. Now you can see both sheets at once!
Leverage Spreadsheet Compare
For robust comparisons, take advantage of Excel’s Spreadsheet Compare tool. Here’s how to use it:
-
Go to the Add-Ins tab and click Compare Files.
-
Select the two files to compare.
-
Pick which elements to compare like cell values, formatting, formulas, etc.
-
Review the color-coded differences side-by-side or see a changes summary.
-
Drill into each change to inspect and validate it.
Use this efficient tool to catch variations between version drafts, surface data mismatches, and verify formula accuracy.
Compare with Formulas
Excel formulas offer another excellent way to compare sheets and identify differences.
VLOOKUP
You can check if a value exists between sheets with VLOOKUP. For example:
=IF(ISNA(VLOOKUP(A1,Sheet2!$A:$B,2,FALSE)),"New Value in Sheet1","Matches Sheet2")
This displays “New Value in Sheet1” if the lookup finds no match for the cell reference.
IF Statement
Quickly flag differences using an IF formula that compares values in the same cell reference across sheets.
=IF(Sheet1!A1=Sheet2!A1,"","Difference in Cell A1")
An IF statement lets you take action when values between sheets don’t match up.
Highlight Differences with Conditional Formatting
Conditional formatting is a handy way to highlight differences between sheets in Excel.
To quickly add it:
-
Select the cells to check.
-
Make a new conditional formatting rule based on whether the cell value differs from that cell reference in the other sheet.
-
Set formats like font color or cell fill to make differences obvious.
Now you can visually scan for highlighted differences instead of flipping between sheets!
Compare Large Datasets
For large datasets, comparing cell-by-cell isn’t realistic. Here are two approaches that can help:
-
Consolidate unique values – Use the Remove Duplicates tool to consolidate each sheet into rows containing only unique values. Then compare these condensed lists.
-
Compare subtotals – Add Subtotal fields like sum or count for key fields in each sheet. Compare the subtotals to catch discrepancies.
Top Tips for Sheet Comparison
Follow these pro tips for smoother Excel spreadsheet comparisons:
-
Start simple. Visually compare in View Side-by-Side before anything advanced.
-
Be methodical. Move cell-by-cell and use a checklist to mark what you’ve compared.
-
Validation formulas. For key fields like IDs, add ISERROR or other validation formulas to catch invalid data.
-
Sort before comparing. Sort sheets identically so data is in the same order.
-
Compare across files. Include IF formulas that reference another file to validate links.
-
Check external links. Update and check external links that may cause changes.
-
Document your process. Note down comparison steps taken to aid in change analysis.
Put It All Together
As you can see, Excel provides numerous effective ways to compare spreadsheets, from the visual methods to advanced formulas and tools.
Here are some best practices to follow when comparing workbooks:
-
Spot check important fields and formulas even if using automated tools.
-
Be systematic – have a process to ensure no data points get missed.
-
Use difference highlighting as a visual aid but understand why a change occurred.
-
Validate that changes make sense and update documentation.

Synkronizer Excel Compare: 3-in-1 tool to compare, merge and update Excel files
The Synkronizer Excel Compare add-in can quickly compare, merge and update two Excel files saving you the trouble of searching for differences manually.
If you are looking for a quick and reliable method to compare two Excel sheets or workbooks, you will certainly find helpful the following features of Synkronizer Excel Compare:
- Identifying the differences between two Excel sheets.
- Combining multiple Excel files into a single version without producing unwanted duplicates.
- Highlighting the differences in both sheets.
- Showing only the differences that are relevant to your task.
- Merging and updating the sheets.
- Presenting detailed and easy to read difference reports.
To get some basic idea about Synkronizer Excel Compares capabilities and performance, lets carry out a couple of field tests.
Supposing you are organizing some event and, in your Excel table, you gather information about the participants such as a participant name, arrival date, number of seats, etc. Also, you have a couple of managers in direct contact with participants and the database, and as a result, you have 2 versions of the same Excel file.
Okay, lets see how efficiently Synkronizer can compare our two sheets and identify differences between them.
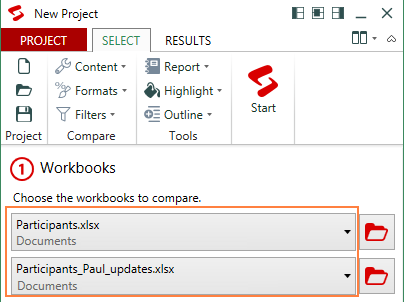
To run Synkronizer Excel Compare, go to the Add-ins tab, and click the Synchronizer 11 icon. 
The Synkronizer pane will show up in the left part of your Excel window, where you do the following:
- Select 2 workbooks to compare:
- Select sheets to compare. If the selected workbooks have any sheets with the same names, all those sheets will be matched and automatically selected for comparison (like Participants sheets in the below screenshot). Also, you can select worksheets manually or instruct the add-in to match sheets by other criteria, for example by worksheet type – all, protected, or hidden.
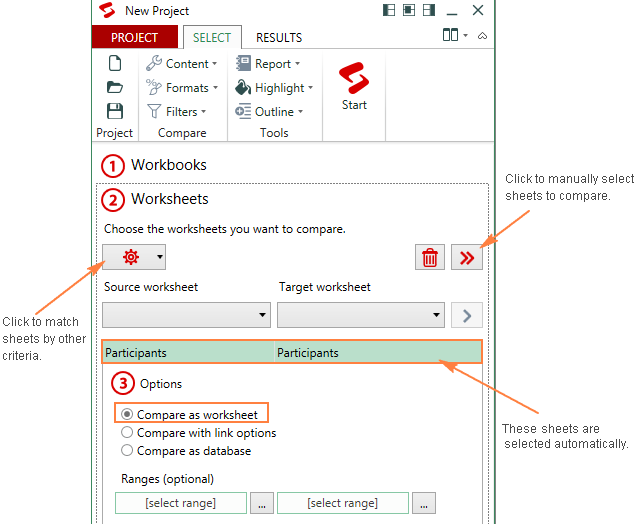 Once youve selected the sheets, the Synkronizer add-in will open them side by side, arranged vertically or horizontally, like in Excels View Side by Side mode.
 - Select one of the following comparison options:
- Compare as normal worksheets – the default option that works in most cases.
- Compare with link options – if the selected sheets do not contain any new or deleted rows and columns, you can compare them “1 on 1”.
- Compare as database – recommended for comparing sheets that have a database structure.
- Compare selected ranges – if you do not want to compare the entire sheets, define the ranges to be compared.
- Choose the content types to be compared (optional). On the Select tab, in the Compare group, you can choose the content type(s) relevant to your current task:

- Under Content, you can select comments and names (in addition to cell values, formulas and calculated values that are compared by default).
- Under Formats, you choose what cell formats such as alignment, fill, font, border etc.
- The Filters option lets you filter out differences that you dont want to display. For example, you can ignore case, leading or trailing spaces, all formulas or different formulas with the same result, hidden rows or column, and more.
- Finally, click the big red Start button on the ribbon and proceed to examining the results.
Usually it takes Synkronizer only a few seconds to compare 2 sheets and present two summary reports on the Results tab:
- In a summary report, you can see all difference types at a glance: changes in columns, rows, cells, comments, formats, and names.
- To view the detailed difference report, just click a specific difference type on the summary report.
The following screenshot shows the summary report (in the upper part of the Results pane), and cell difference report (in the lower part of the pane) that were created for our sample sheets: 
Clicking on a difference in the detailed report will select the corresponding cells on both sheets (the below screenshot shows just one sheet because theres enough room to show both 🙂 
In addition, you can create a difference repot in a separate workbook, either standard or hyperlinked, and jump to a specific difference with a mouse click: 
If the two Excel files you are comparing contain multiple sheets, all matching worksheet pairs will be presented in the summary report for your perusal: 
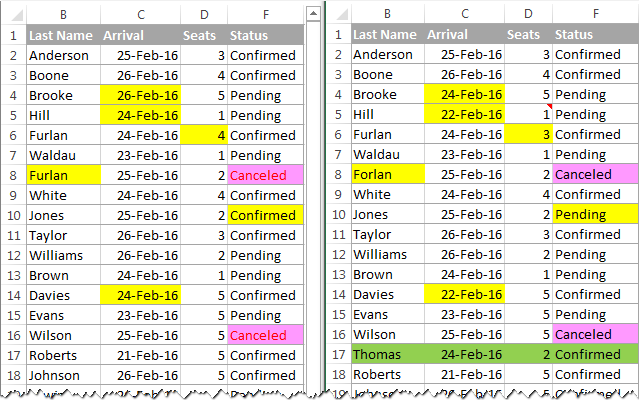
By default, the Synkronizer Excel Compare add-in highlights all found differences, like in the following screenshot:
- Yellow – differences in cell values
- Lilac – differences in cell formats
- Green – inserted rows
To highlight only the relevant differences, click the Outline button on the Results tab, and select the required options: 
The merge function is definitely one of the most useful features of the Synkronizer Excel Compare add-in. You can transfer individual cells or move different columns/rows from the source to target sheet, and have your primary sheet updated in seconds.
To update one or more differences, select them on the Synkronizers pane and click one of the 4 update buttons – the first and last buttons update all differences, while the 2nd and 3rd buttons update selected differences only (the button arrows indicate the transfer direction): 
Well, these are the key features of the Synkronizer add-in, but there is certainly much more to it. Want to give it a try? An evaluation version is available for download here.
Synkronizer is certainly worth your attention, but its not the only way to compare files in Excel. A handful of other comparison tools exist, which basically provide the same set of features but in different implementations.
Ablebits Compare Sheets for Excel
The latest version of our Ultimate Suite includes over 40 new features and improvements, the most exciting of which is Compare Sheets – our own tool to compare worksheets in Excel.
To make the comparison more intuitive and user-friendly, the add-in is designed in this way:
- A step-by-step wizard walks you through the process and helps configure different options.
- You can choose the comparison algorithm best suited for your data sets.
- Instead of a difference report, the compared sheets are displayed in the Review Differences mode so that you could view all the differences at a glance and manage them one-by-one.
Now, lets try the tool on our sample spreadsheets from the previous example and see if the results are any different.
- Click the Compare Sheets button on the Ablebits Data tab, in the Merge group:

- The wizard will show up asking you to select the two worksheets youd like to compare for differences. By default, the entire sheets are selected, but you can also select the current table
 or a specific range
  by clicking the corresponding button:
- On the next step, you select the comparison algorithm:
- No key columns (default) – works best for sheet-based documents like invoices or contracts.
- By key columns – is appropriate for column-organized sheets that have one or more unique identifiers such as order numbers or product IDs.
- Cell-by-cell – best to be used to compare spreadsheets with the same layout and size, like balance sheets or year-to-year reports.
Tip. If you are unsure which option is right for you, go with the default one (No key columns). Whichever algorithm you select, the add-in will find all the differences, it will only highlight them differently (entire rows or individual cells). On the same step, you can choose the preferred match type:
- First match (default) – compare a row in Sheet 1 to the first found row in Sheet 2 that has at least one matching cell.
- Best match – compare a row in Sheet 1 to the row in Sheet 2 that has the maximum number of matching cells.
- Full match only – find rows in both sheets that have exactly the same values in all the cells, and mark all other rows as different.
In this example, we will look for Best match by using the default No key columns comparing mode:

- Finally, specify which differences to highlight and which to ignore, and how to mark the differences. Cell formatting is important to us, so we select Show differences in formatting. Hidden rows and columns are irrelevant, and we tell the add-in to ignore them:

- Click the Compare button and allow the add-in a couple of minutes to process your data and make the backup copies. Backups are always created automatically, so you may not worry about the safety of your data.
Once the worksheets are processed, they are opened side-by-side in a special Review Differences mode, with the first difference selected: 
On the screenshot above, the differences are highlighted with the default colors:
- Blue rows – rows that exist only in Sheet 1 (on the left).
- Red rows – rows that exist only in Sheet 2 (on the right).
- Green cells – difference cells in partially matching rows.
To help you review and manage the differences, each worksheet has its own vertical toolbar. For the inactive worksheet (on the left) the toolbar is disabled. To enable the toolbar, just select any cell in the corresponding sheet.
By using this toolbar, you go through the found differences one-by-one and decide whether to merge or ignore them: 
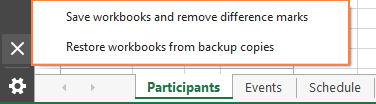
As soon as the last difference is dealt with, you will be prompted to save the workbooks and exit the Review differences mode.
If you have not finished processing the differences yet but would like to take a break for now, click the Exit Review Differences button at the bottom of the toolbar and choose either to:
- Save the changes youve made and remove the remaining difference marks, or
- Restore the original workbooks from the backup copies.
Thats how you compare two sheets in Excel with our tool (hope you liked it 🙂 If you are curious to give it a shot, an evaluation version is available for download here.
How to Compare Two Excel Sheets and Find Differences
FAQ
Can I compare two Excel spreadsheets for differences?
How to compare two tables in Excel for differences?
How do I compare two sheets in Excel?
Once you get to manipulating and comparing the information, you might want to use Look Up, Index, and Match to help your analysis. Open both sheets to compare, then navigate to the “View” tab. Click “View Side by Side” to see both sheets in smaller windows.
How to compare two Excel files?
If you have more than two Excel files, to compare them by viewing Step 1) Open all the to-be-compared workbooks simultaneously. Step 2) In any one of these workbooks, go to the View tab > Windows Group > View Side By Side button. Step 3) From the Compare Side by Side window, select any Excel file.
How do I compare a spreadsheet to a workbook in Excel?
Open Spreadsheet Compare. In the lower-left pane, choose the options you want included in the workbook comparison, such as formulas, cell formatting, or macros. Or, just Select All. On the Home tab, choose Compare Files. In the Compare Files dialog box, in the Compare row, browse to the earlier version of your workbook.
How to compare data in Excel?
Enable View Side by Side mode by clicking the corresponding button on the ribbon. Select sheet 1 in the first window and sheet 2 in the second window. It is the simplest way to compare data in Excel that lets you identify cells with different values. As the result, you will have a difference report in a new worksheet.
