Google Docs is one of the most popular word processors available today. With its easy accessibility, collaboration features and automatic saving, it’s no wonder millions of people use Google Docs for writing, schoolwork and business documents.
One key element in formatting any document is setting the margins – the amount of blank space around the edges of the page. In Google Docs, adjusting margins is quick and easy using two different methods Page Setup and the ruler. In this comprehensive guide we’ll cover everything you need to know about changing margins in Google Docs.
Why Are Margins Important in Documents?
Before diving into how to modify margins in Google Docs, let’s first understand why margins matter in documents.
Margins create white space and separation between the text and the edges of the page. This makes your document more readable and professional looking.
Some specific reasons margins are important include:
-
Readability – Margins prevent text from feeling crammed against the edges. More white space around paragraphs improves readability.
-
Focus – Margins draw the reader’s attention inward to the main text content rather than the periphery.
-
Professional look – Proper margins give documents a polished, formal appearance. Large margins look amateurish.
-
Balance – Balanced inside and outside margins create visual harmony on the page.
-
Printing – Printers can’t print all the way to the edge. Margins prevent text loss.
-
Binding – For printed reports and booklets, margins allow for binding space.
Adjust Margins in Google Docs with Page Setup
The Page Setup dialog box gives you precise control over document margins in inches or centimeters. Follow these steps:
-
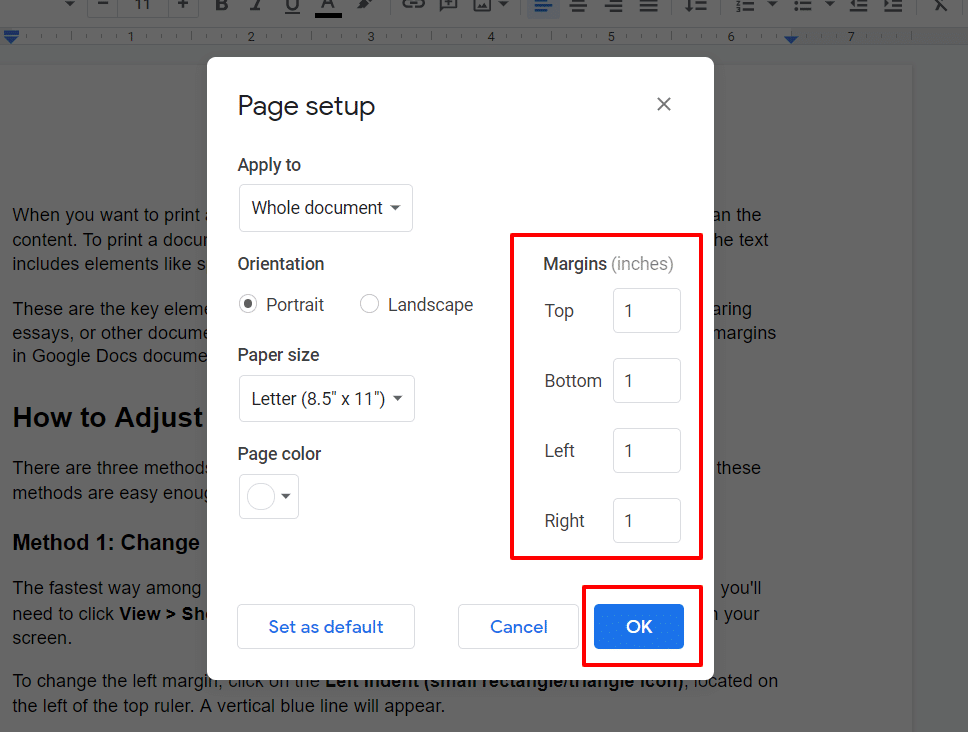
Open your Google Doc and click File > Page Setup. The Page Setup dialog box appears.
-
Click the Margins tab. This displays margin settings.
-
Click any margin and type the new value you want in inches. For example, change the Top margin to 0.5 for half an inch.
-
Repeat for the Bottom, Left, and Right margins as needed.
-
Click OK to apply the new margin settings.
Page Setup allows you to set exact margin widths by typing in values. However, it modifies margins for the entire document at once. For more granular control, use the ruler method covered next.
Modify Margins with Google Docs Ruler
The ruler in Google Docs provides a visual way to adjust margins by dragging. It gives you more flexibility to change margins for specific sections.
Follow these steps to use the ruler:
-
Open your Google Document.
-
Click View > Show Ruler to display the ruler.
-
Select the portion of text you want to adjust margins for.
-
Move your mouse over the gray region in the ruler. The cursor will change to a double-headed arrow.
-
Click and drag the gray region to increase or decrease margins.
-
Repeat for the left and right margins using the vertical ruler.
The ruler method allows you to easily modify margins for individual sections of text. You can make the first page have different margins than the rest of the document, for example.
What Are the Default Margins in Google Docs?
When you create a new document in Google Docs, it uses these default settings for margins:
- Top: 1 inch
- Bottom: 1 inch
- Left: 1 inch
- Right: 1 inch
This means there’s a one inch space between the text and each edge of the page.
1-inch margins are standard for many word processing tools and a good starting point. However, you may want to adjust margins for certain situations:
-
Academic papers – Often require wider 2-inch margins around the entire page.
-
Business reports – May use 1.5 inch margins for a more spacious look.
-
Print booklets – Require wider margins for binding space, ex: 1.5 inches.
-
First page – The first page can have wider 2-inch+ margins for visual impact.
-
Narrow columns – Reducing side margins can fit more text in narrow newspaper-style columns.
The default margins are fine for general use. But don’t hesitate to tweak margins for your specific document needs.
Best Practices for Margin Settings
When determining margin sizes for a document, keep these best practices in mind:
-
Use consistent margins – Keep inside and outside margins the same width for a clean look.
-
Mirror margins – Top and bottom margins should match, as should left and right margins.
-
Minimum 0.5-inch margins – Don’t use margins smaller than 0.5 inches for print documents.
-
Maximum 2-inch margins – Margins wider than 2 inches can look awkward and amateurish.
-
Wider for binding – Increase inside margins by 0.5-1 inch if binding a printed document.
-
First page impact – Use slightly larger margins on the first page for dramatic introduction.
-
Column consideration – Reduce side margins if using newspaper-style columns to fit more text.
-
Be consistent – Use the same margins throughout a large report or book for consistency.
Adjusting Google Doc margins seems simple at first glance. But margin sizes make a surprising difference in the aesthetics and readability of your document. Keep these best practices in mind as you tweak margins for the perfect layout.
Troubleshooting Common Margin Issues
As you adjust page margins in Google Docs, here are some common problems you may encounter:
Text cutoff after changing margins – If reducing margins cuts off text, highlight the affected text and click Format > Align & line spacing > Wrap text to pull it back into the new margin boundaries.
Margins keep resetting – If margins revert to 1-inch despite changing them, the Normal text style probably has 1-inch margins defined. Modify the Normal style to use your desired margins.
Can’t change first page margin – The first page uses the Different first page header setting, which must be disabled in Page Setup to separately control the first page margin.
Header text in margin – Reducing top margin can put header text too close to the main text. Adjust the header position lower on Format > Document header.
Ruler missing – If you don’t see the ruler, go to View > Show ruler to enable it.
Margins only apply to part of document – The ruler method only changes margins for the selected text, not the entire document. Use Page Setup for document-wide margins.
Can’t set small margins – Printer and binder limitations prevent margins smaller than 0.5-0.75 inches. Reduce text size instead to fit more text per page.
By understanding these common margin issues in Google Docs, you can quickly troubleshoot any problems that arise as you test different margin settings.
Adjust Margins for Readability
One key goal when setting page margins is optimizing text readability. Here are some tips:
-
For single spacing, 0.75-1 inch margins improve readability.
-
Double spaced documents can use wider 1.25-1.5 inch margins to avoid a too-wide text column.
-
Justified text alignment can use smaller inside margins of 0.5 inches since spacing absorbs variations in line length.
-
Critical reading documents like textbooks require wide 2+ inch margins for ample line length.
-
Use at least 0.75 inch side margins so text doesn’t feel crammed against the paper edge.
-
Light column text needs 0.5-1 inch margins to keep a comfortably readable line length of 50-100 characters.
Change Margins for Binding Space
For printed documents like reports and books, you need wider inside margins to allow for binding space, also known as gutter margins.
Here are some typical inner margin sizes to use:
-
Saddle stitch binding – Increase inside margins 0.5 inches to allow for staples.
-
Perfect binding – Add 0.75 inches to the inner margin to account for glue and trimming.
-
Coil binding – Coiled spines need about 0.5 inches of extra inside margin space.
-
3-ring binding – No extra space needed since holes are punched right at the edge.
When printing double-sided pages, the inside margins alternate between left and right pages. This allows enough binding space on the interior edges that connect pages together.
Control Margins for Print Booklets
Print booklets require some special considerations for page margins. Here are some tips
Google Docs: Adjusting Margins
FAQ
What is 1 inch margin in Google Docs?
How do I remove top margin in Google Docs?
