Adding cells is one of the simplest things to do in Excel. It may seem daunting initially, but well teach you how to do it quickly.
Adding cells in Excel allows you to insert new data rows or columns in your spreadsheets. Whether you need to make space for additional values or add formulas, learning how to insert cells is an essential Excel skill.
In this comprehensive guide, we’ll cover the various ways to add cells in Excel using menus, shortcuts, and VBA code
Why Add Cells in Excel?
First let’s discuss some common reasons you may need to insert new cells
-
Add data – Insert cells to add new rows or columns of data values in your spreadsheet. This allows entering more data than your original table size.
-
Add formulas – Insert cells to make room for additional formulas that perform calculations on your data. Expand your analysis capabilities.
-
Organize structure – Insert cells to better organize your header rows or data columns by adding spacing around them.
-
Fix errors – Insert cells to replace any cells giving errors and pushing their formulas down.
-
Increase table size – Insert cells to expand the overall size of your dataset by adding more rows and columns.
-
Improve layout – Insert cells to adjust your spreadsheet formatting and layout by adding space between cells.
No matter the reason, knowing how to quickly and easily insert new cells is an invaluable skill for Excel users.
How to Insert a Single Cell
If you only need to add one new cell, follow these steps:
-
Select the cell where you want to add the new cell.
-
Right-click and choose Insert,
-
Select Shift cells down to move other cells down and make space.
-
The new blank cell will be inserted and ready for data.
This menu approach works well for adding just one or two cells sporadically in your spreadsheet.
How to Insert Multiple Cells at Once
If you want to insert entire rows or columns of new cells simultaneously, here are two options:
Option 1: Insert Dialog Box
-
Select the row or column where you want new cells added.
-
Go to the Insert tab on the ribbon.
-
Click Insert Cells… button.
-
Choose Shift cells down or Shift cells right from the drop-down.
-
Set number of cells to insert.
-
Click OK.
Option 2: Right-Click Menu
-
Right-click on the row or column where you want to insert cells.
-
Select Insert… from the context menu.
-
Choose Entire row or Entire column to insert.
-
Set number of rows or columns to add.
-
Click OK.
The dialog box gives you a few more options, but the right-click menu works faster for bulk inserting entire rows or columns.
Keyboard Shortcuts for Inserting Cells
For quick cell insertion without menus, use these handy keyboard shortcuts:
-
Ctrl + Shift + = – Insert new cell above selection
-
Ctrl + = – Insert new cell to the left of selection
-
Alt + I + R – Insert new row above selection
-
Alt + I + C – Insert new column to the left of selection
Keyboard shortcuts are the fastest way to add cells in Excel. No mousing or menus needed!
How to Insert Cells Using VBA
You can automate cell insertion in Excel using VBA (Visual Basic for Applications) macros.
For example, to insert a new row:
Sub InsertRow() Rows(2).Insert Shift:=xlDownEnd SubAnd to insert a new column:
Sub InsertColumn() Columns(2).Insert Shift:=xlToRightEnd SubThis code will insert cells in row 2 or column 2. Adjust the row and column numbers as needed.
VBA is useful for repeatedly inserting cells in Excel without user input.
Adding Cells by Pasting from Other Programs
You can also add cells to Excel by copying data from other programs and pasting:
-
Copy data from word processor, web page, or other app.
-
Paste into Excel.
-
The content will fill new cells added automatically.
Pasting external data is a quick way to populate new cells in Excel.
Top Tips When Adding Cells
Keep these tips in mind when inserting new cells in Excel:
-
Add rows above where you want new data to push existing cells down. Add columns to the left to push right.
-
Double-check cell references and ranges after inserting to avoid reference errors.
-
Sort your data (Z→A) first to avoid blowing out sorted data when inserting.
-
Freeze panes first if you want to keep certain cells visible when inserting.
-
Add cells inside tables with Ctrl + T to autofill formatting.
-
Turn on scroll lock (Scroll Lock key) to keep the same cells in view when inserting.
What Happens When Inserting Cells?
When you insert new cells, your existing data automatically shifts down or to the right:
-
Rows below shift down to make room for new rows.
-
Columns to the right shift right for new columns.
-
Any formulas that reference the original cells will update to reflect the new position of those cells.
-
Absolute cell references ($A$1) will not change. But relative references (A1) will update.
-
Cell formatting will carry over into the new blank cells.
So the overall spreadsheet structure and cell references adjust accordingly when adding cells.
Alternatives to Inserting Cells
In some cases, you may not want to insert cells and shift others down. Here are two alternatives:
1. Append Rows or Columns
To add cells without impacting existing ones, append new rows or columns instead of inserting:
-
PC: Right-click → Insert → Table Row Above/Below or Table Column to Left/Right
-
Mac: CMD + T → check New Rows/Columns in Dialog box.
Appending adds cells but leaves existing ones in place.
2. Add an Extra Sheet or Workbook
Rather than continuing to expand the same sheet, add a new sheet or workbook:
-
Click + at bottom to add new sheet within the workbook.
-
Go to File → New to create an entirely new workbook.
This keeps your datasets better organized without endless sheet expansion.
Common Questions about Adding Cells in Excel
Can you insert multiple rows or columns at once?
Yes, you can insert multiple contiguous cells simultaneously, either through the insert dialog or with keyboard shortcuts. Specify the number of cells to add.
How do I add cells without shifting others Excel?
Use the append options to add rows or columns without shifting existing ones. This inserts new cells while preserving your current layout.
What happens to formulas when I insert cells?
Cell references in formulas will automatically update to reflect the new position of any shifted cells. Absolute references are unaffected.
Can I insert cells on multiple sheets together?
Unfortunately not. Cell insertion only applies to one sheet at a time. You’ll need to insert on each sheet individually.
Can I undo cell insertion?
Like most actions in Excel, you can immediately press Ctrl + Z to undo inserting cells and restore your previous spreadsheet.
Key Takeaways
-
Use the Insert tab or right-click menu to add new blank cells in Excel.
-
Keyboard shortcuts provide the fastest way to insert cells.
-
Adding cells shifts existing ones down and updates cell references.
-
Alternatively, append rows or columns to avoid impacting existing data.
-
Inserting cells is useful for adding data, formulas, formatting space, and increasing table size.
Learning to efficiently insert and add cells gives you more flexibility and space when building Excel spreadsheets. Follow the techniques in this guide to expand your worksheets.
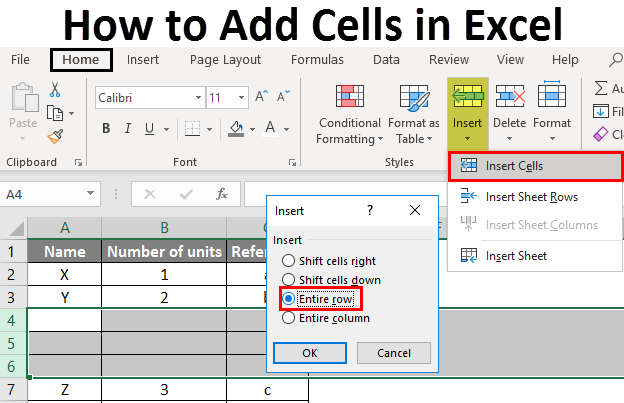
Adding a new column and row.
To add a new column:
- Select any cell.
- Click the Entire column option and OK button in the Insert pop-up menu. Excel will add a column, including the column header between the two existing columns below.
To add a new row:
- In the same way, you can add the row by clicking the Entire Row option.
- A new row will appear between the two existing rows.
Frequently Asked Questions on How To Add Cells In Excel
An insert pop-up menu will appear by pressing the CTRL+ALT+ “+” plus sign. You can select different Insert cell options.
