Spell check is a must in Microsoft Word. With a couple clicks, you can catch typos & mistakes, making your writing accurate and readable. It spots errors, and highlights them; you can review and fix them quickly.
To spell check, go to the “Review” tab at the top, then click on “Spelling & Grammar” or press F7. Word will scan for errors, and underline any incorrect words. Right-click to see suggestions or add to custom dictionary.
Word’s spell check can switch languages. Whether English, Spanish, French, or any other supported language, Word will change dictionaries automatically.
Autocorrect is a great addition to spell check. It fixes errors as you type, saving time.
Pro Tip: Personalize Word by adding words to the custom dictionary. This stops them from being marked wrong during spell check, allowing you to stay consistent.
Spelling errors can be a source of embarrassment and make your work look unprofessional. To prevent such mistakes, it is essential to enable spell check in Microsoft Word. Here’s a guide on how to do it:
In addition to this, there are some extra details that can help to improve your experience:
By following these tips, you can make sure your spell check is accurate and improve your writing efficiency with Microsoft Word. Pay attention to detail for professional communication!
As a writer, correct spelling and grammar are critical for communicating your ideas clearly. Thankfully, Microsoft Word has built-in tools to catch errors and help you polish your documents. Activating spell check ensures typos and misspellings don’t slip through, while grammar check spots issues like subject-verb agreement.
In this comprehensive guide we’ll explain how to turn on spell check and grammar check in Word on both Windows and Mac. We’ll also cover customizing the proofing tools to suit your needs.
Why Use Spell Check and Grammar Check
Here are some key reasons to leverage the proofing features in Word:
-
Catch typos and spelling mistakes before sending documents out.
-
Fix grammatical errors like missing punctuation that could confuse readers
-
Maintain professionalism with polished, error-free writing.
-
Save time on manual proofreading and editing.
-
Take advantage of technology to reinforce good writing habits.
-
Improve clarity by fixing issues that distort what you mean to say.
For best results, you still need to thoroughly read over documents yourself. But spell check and grammar check provide an extra safety net to catch what you might miss.
How to Enable Spell Check in Word
Activating spell check takes just a few quick steps:
On Windows:
- Go to File > Options > Proofing.
- Check the box for “Check spelling as you type.”
- Click OK.
On Mac:
- Go to Word > Preferences > Spelling & Grammar.
- Check the box for “Check spelling as you type.”
- Click OK.
Once enabled, Word will underline spelling errors in red as you write. Right click the underlined word to see suggested corrections.
How to Enable Grammar Check in Word
You can turn on grammar check using these steps:
On Windows:
- Go to File > Options > Proofing.
- Check the box for “Check grammar as you type.”
- Click OK.
On Mac:
- Go to Word > Preferences > Spelling & Grammar.
- Check the box for “Check grammar as you type.”
- Click OK.
With grammar check on, Word highlights grammatical issues in blue. Hover over the blue underline to see suggestions for correcting the sentence.
Customizing Spell Check and Grammar Check
You can customize the proofing tools in Word to suit your preferences:
-
Create Custom Dictionaries: Add specific words you use often so spell check recognizes them.
-
Modify Grammar Settings: Choose which grammar rules to enforce or ignore.
-
Adjust Alert Style: Select underlining, colored text, or no indicators for errors.
-
Set a Language: Have Word check spelling and grammar for non-English text.
Take time to review the options to tailor Word’s capabilities to your writing style and needs.
Using the Editor Pane for More Options
For more robust proofing, use the Editor pane in Word. Click the Review tab and select Editor to open it.
The Editor pane categorizes spelling, grammar, punctuation, clarity, conciseness, formality and other issues. It provides additional suggestions for refining your writing.
The pane also lets you customize which errors you want to ignore easily. This helps minimize disruptive alerts.
Remember to Run Final Spell Check
When you finish writing a document, don’t forget to run a final manual spell and grammar check.
On Windows, go to the Review tab and click “Spelling & Grammar.” On Mac, go to the Review tab and click “Check Document.”
Review any remaining errors flagged and make corrections before sending or printing the document.
Troubleshooting Tips
Here are some troubleshooting tips if spell check or grammar check aren’t working properly:
-
Ensure you have an internet connection for grammar check functionality.
-
Verify the document language is set correctly if checking a non-English text.
-
Try increasing the amount of memory allocated to Word for improved performance.
-
Make sure track changes is turned off, as it disables grammar check.
-
Consider uninstalling and reinstalling Office if issues persist or appear randomly.
Why Proofing Tools Are Essential
In conclusion, leveraging the built-in spell check and grammar check tools in Word is vital for delivering high quality writing. Catching even minor errors that distract readers reflects professionalism and attention to detail.
Activating the checks is quick and easy. Take advantage of the available customizations to avoid wasting time on false positives. Use the Editor pane for robust proofing with more suggestions.
Smooth, polished text lets your ideas shine. Do your writing justice and activate spell check and grammar check today.
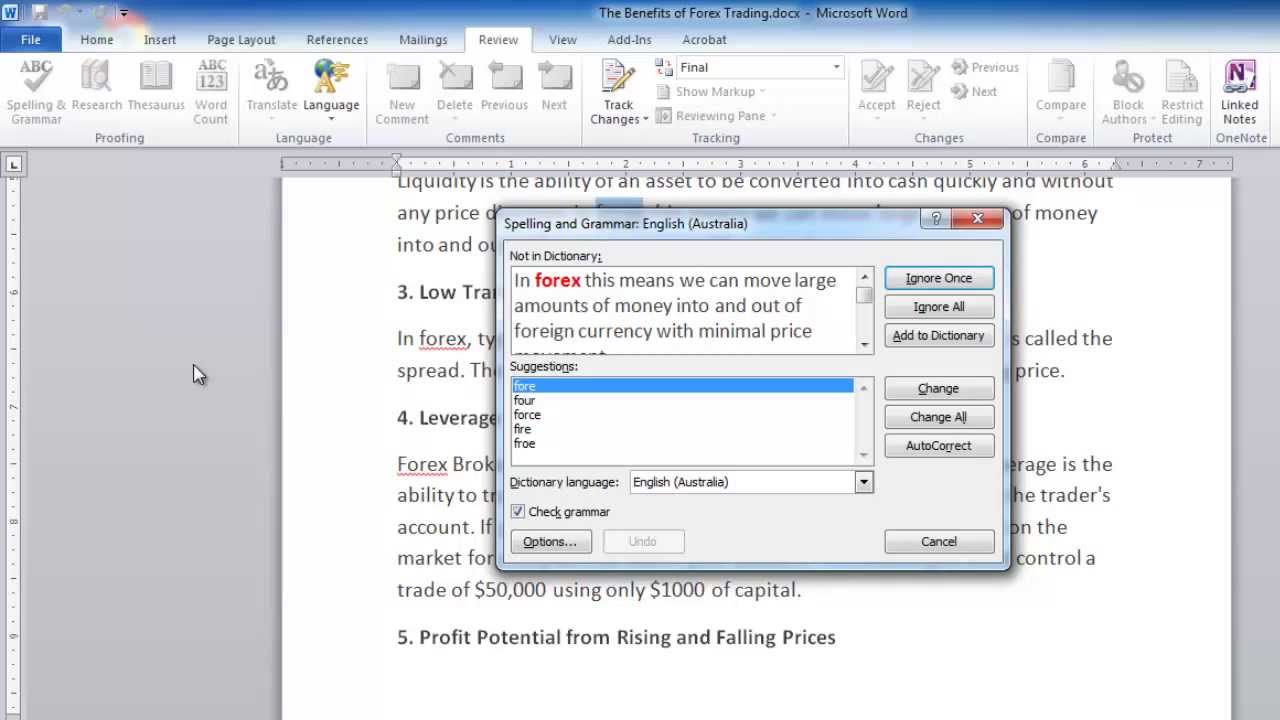
Running a spell check
Do you want to spell check your Microsoft Word document? Here’s how:
- Click on “Review” at the top.
- Select “Spelling & Grammar” or press F7.
- Word will scan for errors and mark them with wavy lines.
- Right-click the underlined word for suggestions. You can even add words to your personal dictionary.
These steps help make sure your document doesn’t have mistakes. It also checks for things like verb tense and capitalization.
Interesting fact: A study by Stanford University showed that proper spelling and grammar give readers an impression of intelligence and credibility.
Using the AutoCorrect feature
Ensure accuracy and professionalism with spell-checking! Use the AutoCorrect feature in Microsoft Word to get the job done. Here’s how:
- Activate it: Check AutoCorrect settings in Word to switch it on.
- Create custom rules: Make your own rules for commonly misspelled words and save time.
- Add words: Add words that are not in the default dictionary to avoid red lines.
- Use shortcuts: Use shortcuts to expand abbreviations or acronyms quickly and accurately.
- Capture errors: Enable “Replace text as you type” to auto-fix capitalization errors.
- Exclude words: Stop AutoCorrect from changing words you don’t want it to by adding them to the exceptions list.
For extra effect, use Wildcard entries, customize punctuation options, and explore Autotext options. Don’t let typos ruin your credibility! Enable AutoCorrect for smooth proofreading and faster writing. Do it now!
How to Turn Spell Check On or Off in Microsoft Word 2016?
FAQ
Why is my spell check not working on Word?
How do I reactivate spell check in Word?
How do I turn spell check on?
How do I do a spelling and grammar check in Microsoft Word?
This wikiHow teaches you how to do a spelling and grammar check in Microsoft Word using your Windows, Mac, iPhone, iPad, or Android device. To run a spell check, click the “Review” tab. Click the down-arrow next to “Spelling and Grammar” and select “Spelling”.
How to turn off spell check in word?
If you don’t want to use the default spell check or using a third-party spell and grammar check tool, follow the below steps to turn off spell check in Word. Open the Word application. Click “File” on the Ribbon menu. Click the “Options” option on the sidebar. Select the “Proofing” tab on the sidebar in the Options window.
How do I run a spell check?
To run a spell check, click the “Review” tab. Click the down-arrow next to “Spelling and Grammar” and select “Spelling”. Click a suggestion to apply it, or click “Ignore once”, “Ignore all”, or “Add to dictionary”. On mobile, find a word with a red squiggly line underneath it. Tap a suggestion from the pop-up menu. Open a project in Microsoft Word.
How do I run a spell check in Microsoft Word for Office 365?
Running a spell check in Microsoft Word for Office 365 is a breeze. Simply navigate to the ‘Review’ tab on the ribbon at the top of the screen, click on ‘Spelling & Grammar’, and Word will automatically begin checking your document for any spelling or grammar errors.
