Drop down lists in Excel allow you to choose from a preset list of options in a cell This makes data entry simpler, more consistent, and less prone to errors Often, you may need to edit an existing drop down list by adding, removing, or reordering options. Fortunately, Excel makes it easy to customize your drop down lists after you’ve already created them. In this article, I’ll walk through the steps to edit a drop down list in Excel.
Why Use Drop Down Lists in Excel
Before jumping into how to edit a drop down list, let’s first cover why you would want to use them in Excel
-
Simplify data entry – Rather than needing to manually type the same options over and over, a drop down list lets you quickly choose from a list. This saves time and effort.
-
Consistency – Drop down lists ensure the exact same options are chosen each time. This avoids inconsistencies from typos or formatting differences.
-
Error reduction – By limiting choices to a preset list, you reduce errors from incorrect manual entries
-
Data validation – Drop downs allow you to validate data by restricting entries to approved options only. This is great for templates used by others.
-
Cleaner presentation – Neat drop downs can make worksheets more organized and readable versus long lists typed out.
Now that you know the benefits, let’s look at how to customize your drop downs.
Edit Drop Down List Items
- On the Excel worksheet containing the drop down, click the cell with the drop down and go to the Data tab.
- Click Data Validation. This opens the Data Validation dialog box.
- In the Allow box, make sure “List” is selected.
- Click the button next to the Source box. This opens the in-cell drop down list.
- Here you can now edit the list items:
- To add a new item, click an empty row and type the item name.
- To delete an item, right click it and click Delete.
- To reorder items, click and drag them up or down.
- When done editing, click OK to close the list.
- Back in the Data Validation dialog box, click OK to save the changes.
And that’s it! The updated drop down list will now show your customizations. This makes tweaking your Excel drop down lists fast and easy.
Add Items Faster with the Source Box
For the previous method, you needed to edit the list items through the in-cell drop down. While that works fine, there is an even faster way – editing the list directly in the Source box:
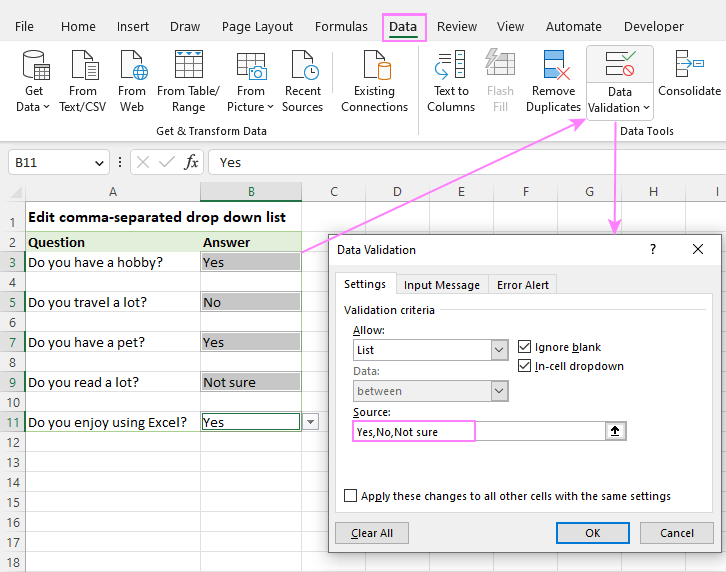
- Go to the Data tab and click Data Validation.
- In the Data Validation dialog box, click the Source box.
- Here you can edit the comma-separated list of items:
- To add a new item, type it after the last comma.
- To delete an item, remove it and the comma.
- To reorder, move the item to the desired spot.
- Click OK when done to save the changes.
This speeds up the process since you can directly edit the list in the Source box without opening the in-cell dropdown. Useful when you have many items to add, remove, or rearrange.
Change List Items on Multiple Worksheets
If you have the same drop down list repeated across multiple worksheets, editing each one individually can be tedious. Luckily, you can link them together and update every instance at once:
-
On one of the worksheets, create a new table with the shared drop down list items. Give it a name like “ListOptions”.
-
On the other sheets, select the drop down cell and go to Data Validation.
-
In the Source box, enter:
=ListOptions
This links the drop downs to the named table.
- Now whenever you edit the entries in the “ListOptions” table on the first sheet, it will automatically flow through to every worksheet using that Source.
With this technique, you only need to manage your list in one spot rather than editing each drop down separately. Keeping changes in sync across multiple sheets is a breeze.
Tips for Managing Excel Drop Down Lists
Here are some additional tips for working with and customizing drop down lists in Excel:
-
Give your drop down list tables meaningful names to make managing linked lists easier.
-
Sort your list alphabetically or by frequency to make finding items faster.
-
To blacklist certain invalid options, add them under Validation criteria with “Error alert” selected rather than rejecting all non-list values.
-
For very long lists, add a helper column with the first letter to allow alphabetical filtering.
-
Color code drop down lists for visual organization and quick scanning.
-
Freeze drop down list rows and columns so they remain visible when scrolling in large sheets.
-
Use Data Validation rules to require selections from the drop down rather than direct entry.
-
If needed, allow multiple selections from the list rather than just a single choice.
-
To prevent inappropriate edits, protect sheets with editable drop downs by locking cells.
Frequently Asked Questions about Editing Drop Down Lists
Here I’ll answer some common questions about editing drop down lists in Excel:
How do I add more items to my existing drop down list?
Simply edit the list Source, either directly in the Source box or through the in-cell dropdown, and add your new options below the existing ones. Just be sure each item is separated by a comma.
What if I delete the wrong drop down item by accident?
Not to worry! Since Excel lists have no undo capability, just re-add the deleted item to the end of the list in the Source. Then reorder it back to the right spot, if needed.
Can I alphabetize my drop down items after adding new ones?
Yes, Excel allows you to sort your drop down items in the Source box. After adding new items, click the Sort button to arrange alphabetically A-Z.
I have two columns of drop down items. Can I merge them into one list?
Absolutely. Just copy the items from the second list, paste them below the last item in the first list, add commas between each, and remove duplicates. Then you’ll have one unified list.
How do I reorder drop down items without editing the Source directly?
If you want a visual drag-and-drop approach, edit the list table itself (the range referenced in the Source box). The drop down will dynamically update to match the table order.
Can I change the selected drop down option on multiple sheets simultaneously?
Unfortunately, no. The chosen option cannot be linked. But you can link the lists themselves to update across sheets, just not the selected choice.
I imported a drop down from another workbook. Can I just edit the list there to update it?
No, changes to the original workbook won’t carry over. However, you can re-link your imported drop down to the new external list by refreshing the Source box reference.
What if I want certain items to always appear at the top or bottom of my drop down list?
When building your list in the Source box, simply arrange your fixed items at the beginning or end. Then sort the middle dynamic items as needed without affecting the pinned ones.
Conclusion
Being able to customize your Excel drop down lists is crucial for keeping data entry smooth, consistent, and accurate in your worksheets. Whether adding, removing, reordering, or linking items across sheets, the steps covered in this article make editing drop downs a breeze. Use these time-saving techniques to create perfect drop downs for your Excel workbooks.