To create a fillable form in Word, you need to enable the Developers tab and use form controls.
This article provides a step-by-step guide explaining how to locate the tab and effectively use controls for a quick turnaround.
For those interested in more advanced and automated fillable forms, we’ve also added methods for both Adobe Acrobat and PandaDoc.
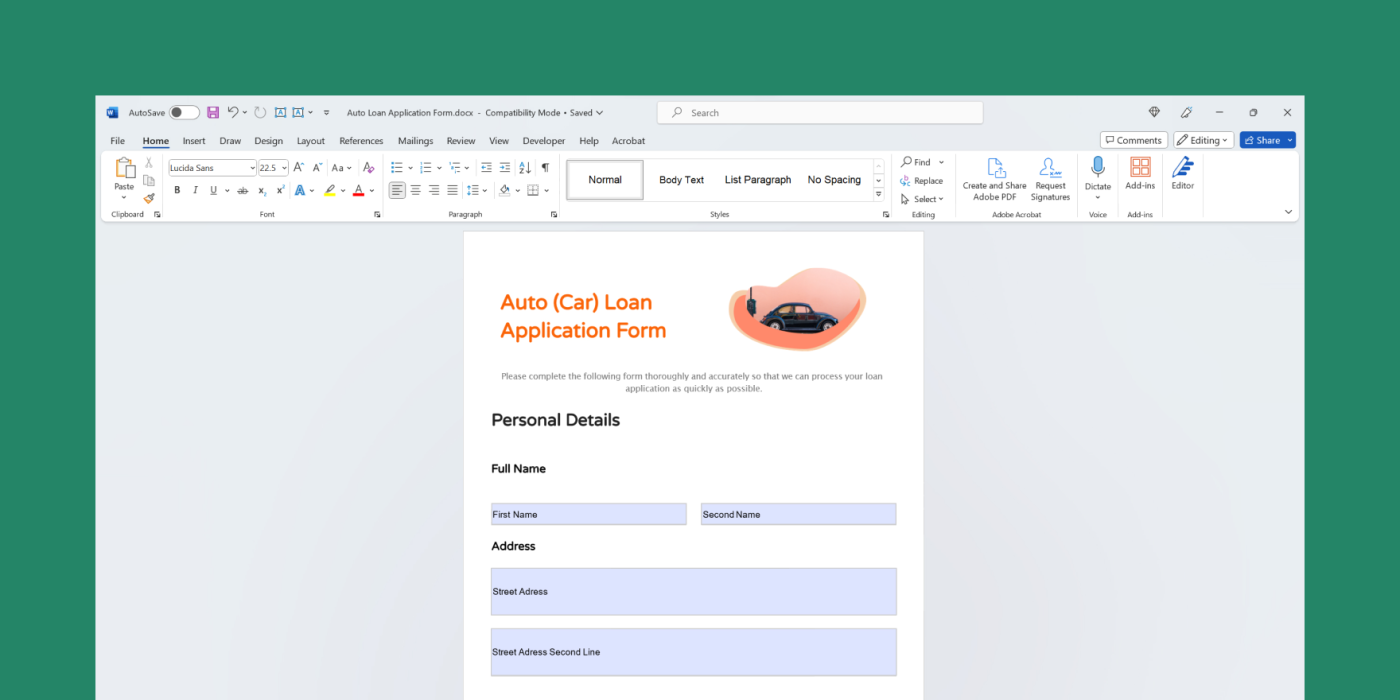
Microsoft Word offers a quick and easy way to create customized fillable forms. These digital forms allow you to collect data, automate document assembly, and streamline workflows. This guide will walk you through constructing functional fill-in forms from scratch using Word’s built-in tools.
Why Use Word for Fillable Forms?
Here are some key advantages of using Word to generate fillable forms:
-
It’s free – Comes included in Microsoft Office at no extra cost. Avoids paying monthly fees for form software.
-
Familiar interface – Leverages an application most are already comfortable using. Shallow learning curve.
-
Visually customizable – Can fully brand forms with colors, fonts, images, and layouts
-
Content control options – Numerous built-in form field types like text boxes, dropdowns, checkboxes, date pickers, etc.
-
Data integration – Can link forms to Excel for easy data import and analysis.
-
** Layout flexibility** – Dynamic positioning of fields and guidance text possible.
-
Accessibility – Full support for assistive technologies like screen readers for vision impaired users.
-
File export – Can save forms as PDFs or shareable links, allowing digital distribution.
Overall, Word empowers anyone to make forms with minimal training. Now let’s explore the steps to build one.
How to Create a Fillable Form in Word
Follow these steps to construct your own custom fill-in form in Word:
1. Enable the Developer Tab
-
Click “File” then “Options” and select “Customize Ribbon”.
-
Under “Main Tabs”, check the box beside “Developer”.
-
Click “OK”. The Developer tab will now display in the ribbon.
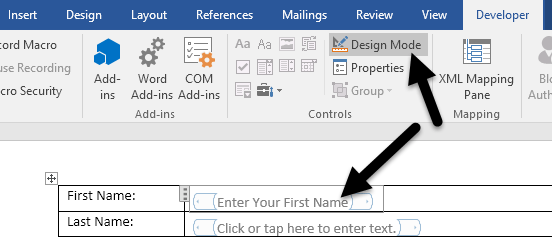
2. Turn on Content Control Tools
-
Click the “Developer” tab.
-
Check the box for “Design Mode” in the far left corner to activate form editing features.
3. Insert Content Controls
-
Click on the form field button for the type you want like “Text Form Field” or “Check Box Form Field”.
-
Click within the document where you want the form control placed.
-
Repeat for each form element needed.
4. Customize Form Fields
-
With a form control selected, click “Properties” to customize settings like required status, input format, and more.
-
Update the placeholder text by selecting a control and editing the text within.
-
Repeat properties and placeholder customization for all fields.
5. Add Instructional Text
-
Click below or above form fields to add headings, descriptions, and guiding text for users.
-
Format text as needed with font adjustments, colors, numbering, etc.
6. Protect Form
-
Go to the “Developer” tab and click “Restrict Editing”.
-
In the pop-up, check the box for “Allow only this type of editing in the document” and select “Filling in forms”.
-
Click “Yes, Start Enforcing Protection” to enable.
The form is now complete and secure! Test it by clicking outside the Developer tab and attempting to add/alter content as an end user. The fields will be the only parts editable.
Tips for Making User-Friendly Fillable Forms
Follow these best practices when designing fill-in forms for optimal ease of use:
-
Use clear, succinct language for titles, instructions, and field placeholders.
-
Group related fields under descriptive headings.
-
Limit use of bright colors/excessive text styling.
-
Include explanatory captions for any fields that may cause confusion.
-
Arrange fields in logical order based on workflow.
-
Make important fields required and mark them clearly.
-
Use dropdowns for fixed sets of options over free text fields when possible.
-
Show examples of properly formatted input like phone numbers.
-
Make forms appear simple and quick to complete at a glance.
-
Place Submit button at bottom with clear visibility.
Advanced Functions for Power Users
For those wanting to level up their Word form game, here are some advanced functions to explore:
Calculated Fields
Automatically compute values like totals or taxes based on inputs to other fields.
Input Validation
Define custom validation criteria required to submit the form. For example, validate date formats or length of responses.
Multiple Pages
Span form across multiple pages with navigation buttons between each. Useful for long forms.
Conditional Logic
Show or hide certain fields based on selections/values entered in other fields. Allows for branching paths.
Excel Integration
Link form to Excel table to auto-populate spreadsheet with submitted entries. Streamlines data aggregation.
Distribution via Share Link
Generate a link to email forms for digital completion rather than manual PDFs. Facilitates collecting responses.
The possibilities are vast once you dig into the more advanced tools!
Getting Creative with Unique Form Layouts
Don’t be bound by standard form conventions – get creative with visual layouts and interactive elements. Some ideas:
-
Mimic famous personality quizzes or buzzfeed-style interactives
-
Format like traditional paper documents with handwriting fonts and images of folded corners, stamps, etc.
-
Use shapes, lines, and text boxes to create flowchart or decision tree style forms
-
Incorporate relevant graphics and visual callouts
-
Present as fun trivia game with scoring
-
Emulate popular applications like social profiles or dating profiles
Use Cases for Fillable Forms
There are endless applications for fillable forms across school, work, and personal contexts:
-
Patient intake forms for doctors
-
Job applications for recruiters
-
Quizzes or game sheets for teachers
-
Order forms for sales teams
-
Conference registration forms for events
-
Surveys or contests for marketing departments
-
Volunteer sign-up sheets for nonprofits
-
Waivers or permission slips for sports teams
-
Rental or job applications for individuals
And more! Anywhere information needs collecting, forms are useful.
Summary: Key Takeaways
-
Word’s content controls offer an easy way to build functional, customized fillable forms
-
Follow the steps to enable Developer tab, add fields, customize properties, protect form
-
Smart design and clear user instructions optimize ease of use
-
Advanced features support calculations, validation, conditional logic, Excel links and more
-
Forms have nearly unlimited applications from quizzes to patient intake and everything in between
With this simple yet powerful built-in tool, anyone can create forms for their needs. So next time you’re gathering data or need to standardize a process, turn to Word rather than complex form builders or paper printouts. Give your new fillable forms a try!
Step Enable Form Editing
Click on the Tools tab in the top menu and select Prepare Form. Acrobat automatically analyzes your doc and identifies the form fields.
Step Manage restriction settings
In the Developers tab, click the Restrict Editing tab. Select the Editing restrictions checkbox and choose Filling in forms from the list that appears.
In the end, press the Yes, Start enforcing protection button.
The document is now restricted. Anyone you send this document to will only be able to fill in the forms.
How to make Fillable Form in Microsoft Word
How do I create a fill-in form in word?
Here are five detailed steps you can use to create a fill-in form in Word: 1. Open the program and go to the “Developer” tab When opening the program, make sure it’s displaying the “Developer” tab in the ribbon. The ribbon is the toolbar at the top of the screen containing the tools you can use to complete your tasks.
How to create a fillable form document in word 365?
To add a fillable object, place the cursor where you want it and go to Developer tab > control type > click on page. To add the Developer tab, go to File > Options > Customize Ribbon > Main Tab > Developer > OK. This article explains how to create a fillable form document in Word for Microsoft 365, Word 2019, 2016, 2013, and 2010.
How to create form data in Microsoft Word?
The form data you create can include the option to choose a date, mark a checkbox, select Yes or No, and more. Before you can configure these controls, you must add the Developer tab to Microsoft Word as they are called. You can create and configure any form data using this tab. Select File from the top menu. Then, choose Options .
