In Agile project management, it is important to have a clear picture of the project’s reality, see the impacts of your work, and know when things exceed expectations or aren’t following the project timeline. While tools like a Gantt chart help you visualize the project plan, the burndown chart is the best way to visualize your progress against that plan. A burndown chart lets you see the work that still needs to be done in order to arrive at project completion on time.
In this post, we’ll go over what a burndown chart is and its benefits. Then we’ll advance to the more hands-on part, where you’ll learn how to create a burndown chart in Excel. But we’ll also look at the limitations of a burndown chart and why you should be leveraging additional tools. Let’s begin!
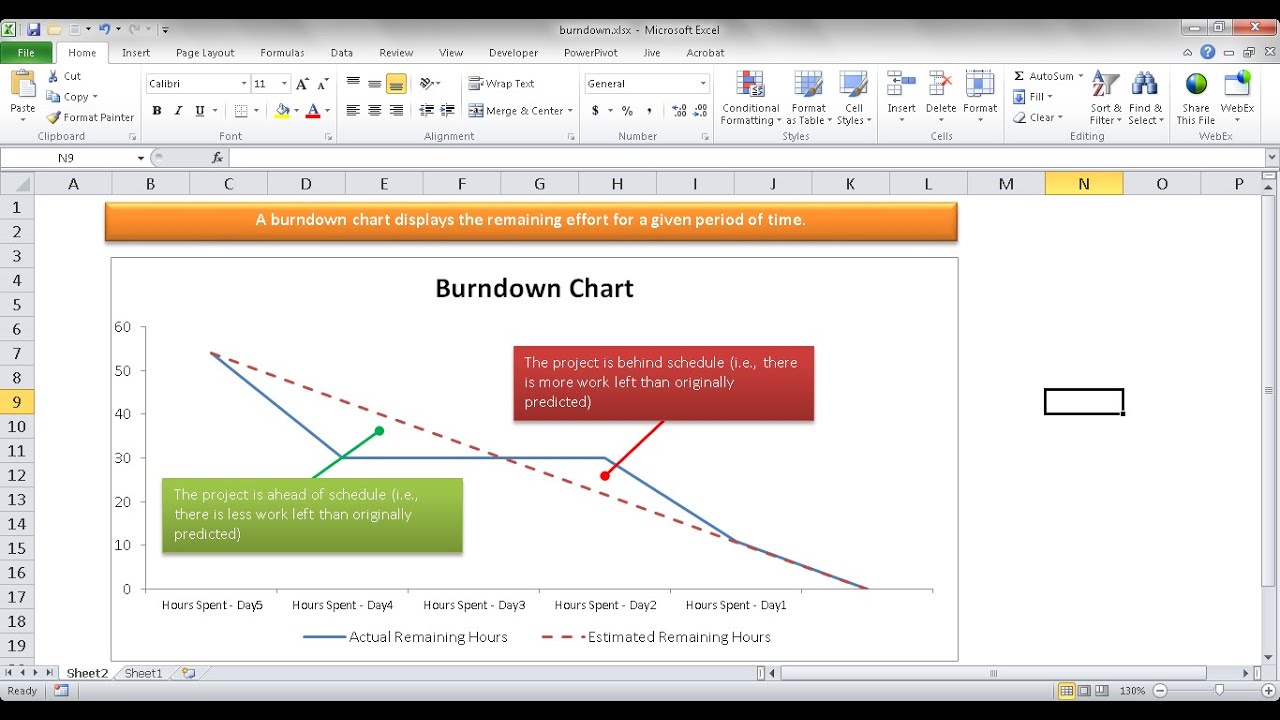
A burndown chart is one of the most useful project management tools for tracking progress. As its name suggests, it shows how much work remains to be done over the course of a project.
Burndown charts are commonly used in agile frameworks like Scrum But you don’t have to be doing formal agile development to benefit from a burndown chart Any project with a finite amount of work can utilize a burndown chart to ensure timely completion,
In this tutorial, I’ll walk you through how to create a simple yet effective burndown chart in Excel I’ll cover
- What a burndown chart is and why it’s useful
- The step-by-step process for building a burndown chart in Excel
- Tips for formatting and customizing your chart
- Common mistakes to avoid
So if you’re ready to add burndown charts to your project management toolkit, let’s get started!
What is a Burndown Chart?
A burndown chart is a visual representation of the remaining work in a project over time. It shows the total effort remaining on the vertical axis and the time (typically days) on the horizontal axis.
The chart displays two key lines:
-
Ideal burndown line – This shows the planned rate of completion. It decreases at a consistent pace based on the total work divided by the number of time intervals.
-
Actual burndown line – This shows the real progress made It will fluctuate based on how much work the team completes each time period
Ideally, the actual burndown line will closely track the ideal burndown line. This shows your team is on schedule. If the actual line is above the ideal line, you are behind schedule.
Here are some of the key benefits of using a burndown chart:
-
Visualize progress – See at a glance whether the project is on track
-
Identify scope creep – Spot when new work is added so you can take corrective action
-
Forecast completion – Predict whether you will finish the project on time based on the current burndown rate
-
Keep the team focused – Maintain urgency and focus by showing the remaining work
Now let’s look at how to build one of these helpful charts in Excel.
How to Make a Burndown Chart in Excel Step-by-Step
Here is a step-by-step guide to creating a simple burndown chart in Excel:
Step 1: Enter Your Project Information
- In cell A1, enter the project name
- In cell A2, enter the start date
- In cell A3, enter the end date
- In cell B1, enter the total number of days for the project
- In cell B2, enter the total work items or story points for the project
This provides the key information about your project that will drive the chart calculations.
Step 2: Build Your Timeline
- In cell A5, enter the first date for your chart timeline
- In cell B5, enter the timeline label (for example “Day 1”)
- Select A5:B5 and drag the fill handle down to autofill the remaining time intervals based on your project length
This creates a column showing the days, weeks, or other time intervals for your chart’s horizontal axis.
Step 3: Add the Ideal Burndown Line Values
- In cell C5, enter this formula:
=B2/B1 - Hit Enter, then double click the fill handle in cell C5 to copy this formula down the entire column
This calculates the ideal daily burn rate by dividing the total work by the total days. The result is a straight descending diagonal line showing the planned rate of completion.
Step 4: Build the Actual Burndown Line
Here is where you will capture the actual remaining work each time period:
- In cell D5 enter the formula:
=B2-E4 - In cell E5, enter the actual remaining work for the first time period
- In cell D6, enter:
=D5-E5and fill down
Cell D shows the ideal remaining work. You overwrite cell E each period with the real remaining work. Cell D then subtracts E to show whether you are above or below plan.
Step 5: Generate the Burndown Chart
Select your data table and insert a stacked column chart with the actual burndown line as a line graph:
- Select columns A through E
- On the Insert tab click the Column Chart button
- Choose the first stacked column chart option
- Right click the Actual Work data series and select Change Chart Type > Line
- Format and customize the chart as desired
The stacked columns show the ideal remaining work while the Actual Work line overlays to show your real progress.
And that’s it! Here are some tips for finishing off your burndown chart in Excel.
Burndown Chart Tips and Tricks
Follow these tips to get the most out of your Excel burndown chart:
-
Add milestones – Mark key interim milestones directly on the chart timeline to visualize upcoming goals
-
Format the lines – Use colors, dashes, and arrows to make the ideal and actual lines stand out
-
Include figures – Show total story points or hours remaining next to the chart for easy reference
-
Smooth the line – Use Excel trendlines to create a smoothed actual work line if data is volatile
-
Update frequently – Update the remaining work at least weekly, if not daily for best visibility
-
Avoid bad data – Don’t chart actual work higher than the ideal. Fix incorrect data for an accurate chart
-
Size appropriately – Make the chart sufficiently large so the trendlines and figures are legible
Common Burndown Chart Mistakes to Avoid
Here are some key mistakes that can torpedo your burndown chart effectiveness:
-
Not updating frequently enough – Infrequent updates hide problems
-
Failing to fix incorrect data – Bad data leads to incorrect charts
-
Showing incomplete timelines – Missing past dates or future dates distorts the view
-
Neglecting milestones – Lack of milestones causes focus on the end date only
-
Insufficient formatting – Poor readability obscures the chart’s message
-
Disjointed ideal/actual – Gaps between the lines confuse whether on track
-
Too much complexity – Don’t overload the chart with extra lines, colors, or figures
-
Not sharing with team – The chart only helps if everyone sees it!
Putting It All Together
As you can see, creating a simple burndown chart in Excel is straightforward. Follow the step-by-step instructions to build your foundation. Then apply the tips and tricks to customize the chart for your team’s needs.
Burndown charts are powerful visual tools for keeping projects on track. But garbage in, garbage out. Be diligent to enter accurate data and update frequently. Fix any incorrect actuals immediately to maintain the chart’s precision.
With the right data and design, your Excel burndown chart will provide an indispensable at-a-glance view of the project status. All the team needs to keep the momentum going and the finish line in sight!
So give it a try on your next project. Just don’t forget to share with the team! A burndown chart does no good if hidden on your computer. Post it prominently to motivate on-time delivery.
What Is a Burndown Chart?
A burndown chart is a visual representation of a team’s or project’s progress over time. With this snapshot, you can analyze your team’s pace and determine if they’re on track to finish on time.
The burndown chart can act like a “scoreboard” for your team, which they check to see how much work there is left and how well they’re doing. Visibility like this empowers your engineers to take ownership over their work. It’s part of what Kathryn Koehler, Director of Productivity Engineering at Netflix, described as “treating your team like adults” on the Dev Interrupted podcast:
The two main types of burndown charts are release and sprint. The release burndown chart tracks the progress of a scrum project’s release or version, whereas the sprint burndown chart is scoped to an individual sprint.
In this post, we’re going to focus on the sprint burndown chart since it is the more popular tool.
Using Burndown Charts for Agile Project Management
A sprint burndown chart is made up of several essential pieces of information:
- A horizontal axis that represents days of the sprint
- A vertical axis that represents work completed. The simplest method is to count the number of tasks completed, but the better approach is to use story points.
- Two lines. One is your estimated or ideal work line, and the other is the actual work line.
A basic burndown chart looks just like this:
The sprints starts in the upper-left corner of the chart on day zero. The lines slope downward toward the bottom right corner as the project progresses and work is “burned down”.
If the red Actual line is above the blue Ideal line, your team is behind schedule: You have not completed as much as you would have liked. If the Actual line is under the Ideal line, you are moving faster than expected.
With a burndown chart, all you have to do is look at which line is higher in order to answer the question: On we on track to deliver what we committed to?
