When building tables and entering data in Excel, adjusting cell sizes is an important formatting technique. The default cell heights and widths may not always suit your content layout and visibility needs. Thankfully, Excel provides a handy set of tools to customize cell sizing with just a few clicks.
In this guide, we’ll look at the various ways to change cell size in Excel across columns, rows, and sheets. Let’s examine how to:
- Set specific column widths and row heights
- Automatically resize cells
- Use the mouse to adjust sizes
- Set default sizes for new sheets
Optimizing your cell sizes helps data and headers fit neatly, reduces messy padding, and improves worksheet readability. Let’s dive in!
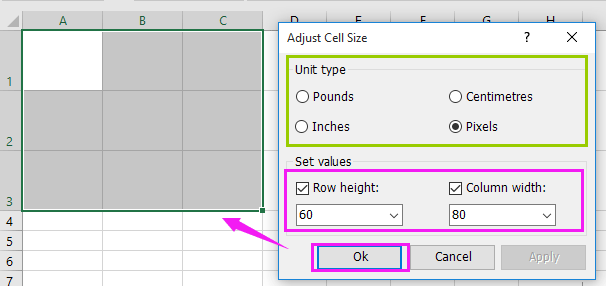
Setting a Column to an Exact Width
The most direct way to change a column’s width is by specifying it in inches Here are the steps
- Select the column or range of columns to adjust.
- On the Home tab click “Format” then “Column Width”.
- In the dialog box, enter your desired width in inches.
- Click “OK” to apply the new width.
This sets all the selected columns to the defined size, Helpful if you need headers to fit a certain space or data to meet format requirements
Adjusting Row Height Precisely
Similar to columns, row heights can be set to an exact measurement as follows:
- Select the target row(s).
- On the Home tab click “Format” then “Row Height”.
- Enter the height in inches in the dialog box.
- Click “OK” to finalize the change.
Now your rows will match the indicated size. Useful for spacing out header rows or expanding data rows.
Auto-Sizing Columns and Rows
Manually specifying sizes can be tedious. For quick fitting, Excel provides an AutoFit option:
To AutoFit Columns:
- Select the columns to adjust.
- On the Home tab click “Format” then “AutoFit Column Width”.
To AutoFit Rows:
- Select the rows to adjust.
- On the Home tab click “Format” then “AutoFit Row Height”.
This automatically sets the width or height to fit the content in that cell. It saves the effort of guessing the right size.
Resizing Cells with the Mouse
For fast interactive resizing, you can drag the cell edges:
- To resize column width – drag the right border of the column header.
- To resize row height – drag the bottom border of the row header.
This offers real-time visual feedback as you adjust, so you can release at the ideal size.
Setting Default Sizes for New Sheets
Rather than changing sizes sheet-by-sheet, you can define default widths and heights. These apply to all new sheets created.
To Set Default Column Width:
- Right-click the sheet tab and choose “Select All Sheets”.
- On the Home tab click “Format” then “Default Width”.
- Enter a new standard width in inches.
To Set Default Row Height:
- Right-click the sheet tab and choose “Select All Sheets”.
- On the Home tab click “Format” then “Default Height”.
- Enter a new standard height in inches.
Now your defaults are saved for consistency across sheets.
Handy Sizing Shortcuts
A few handy mouse shortcuts can speed up sizing operations:
- Double-click a column edge to AutoFit to contents
- Double-click a row edge to AutoFit the height
- Drag the edge while holding “Shift” to adjust multiple columns or rows together.
Familiarize yourself with these actions to optimize your resizing workflow.
Top Cell Sizing Tips
Keep these pointers in mind for flawless cell sizing:
-
Watch for ### signs indicating data that doesn’t fit the column. Widen until these disappear.
-
Narrow columns with no data to recover horizontal space.
-
Use AutoFit when first building tables to automatically size to headers and contents.
-
Set row heights to at least match the font size for optimal readability.
-
Triple-click a column edge to AutoFit the entire sheet at once.
-
Hold “Ctrl” while dragging edges to resize only cells with data.
-
Turn on gridlines temporarily to help visually guide alignment when sizing.
Sizing Cells Like a Pro
With this guide, you should feel empowered to take control of cell sizes in your Excel workbooks. Remember the options for setting specific sizes, auto-fitting, mouse adjusting, and defaults.
Here are some final size-changing scenarios to test your skills:
-
Set columns A:D to 100 pixels wide for displaying charts
-
AutoFit all header rows to neatly contain the labels
-
Standardize the sheet by setting default column and row sizes
-
Fit comment text by widening the cell to show the full content
-
Restrict numeric columns to 50 pixels to conserve horizontal space
Practice makes perfect! Don’t be afraid to experiment with different sizes to arrive at layouts that are visually clean, readable, space-efficient and well-proportioned. Crisp and consistent cell sizing makes a workbook feel polished, planned, and professional.
How to increase cell size in excel
How do I change the size of a cell in Excel?
If you prefer to adjust the cell size manually, you can do so by clicking and dragging the borders of the cell to make it wider or narrower. To do this, simply click on the border of the cell that you want to adjust and drag it to the desired size.
How to change column width in Excel?
For selecting some particular columns, left-click the first column tab for your provisional selection, hold the click, and then drag the mouse pointer toward the last column. Release the held mouse button at the column you want your selection to end. Then you can apply the column width in the same manner as explained in this method.
How do I resize a column in Excel?
To resize a column, select it and press the right mouse button to display the context menu. Choose the menu Resize option or press the shift+R key . Buttons show on the bottom of the LOV table that allow the application user to either shrink or increase the column size. Changing the search column Select the LOV table and open the context menu.
