Theres no pain quite like the sting of losing hours of work because of a software crash or power failure.
In an ideal world, youd save your work early and often. But there are times when, for whatever reason, you havent saved an Excel spreadsheet when disaster strikes.
The good news is that, in most cases, you can recover that unsaved Excel file with little or no data loss.
We’ve all been there – working hard on an Excel spreadsheet, only to have the power go out or your computer crash before you can save your work. That feeling of panic sets in as you realize hours of work could potentially be lost forever.
As someone who uses Excel daily, I’ve learned a thing or two about recovering unsaved Excel files over the years. While it can be frustrating in the moment, there are several ways you can get your work back through Excel’s built-in AutoSave and AutoRecover features.
In this article I’ll walk you through the step-by-step methods I use to find and recover unsaved Excel files based on two common scenarios
- Recovering a new Excel file that was never saved
- Retrieving a file with unsaved changes
I’ll also share my best tips for preventing data loss in Excel going forward, Get ready to breathe a sigh of relief – your unsaved work is not lost yet!
Recovering a New Unsaved Excel File
If you were working on a new Excel file that you hadn’t yet saved before disaster struck, don’t panic. As long as you have AutoRecover enabled (which it is by default), Excel automatically saves temporary versions of your work every 10 minutes.
Here are the steps I take to recover an unsaved new file:
-
Open Excel and click “File” > “Open” on the ribbon.
-
At the bottom of the Open window, click “Recover Unsaved Workbooks” after selecting “Recent.”
-
Browse the available unsaved files and look for yours. Double click to open it.
-
Finally, save the recovered file immediately under a new name.
If you don’t see your unsaved file there, it’s time to dig a little deeper. Close the Open window and click “File” > “Options” > “Save” to find the AutoRecover file location.
For me, it’s:
C:UsersMyNameAppDataRoamingMicrosoftExcelOpen this location, and search for your unsaved file. If you still can’t find it, try a file recovery program or contact Excel support. But in most cases, AutoRecover will have your back!
Retrieving an Excel File with Unsaved Changes
What if you were working in an existing Excel file but didn’t save your latest changes? As long as AutoRecover is on, you can typically restore the most recent unsaved version of that file.
When you reopen Excel after a crash, a “Document Recovery” pane may automatically appear with unsaved files listed. If you see yours there, just click to open it and save the changes!
If not, try these steps to find your unsaved edits:
-
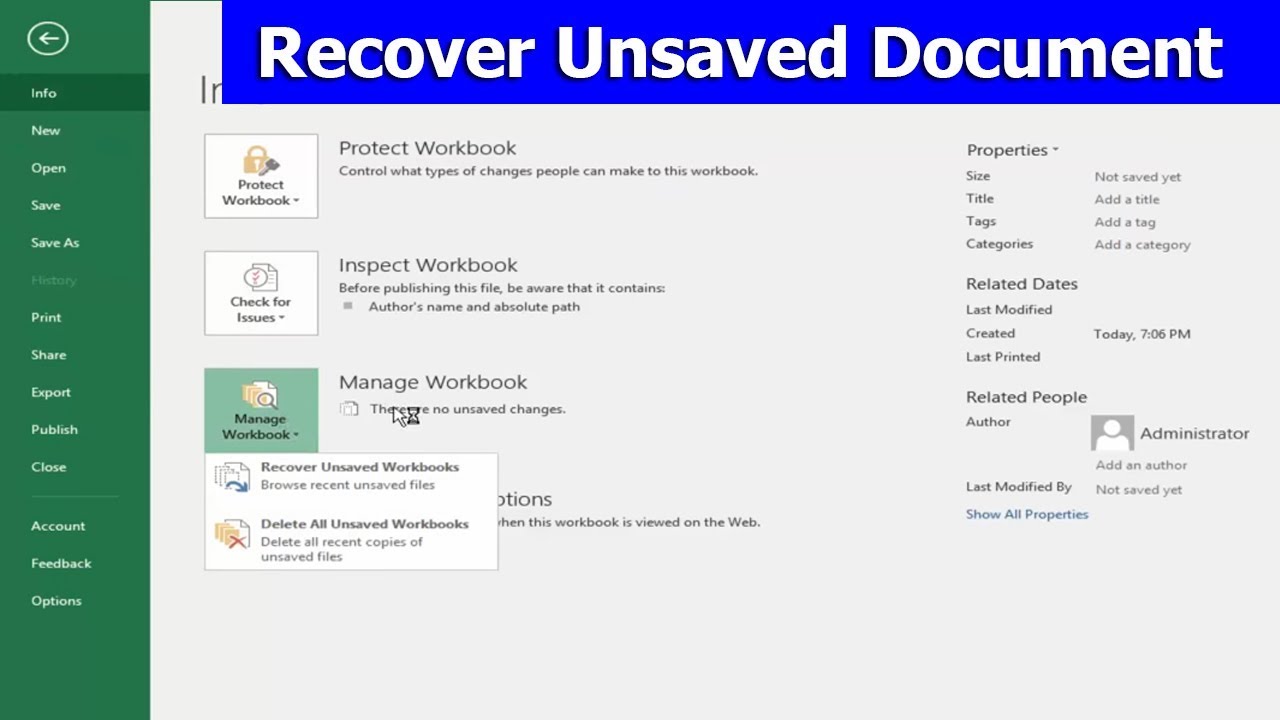
In Excel, go to “File” > “Info” > “Manage Workbook” > “Recover Unsaved Versions.”
-
Browse the list of unsaved versions and preview them.
-
When you find the changes you want to recover, click “Restore” to open the version.
-
Save it right away under a new name.
Again, this works because AutoRecover has your back, saving revisions as you work. But if for some reason you still can’t find your unsaved changes, your last resort is reverting to a previously saved version from File History or cloud storage.
Restoring Previous Versions from File History and OneDrive
If AutoRecover fails, I rely on File History or OneDrive version history to restore unsaved changes and previous versions of Excel files.
To use File History:
-
Right-click the file, choose “Properties”, and look under Previous Versions.
-
Select the version you want, and click “Restore” to recover it.
For OneDrive:
-
On OneDrive.com, right-click the file and choose “Version History.”
-
Click the version you want, then click “Restore” or “Download.”
With both options, you can preview different versions before deciding which to restore. This works great for recovering important older versions that were accidentally overwritten.
My Best Tips for Preventing Excel Data Loss
While you can recover unsaved Excel files, it’s much better to avoid data loss in the first place. After learning the hard way a few times, I now stick to these habits:
-
Enable AutoRecover: Make sure it’s on in Excel’s Save options and set to save every 5-10 minutes.
-
Save regularly: I hit Ctrl+S every few minutes to update my file – don’t rely only on AutoSave!
-
Use OneDrive or Google Drive: I keep all my Excel workbooks synced to cloud storage for auto-backup.
-
Create file backups: For super important files, I make backup copies in other locations.
-
Close Excel properly: Never force quit Excel or shut down without closing files first.
Following these simple practices gives me confidence that my Excel work will be backed up and protected. I rarely lose files these days!
Don’t Panic! You Can Get Your Unsaved Excel Files Back
Accidentally closing Excel without saving or having your computer crash in the middle of editing is never fun. But by leveraging AutoRecover, File History, OneDrive, and good file management habits, you can almost always recover unsaved Excel work.
The next time disaster strikes, use the step-by-step methods I outlined to restore your newest edits and find previous versions of Excel files. With the right tools and knowledge, you can rescue your hard work and avoid needing to start over from scratch.
Frequency of Entities:
https://www.excel-university.com/how-to-recover-excel-file-not-saved/: 3
https://spreadsheeto.com/recover-excel-file/: 2
How to recover a saved Excel file with unsaved work
If Excel closes before youve had a chance to save the most recent changes to your file — but the workbook has already been saved at least once — the program makes it easy to recover that lost work.
1. Start Excel and then, in the pane on the left, click Open.
2. Choose the file you were working on, but didnt have an opportunity to save before losing work.
3. In most cases, you should see the Document Recovery pane on the left. It lists all unsaved files you had open before the crash. Choose the file you want and then save it to keep your work.
How to recover an unsaved Excel file
As a general rule, Excel frequently saves your work automatically in the background, and allows you to recover the latest version of your work if Excel should close, even if youve never had a chance to save the file even once.
1. Start Excel and then, in the pane on the left, click Open.
2. At the bottom right, click Recover Unsaved Workbooks.
3. Choose the unsaved file from the list of available unsaved workbooks.
How to Recover Excel File Not Saved or Lost [Tutorial]
How to recover unsaved Excel files?
Most of the time, the files can be retrieved either way, but the best method for recovering unsaved Excel files will differ based on your goal. To restore your new file without any saved updates, open Microsoft Excel first. Then, click Open on the File tab on the Ribbon.
How do I recover a saved Excel file?
For the first scenario described above, the way to recover your never – before – saved file is to, first, open Microsoft Excel. Then go to the File tab on your Ribbon and click Open. Click Recent and then scroll to the bottom of the page and click Recover Unsaved Workbooks (see the screenshot below).
How do I save an unsaved Excel file?
Open a new Excel workbook. In the dialog box that opens, scroll through the list of unsaved Workbooks and open the one you want. Save the file (using the ‘Save As’ option) with a different name in the location of your choice. By default, Excel saves a copy of all the unsaved files at the following location:
How to recover an unsaved file?
Don’t panic and discover below how to recover an unsaved file. Go to FILE -> Open. Choose Recent Workbooks. Scroll down and click on the Recover Unsaved Workbooks button at the bottom of the list. Note. You can also go to FILE – > Info, open the Manage Workbooks drop-down and select Recover Unsaved Workbooks from the menu.
