Writing out a work schedule with pen and paper might seem simple, but it doesn’t always work in the modern work environment. Organizations that invest in digital scheduling and time-tracking software can decrease scheduling mistakes and off-the-clock work.
Plus, work schedules should be easy to edit, immediately shareable, and flexible. Learning how to make a work schedule in Excel can help fulfill these needs if work scheduling software is out of reach.
Whether you’re planning your own workday or organizing a team of employees, creating a work schedule in Excel is an easy and effective way to keep your work schedules on track.
As a manager, creating a weekly or monthly work schedule for your team is a crucial task. But it can also be tedious and time consuming if done manually. Fortunately, using Excel to make a staff schedule saves time and helps organize shift scheduling.
In this step-by-step guide, I’ll show you how to create a full work schedule in Excel complete with employee names, days, times, and more. With these tips, you can quickly generate a schedule that provides coverage when you need it. Let’s get started!
Why Use Excel for Scheduling?
Before we dive into the steps, let’s look at why Excel is a great choice for making work schedules:
- Ease of use – Excel is intuitive software many people already have. No special training needed!
- Visual interface – Schedules are easy to read and scan as grids.
- Editable – Schedules made in Excel can be quickly updated as needs change.
- Shareable – Excel files are easy to share with employees.
- Familiar to employees – Most staff already know how to use Excel.
- Free – Excel comes free with Microsoft Office or Google Sheets.
With Excel’s flexibility and widespread use, it just makes sense for scheduling. Now let’s look at how to put together a schedule.
Step 1 – Open a Blank Excel Spreadsheet
First, launch a new blank Excel workbook to begin building your schedule This provides a open canvas with empty cells to work with
A few ways to open a new file
- Press Ctrl + N on your keyboard
- Go to File > New in the Excel menu bar
- Click the “New” icon that looks like a blank page
Start with a fresh workbook even if you have an existing schedule file. We’ll be creating the schedule structure from scratch.
Step 2 – Create Column Headers
With a blank sheet opened, begin adding the headers by typing each day of the week across the top row. This will become your column labels.
- For example, in cell A1 type Sunday, B1 type Monday, C1 type Tuesday etc until you reach Saturday.
Spacing out the days of the week across columns gives you plenty of room to add shift details under each header later on.
Step 3 – Add Employee Names Down the Left Side
Next, input your staff members’ names down the leftmost column.
- Place each team member’s name in a separate row.
This left column will become your row labels. Each name here will represent a row you can schedule for that employee.
Leave some blank rows between names to space things out and make the schedule neater.
Step 4 – Title Additional Columns
I recommend adding a few supplemental headers to provide more context in your schedule:
-
Times Column – Helps identify shift lengths. Title a column to the left of your days of the week “Times” and put hours here like 8am, 9am, 10am etc.
-
Total Hours Column – Lets you tabulate weekly hours per employee. After the last day column, make a “Total Hours” header and input a SUM formula.
-
Notes Column – An optional column for shift notes and details. Add a “Notes” header to the right of your dates.
These extras make your schedule more understandable at a glance.
Step 5 – Enter Employee Shifts
Here comes the fun part – filling in the actual shift details for each person!
For each employee:
-
Input start and end times – List the beginning and end of their shift under the corresponding day column.
-
Show break time – Split up the shift if there is a unpaid break.
-
Copy/paste to repeat – Copy identical shifts to paste for multiple days.
-
Color code shifts – Use Excel’s cell fill colors to color code distinct shifts.
Aim to make the schedule very visual and easy to scan. With just a glance, anyone should be able to see which employees are working and when.
Step 6 – Add Up Total Hours
Use Excel formulas to automatically tabulate weekly hours worked in the “Total Hours” column.
Here’s one way:
- Select the cell to the right of an employee’s name
- Type =SUM(
- Highlight all the cells containing that employee’s shifts
- Type ) and press Enter
This will calculate the total for that row. Copy the formula down for each employee. The beauty of Excel!
Step 7 – Include Notes Where Needed
For any shift details that don’t fit in the main table, use the Notes column to provide extra information.
For example:
- Appointment times
- Requested days off
- Job duties or responsibilities
- On-call designations
- Anything else worth documenting
Keeping relevant notes right in the schedule makes them easy to find later.
Step 8 – Save and Share the Schedule
Once your schedule is complete, be sure to:
- Save it with a name like “May 2022 Staff Schedule.xlsx”
- Print a copy to post or hand out
- Email it to all employees for reference
- Share access if using Google Sheets or Office 365
Your team needs access to stay up-to-speed on the latest schedule. Make it available through as many channels as possible.
And that’s it – you’ve created a professional, easy to digest work schedule in Excel! Updating it each week or month only requires modifying the existing template.
Work Schedule Template in Excel
For your convenience, I’ve created a free, downloadable Excel work schedule template covering all the steps in this guide.
You can download and customize it for your own scheduling needs:
DOWNLOAD EXCEL WORK SCHEDULE TEMPLATE
Now let’s look at some examples of work schedules in Excel.
Examples of Excel Work Schedules
Here are few examples showing how a finished schedule looks after following the steps in this guide:
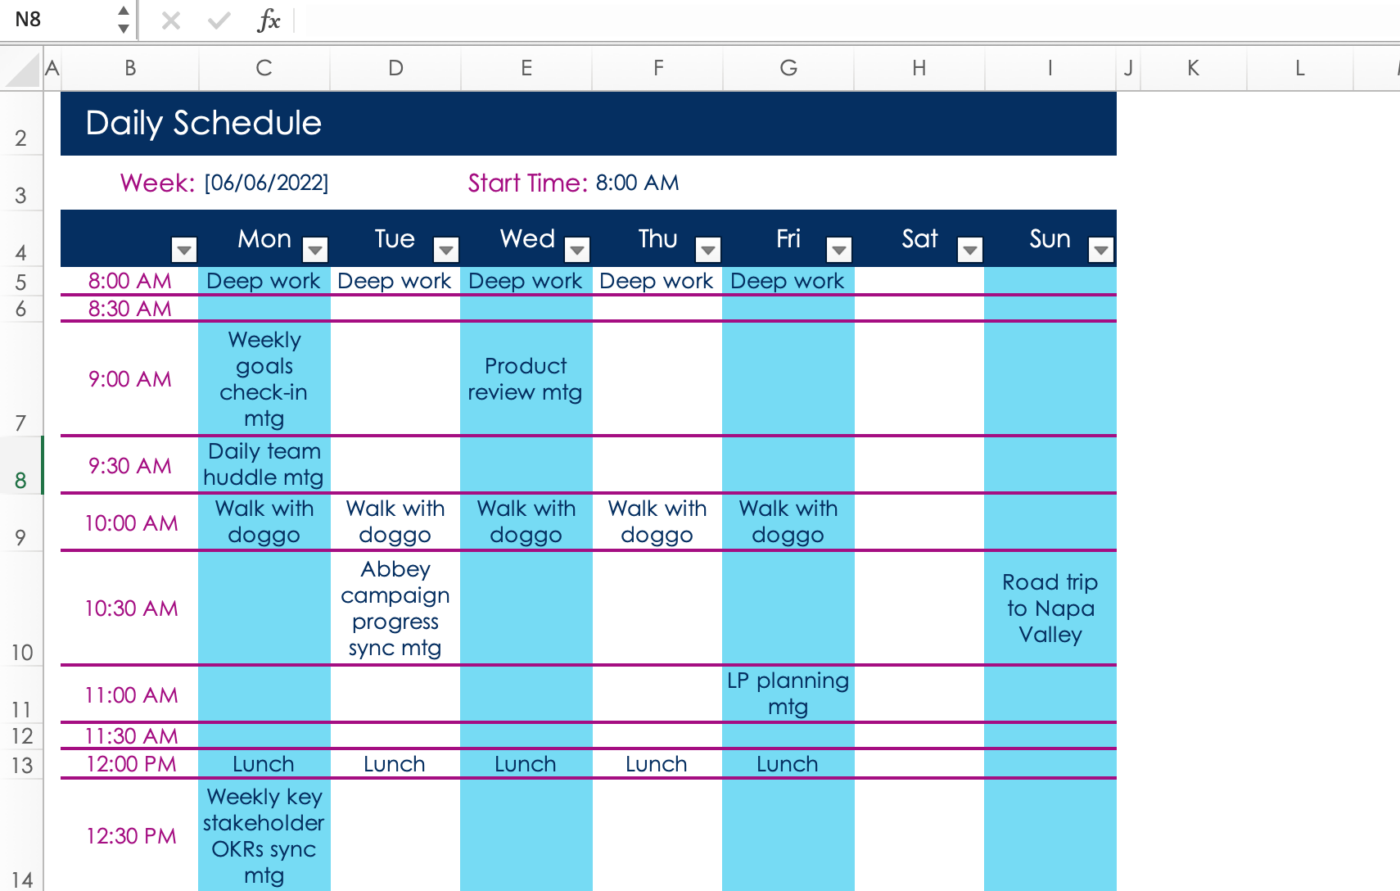
Weekly Team Schedule
A simple weekly schedule for a small team:
![Weekly team schedule][weekly-schedule]
Monthly Appointment Schedule
A monthly schedule for reservations and appointments:
![Monthly appointment schedule][monthly-schedule]
Shift Schedule for Manufacturing
A 24/7 shift schedule for a factory:
![Manufacturing shift schedule][shift-schedule]
As you can see, Excel schedules can take many forms depending on your specific needs.
Tips for Better Excel Schedules
To make your life easier, here are some helpful tips for creating and managing Excel schedules:
- Use color coding to distinguish types of shifts or teams.
- Add conditional formatting to highlight schedule conflicts.
- Create separate sheets for different locations or teams.
- Make a yearly schedule with separate worksheets for each month.
- Use freeze panes to keep headers visible when scrolling.
- Have managers or employees submit requests in a separate sheet.
- Protect the sheet with passwords to avoid unauthorized changes.
- Turn on change tracking to see edits made by others.
- Set the print area to only print relevant parts of the schedule.
Getting creative with Excel’s features will save you time and headaches around scheduling.
Scheduling your staff in Excel is easy and intuitive once you know the steps. By following this guide, you can create a structured, visual schedule that suits the needs of any team, project, or company.
The flexibility of Excel makes it the ideal platform for managing something as fluid as shift schedules. Use it to organize employee hours in a way that keeps everyone informed and working together.
Excel schedules: What to consider
Before diving into the ins and outs of Excel, you need to have a clear picture of what you want to achieve with your schedule. Work schedules can come in many different shapes and sizes, and each type can be used to achieve different goals.
Do you need a work schedule for your own personal work day, or are you scheduling a team of employees’ shifts across a week or two? Whatever schedule you create, focus on ease of use. You should be able to glance at a work schedule and almost immediately know who needs to be where at what time, quickly track hours for payroll, and view current and upcoming project steps.
How to create a work schedule in Excel
You don’t need high-level Excel skills to whip up a work schedule in Excel. In fact, any Excel user — from beginner to advanced — can quickly and easily create a usable, flexible work schedule.
Before creating a work schedule in Excel:
- Understand employee workloads: Project-based work plans with task management may need specialized work schedules.
- Evaluate available resources: If a business does not have the resource to bring a project to completion, work schedules may need to shift.
- Evenly distribute work: Work should be distributed evenly to employees based on position, expectations, and experience.
To create a work schedule in Excel, follow these 10 steps:
1. Open Excel and start a new blank spreadsheet.
2. Highlight cells A1 to E2 and select “Merge and Center.” Enter your preferred schedule name in the merged cells.
3. Select cells F1 to H2. From the “Borders” dropdown, choose all borders.
4. In these cells, enter the below key headers. After entering the headers, adjust the cells to fit the text.
- F1: Daily Start Time
- G1: Time Interval
- H1: Starting Date
5. In cell A3, enter “time.”
6. In cell A4, enter the starting work time — for example, 7:00 a.m.
7. From cell A5 down, enter time in 30-minute increments.
8. From cells B3:H3, enter the days of the week. Begin with whichever day works best for your work schedule.
9. Select all cells and center-align text. Then adjust cells to fit the text.
10. Optional: Color code times and days of the week. Then save your schedule as a template.
After creating the base work schedule, you can fill in the days and times with project tasks, assignments, meetings, and other necessary information.
How to create a work schedule in Excel
How do I create a work schedule for my team?
Use these steps as a reference when producing a work schedule for your team: 1. Open a blank spreadsheet Start by searching for the Excel application on your computer or clicking on the Excel icon on your desktop. On the home screen, click “Blank workbook.” This opens a new spreadsheet where you can create your custom schedule. 2. Create a header
How do I create a weekly schedule in Excel?
Steps: Choose the Alignment ribbon group’s Merge & Center option for cells B2 to I2, and then type the heading “Weekly Schedule”. Navigate to Cell Styles. Choose Heading 2 from the drop-down menu. In column B4, record your work schedule’s Starting and Ending Times. The beginning time is 8:00 AM, and the ending time is 5:00 PM.
How do I create a custom schedule?
Start by searching for the Excel application on your computer or clicking on the Excel icon on your desktop. On the home screen, click “Blank workbook.” This opens a new spreadsheet where you can create your custom schedule. 2. Create a header Insert a header for your schedule so everyone on the team clearly understands the document.
How do I add a schedule to a calendar?
Excel doesn’t directly integrate with calendar apps, but you can export your Excel schedule to a CSV file and then import it into most calendar applications. Open Excel and create a new blank spreadsheet. Set up your columns and rows for days of the week and employee names or time slots. Enter your data for each shift or task.
