Email is an essential communication tool for most people. We use it to stay in touch with friends and family, collaborate with coworkers, and more. But have you ever wanted to save an important email to refer back to later? Knowing how to properly save an email can be incredibly useful.
In this beginner’s guide, I’ll walk you through the step-by-step process for saving an email on both Windows and Mac operating systems Whether you use Outlook, Gmail, Yahoo, or another email platform, the general principles are the same With just a few clicks, you’ll be able to preserve important emails as files on your computer for future reference.
Why Save an Email?
Here are some of the most common reasons you may want to save an email:
-
To refer back to important information or attachments. By saving an email, you can quickly find it again later instead of hunting through your crowded inbox.
-
To preserve a record. For tax documentation, contracts, receipts, or other official business, saving an email creates a timestamped paper trail.
-
To archive meaningful correspondence, Maybe it’s an email from a loved one you want to keep Saving it prevents accidental deletion,
-
To send to someone else. You can forward saved emails as attachments.
-
To print. Saving an email allows you to print a clean hard copy without extraneous inbox clutter.
-
To export from one email platform to another. If you’re transitioning email providers, saving emails helps transfer your data.
How to Save an Email on Windows
The process for saving an email on Windows will vary slightly depending on whether you use Outlook, an email client like Thunderbird, or a webmail service like Gmail through your browser. But the general steps are as follows:
If You Use Microsoft Outlook:
-
Double-click to open the email message you want to save.
-
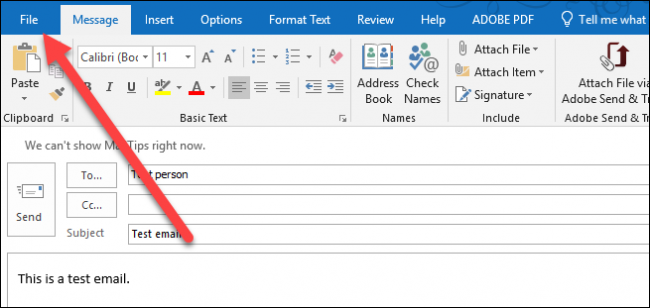
Click “File” in the top menu bar and select “Save As” from the dropdown menu.
-
In the “Save As” dialog box that opens, use the left “Folder” pane to select the location where you want to save the email. This might be a local folder like “My Documents” or a specific Outlook folder you created.
-
In the “File name” field at the bottom, enter a descriptive name for the saved email file.
-
By default, it will save as an Outlook Message Format (.msg) file. You can choose another file format like .eml if preferred.
-
Click “Save” when you’re ready.
-
The email will now be accessible in the designated folder as a file you can open anytime.
If You Use Another Email Client:
-
Open the email you want to save.
-
Look for a “Save As” or “Export” option in the File menu. This may be under a Menu icon, Options/Tools, or in the email header itself.
-
Select a save location and file format when prompted. Common options are .eml or .msg.
-
Enter a file name and click “Save.”
-
The saved email will appear as a file in the selected folder location.
If You Use Webmail Like Gmail:
-
Open the Gmail web interface and locate the email you want to save.
-
Click the downward arrow next to the Reply button to expand menu options.
-
Choose “Show original” from the menu. This displays the full email contents including headers.
-
Right click anywhere in the message body.
-
Select “Save as” from the popup menu.
-
Choose a save location like your Desktop or Documents folder.
-
Enter a file name, pick a file format like .eml, and click “Save.”
-
The email is now saved as a file for easy access outside of your webmail inbox.
How to Save an Email on Mac
Saving an email works very similarly on a Mac as it does in Windows. Here’s an overview:
If You Use Apple Mail:
-
Open the email you want to save.
-
Click “File” and select “Save As…”
-
Pick a folder location and enter the file name. The default format will be .eml.
-
Click “Save” and the email will be accessible as a file.
If You Use Microsoft Outlook:
-
Open the target email.
-
Select “File” then “Save As.”
-
Choose a save location and file format.
-
Name the file and click “Save.”
If You Use Webmail:
-
Open the email in your web browser.
-
Right click or ctrl + click in the message body.
-
Choose “Save As” from the menu.
-
Pick a destination folder and file format.
-
Enter a file name and click “Save.”
-
The email will be downloaded from webmail as a file.
The saved email will now be available outside your email application for easy access and sharing.
Tips for Saving Emails More Efficiently
Here are some power-user tips for saving emails even faster:
-
Create a dedicated email save folder. Having a single go-to folder avoids hunting for a save location every time.
-
Use keyboard shortcuts. For example, CTRL+S or ⌘+S lets you save without using menus.
-
Set default save formats. Skipping format selection each time saves clicks.
-
Automate naming. Apply formulas like date+subject line to filename so you don’t have to manually enter names.
-
Merge similar emails into one. Use forwarding to aggregate content from multiple emails into a single saved file.
-
Save email attachments separately. Detach attachments first to preserve important documents.
-
Save email automatically. Use rules to save sent or received emails based on keywords or other criteria.
Why Save Emails As Files?
While saving emails may add an extra step to your workflow, the benefits of being able to quickly locate important messages and preserve email content outside your inbox generally outweigh the small amount of extra effort.
Think of saving an email as you would saving a photo or document file. It removes the content from the temporary, disorganized space of an inbox or gallery and places it into permanent organized storage for reliable future access. Emails are often just as important and worth saving.
So next time you receive an email you need to reference later, give it the same care you would an important photo or work document. Now that you know how to easily save emails on Windows and Mac, you’ll always have a copy of treasured messages and records safe, sound, and accessible when you need them.
2 Answers 2 Sorted by:
As i know, we can export email, contacts, and calendar to an Outlook .pst file to back up. Please refer to this article to export:
Outlook includes an ability to archive mail (Exchange, IMAP and POP).
Go to Outlook, Options, Advanced, Auto Archive.
Set up Archive, give it a file name (that you can find), and then make sure all Outlook Folders are set to archive. Folder Properties. They should be set up.
Set the Archiver to run in a day or two and for everything 1 day old.
Everything in an email will be archived (email, to, from, attachments and all that).
I assume your school account is Exchange and so Archiving is your best bet here.
Once the archive has been created, you can open it with Outlook of your own because archives are PST files.
How to save an email as a PDF on Gmail or Outlook
How do I save a message?
In Mail, from the message list, select the message you want to save so it opens in the reading pane, or double-click the message to open to open it in a new window. From the message header, select More actions > Save as. Tip: You can also right-click the message from the message list and from the menu, select Save as.
How do I save an email as a PDF?
For example, if you have Adobe installed, you’ll likely see an “Adobe PDF” option. That will work just as well. Next, click the “Print” button. In the “Save PDF As” window that opens, select where you want your PDF to be saved, type a filename, and then click the “Save button. You have now saved your email as a PDF.
How do I save an email in outlook?
To save an email from the Outlook client, open the email and click “File.” Now, click the “Save As” button. Choose the location where you want to save the email and then select the “Save” button. Your email will be saved in .msg format, which is a Microsoft format you’ll need to open in Outlook.
How to save an email in Outlook 365?
Launch Outlook. Select the message that you want to save. Now click the File tab and click Save as in the backstage view. A Save As dialog box will open. Choose the folder where you want to save the email as a file. In the File Name box, name the file, then click Save. The Email is saved as a File.
