Do you want to learn how to merge cells in Google Sheets? We’ve got you covered – this blog will succinctly lay out all the options at your disposal.
Google Sheets allows you to merge two or more cells into a single cell. This practice has several applications.
For instance, merging cells is especially useful when you want to create a title that spans multiple columns in a few clicks. But this is just one of the many potential use cases for merging cells.
The following guide will demonstrate all the ways to merge cells in Google Sheets, based on examples and step-by-step walkthroughs.
One of the many useful features of Google Sheets is the ability to merge cells. Merging cells allows you to combine multiple cells into one larger cell. This can help organize and present your data in a cleaner way.
In this comprehensive guide, we’ll explain what merging cells means, why you may want to do it, and walk through the entire process of merging cells in Google Sheets using simple step-by-step instructions.
What Does Merging Cells Mean?
Merging cells refers to combining two or more adjacent cells in a spreadsheet into a single larger cell The cell values from the merged cells are consolidated into one
For example let’s say you have data in cells A1, B1 and C1. If you merge these three cells, their data will be merged into a single wider cell spanning columns A through C.
When you merge cells, only the contents of the top-left cell are kept. The other merged cells become blank. You can then enter data into the larger merged cell as needed.
Why Merge Cells in Google Sheets?
Here are some common reasons you may want to merge cells in your spreadsheets:
- To create wider cells that span multiple columns for headings or labels
- To make cleaner spanning rows or columns by removing blank cells
- To create a larger cell for text blocks, lists, or other long form content
- To combine data from duplicate cells into one master cell
- To group together cells for a total or summary value
- To present or organize data in a more visually appealing way
In essence, merging cells allows you to structure your sheet and present data in a customized way for better visualization.
Step-by-Step Guide to Merge Cells in Google Sheets
Without further ado, let’s jump into the step-by-step instructions for merging cells in Google Sheets.
1. Open the Google Sheet
-
Go to docs.google.com and open the spreadsheet containing the cells you want to merge.
-
You must have edit access to the sheet in order to merge cells.
2. Select the Cells to Merge
-
Click on the first cell you want to merge.
-
Then hold down the Shift or Ctrl key to select additional adjacent cells.
-
You can select an entire row or column by clicking the row/column header.
-
All selected cells will be merged.
3. Click Format > Merge
-
With the cells selected, click on the Format menu option at the top.
-
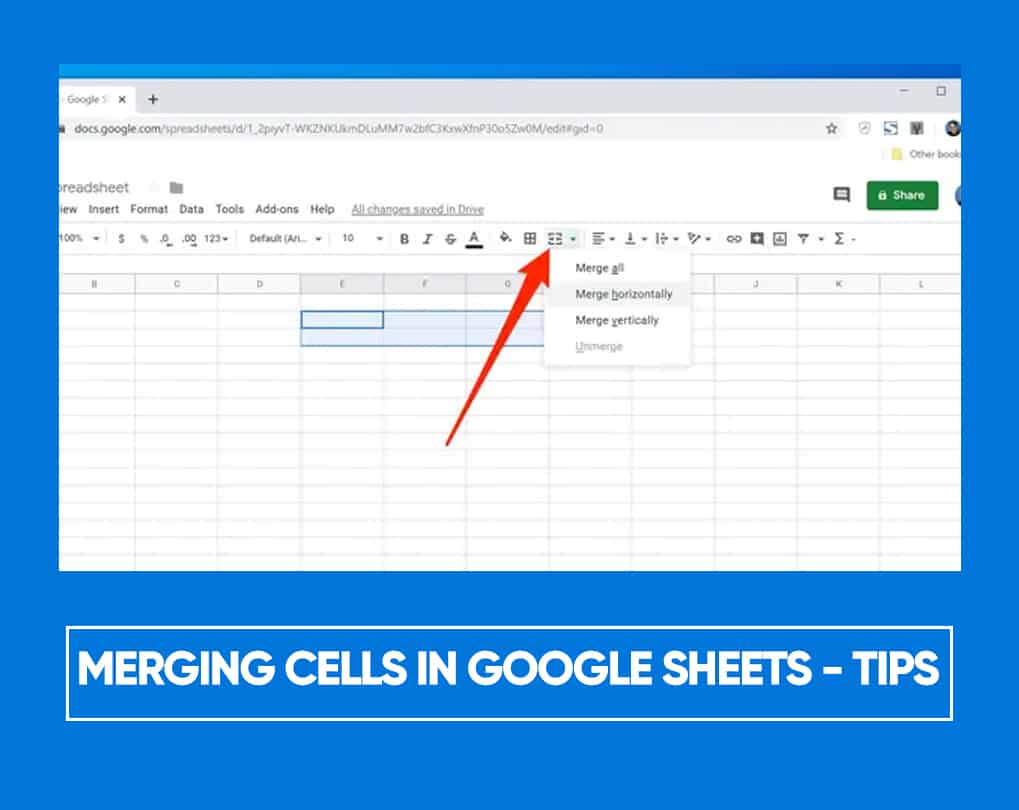
From the dropdown menu, select Merge.
![][]
4. Choose Merge Type
- In the pop-up window, there are three merge types: – Merge all cells – Merge horizontally – Merge vertically
- Select the appropriate option depending on how you want to merge the cells.
- Click Merge to complete the action.![][]
And you’re done! The selected cells will be merged into a single larger cell.
5. (Optional) Split Merged Cells
To undo a merge and split the cell back into individual cells:
- Select the merged cell you want to split
- Click Format > Merge again
- Select Unmerge in the pop-up window
That will split the merged cell back into multiple cells.
Additional Merging Tips and Tricks
Here are some handy tips to make merging cells in Google Sheets even easier:
- Use keyboard shortcuts. Instead of the menu, press Ctrl+Shift+M (Windows) or Cmd+Shift+M (Mac) to merge selected cells.
- Merge by right-clicking. Right click the selected cells and choose Merge cells from the context menu.
- Merge on insert. Check the box for Merge cells upon insertion when inserting rows or columns to automatically merge cells.
- Adjust cell borders. Borders may need adjusting after merging cells. Use Format > Borders to fix borders.
- Merge by dragging. Click and drag across multiple cells while holding Shift or Ctrl to select and merge in one move.
- Merge entire sheet. Select all cells (Ctrl/Cmd+A) and merge to make one large cell spanning the entire sheet.
When Not to Merge Cells in Google Sheets
Merge cells judiciously in Google Sheets. Here are some cases when you may want to avoid merging cells:
- In data tables, when you need to sort or filter rows. Merged cells can’t be properly sorted/filtered.
- When sharing collaboratively. Merged cells may cause issues with shared editing by multiple users.
- With formulas that refer to cell ranges. Cell references may need adjustment after merging.
- For tracking changes. Merged cells won’t show granular change history across individual cells.
- With conditional formatting rules. Rules may not work properly when applied to merged ranges.
- For data validation. Merged cells only validate based on the upper-left cell value.
- On protected sheets. Merged cells on protected sheets can only be edited by sheet editors.
In general, avoid merging cells containing data you need to frequently analyze, visualize, or collaborate on. Use merging just for presentation.
Troubleshooting Errors When Merging Cells in Google Sheets
Here are some common errors you may encounter and how to fix them when merging cells:
- You are trying to merge overlapping merged cells. Unmerge any merged cells first before attempting to merge a new range.
- Cannot merge because other users are currently editing. Wait for other collaborators to finish editing before merging.
- Merged cells cannot be filtered. Turn off filtering or unmerge cells before using filters.
- Formula parse error. Use absolute references and adjust cell ranges in formulas after merging.
- Cannot edit this merged cell. Unprotect the sheet or ask a sheet editor to edit the merged range.
- Circular dependency error. References to merged cells may be causing a circular reference. Check formulas.
Following these troubleshooting tips should help resolve any issues when merging cells in Google Sheets.
Next Steps After Merging Cells in Google Sheets
After you’ve successfully merged cells, here are some next actions to take:
- Format the merged cell: Customize text styles, alignment, background color, etc.
- Add or edit content: Input text, numbers, links, bullets, images, etc as needed.
- Adjust formulas: Fix cell references to work with the merged ranges.
- Update charts: Ensure charts that depend on the data are synced with the merged cells.
- Share or collaborate: Let collaborators know about merged cells if sharing the sheet.
- Create a merged cell template: Save a sheet with preset merged formats for reuse.
Do these steps as applicable to make the most of your newly merged cells in Google Sheets!
Merging cells is a simple but immensely useful trick to create formatted, customizable tables and lists in Google Sheets.
To quickly recap how to merge cells in Google Sheets:
-
Select the cells to merge
-
Click Format > Merge
-
Choose the merge type
-
Click Merge
-
Optionally split merged cells later with Unmerge
So go ahead, merge cells seamlessly in your sheets for structured data presentation! Just be mindful of when not to merge cells.
Merge cells in small datasets
Avoid merging cells in large datasets, especially in cells with formulas, since this can disrupt calculations and cause errors. It’s best to use the merge cells option to format your data tables and other presentational choices.
Create a Google Sheets Formula
You can also use formulas to combine data from two cells into a single cell. Let’s try this using the original dataset we pulled from HubSpot. You can do this with the walkthrough below, or use Coefficient’s free GPT Copilot to generate your formulas. Here’s a quick video on the free formula builder.
Now, let’s jump into the manual formula build to merge your cells. For this example, let’s combine the first and last names of the Deal Owners into a single cell by using a formula.
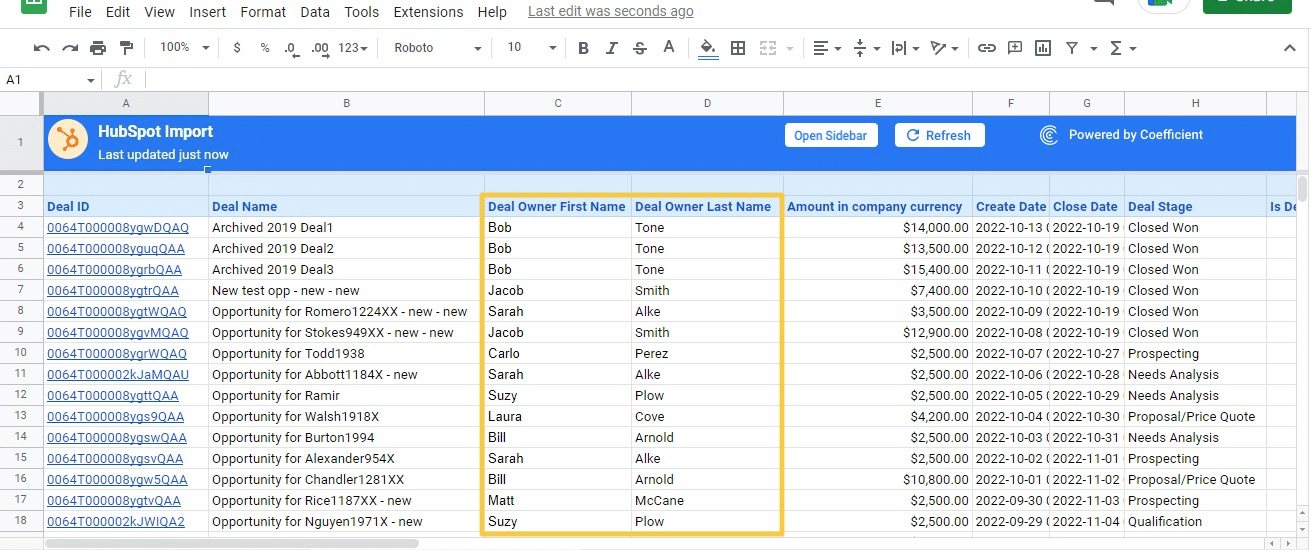
First, add another column at the right of the Deal Owner Last Name column (column D) and type in Full Name as the header.

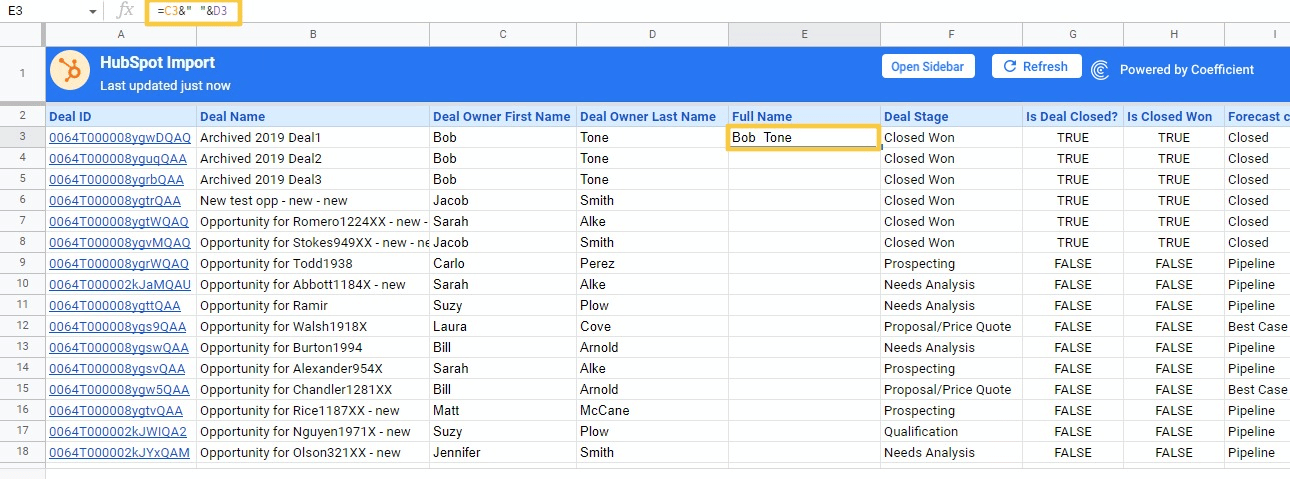
Next, click the cell where you want to display the full name (cell E3 in this case).
Then type in the formula below to merge the first and last names in cells C3 and D3 in your new cell.
Syntax:
=[Deal Owner First Name cell]&””&[Deal Owner Last Name cell]
Formula:
=C3&” “&D3
Press Enter and you’ll see the combined first and last name in your cell.
The ‘Auto Fill’ feature allows you to automatically apply the same formula to the rest of the column. Otherwise, drag the formula down to apply it to the entire column.

The formula lets you merge cell values quickly and easily without having to manually copy-and-paste the data over.
How to use the “Merge Cells” tool in Google Spreadsheets
How to merge multiple cells in Google Sheets?
Merging multiple cells in Google Sheets. Merge Cells in Excel: Select multiple cells to merge. Click on the Merge & Center icon on the Home tab of the ribbon to merge cells and center data across the selected range.
What does merge all mean in Excel?
Merge All: Merges all the cells into one cell that spans the entirety of the selection, horizontally and vertically. Merge Horizontally: Merges the selected cells into a row of the selected cells. Merge Vertically: Merges the selected cells into a column of the selected cells.
How do I merge rows and columns in Excel?
Highlight the cells you want to merge. Click on the arrow just next to “Merge and Center.” Scroll down to click on “Merge Cells”. With alignment preserved, this will combine all rows and columns into a single, sizeable cell. The content of the upper-left cell will be merged with the contents of all highlighted cells.
