Looking for an resizer on Mac? Whether you need to scale down a large file for it to take up less space and be more sendable, need to resize to fit into a presentation without distortion and weighing down the file, or just need to compress your endless photo library, there are plenty of options for you to choose from.
In this post, we will look at several resizing tools at your disposal and how to use them.
Get PhotoBulk to batch-resize s without loosing quality! Also, try Luminar Neo to enhance your s. Both are available on Setapp.
Resizing images is a common task that every Mac user will need to do at some point. Whether you need to shrink a large photo to send as an email attachment or enlarge a small image for printing, macOS offers several quick and easy ways to resize images to any dimensions you need.
In this comprehensive guide, I’ll explain the basics of image resolution and sizing, when you may need to resize photos and graphics on a Mac, and provide simple step-by-step instructions using built-in Apple tools like Preview, Photos, Safari, and more.
Let’s get started learning the ins and outs of resizing images on your Mac!
Image Resolution Basics
Before learning how to resize, it helps to understand some fundamentals about image resolution.
Resolution refers to the amount of detail an image contains based on its pixel dimensions Resolution is measured in pixels per inch (PPI) or pixels per centimeter
Image size is the actual dimensions of an image – usually defined by width and height in pixels.
A high resolution image has more pixels so it can be enlarged without losing quality. A low resolution image has fewer pixels so quality degrades if you increase its display size.
Matching image resolution to your intended use is important. Web images only need 72 PPI. Print projects require a minimum of 300 PPI for best results. Using images with resolution lower than needed often produces blurry, pixelated results.
When resizing images on your Mac, the goal is to scale the image proportionally so you don’t distort it. Let’s look at when you may need to resize photos or graphics and the tools you can use.
Common Scenarios for Resizing Images on Mac
Here are some of the most common situations where you’ll need to adjust image sizing on a Mac:
-
Reducing image size for email – Most email services limit attachment sizes to around 10MB. Resizing large images to lower resolution reduces file size to allow attaching.
-
Sharing photos on social media – Facebook, Instagram, Twitter, and other social platforms have specific image dimensions for displaying content properly on different devices. Resizing to the recommended dimensions ensures your images look their best.
-
Printing photos – Digital cameras produce photos at 72-300 PPI usually. Resizing to at least 300 PPI creates high quality prints without pixelation or blurring.
-
Enlarging small images – Icons, logos, and other graphics may need to be enlarged for print materials, presentations, websites, etc. Resizing increases pixels to allow enlarging small images cleanly.
-
Creating thumbnails – Displaying full-size images on web pages consumes bandwidth and slows loading. Generating smaller thumbnails improves performance while linking full images for viewing.
-
Cropping to focus on key areas – Cropping images maintains size but removes outer edges to hone in on important portions.
-
Fitting images to specific dimensions – Design layouts, templates, and projects often require images to be within defined width/height parameters. Resizing makes images fit as needed.
Now let’s go over your various options for resizing images using the default tools included in macOS and common Mac apps.
How to Resize Images Using Preview
Preview is the default image viewer included on every Mac. It provides a quick and easy way to resize one or multiple images at a time.
To resize an image in Preview:
-
Right click the image file in Finder and choose Open With > Preview. Or double click to open.
-
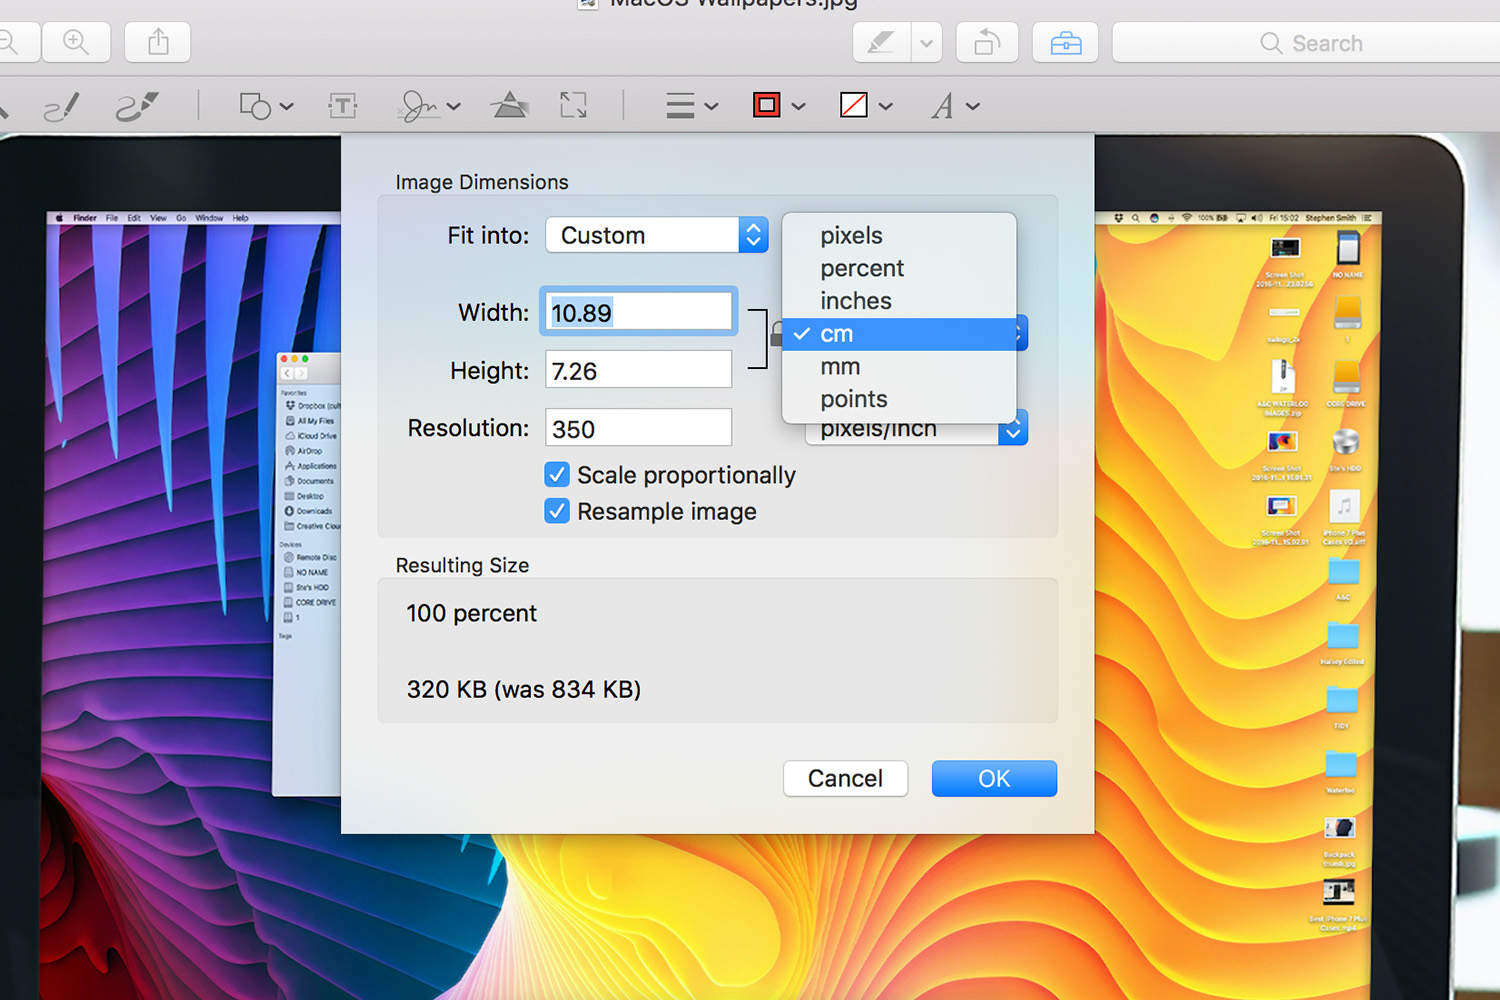
Select the Adjust Size option from the toolbar.
-
Change the image dimensions by entering specific pixels or percentages.
-
Click OK to resize the image as specified.
-
Choose Export from the File menu to save your resized version as a new file.
Preview also lets you resize by dragging handles on the image borders to scale larger or smaller. And you can choose scaling options like Fit to Window and Actual Size.
Resizing Images in Photos App
The Photos app included on modern macOS versions has great image editing capabilities. Here are the steps for resizing in Photos:
-
Double click a photo to open it.
-
Click Edit in the top right.
-
Select the Crop & Rotate icon.
-
Enter new dimensions or drag handles to scale the image.
-
Click Done and Save to apply resizing.
Photos app makes it easy to resize one or multiple images quickly. Like Preview, it also handles batch exports well.
Resizing Web Images in Safari
Need to grab an image from a webpage and resize it for use elsewhere? Safari makes it simple:
-
Right click the image on the web page and choose Save Image As.
-
In the Save dialog box, click More Options.
-
Adjust sizing, file format, and naming options in the expanded dialog.
-
Click Save to download the resized image file to your Mac.
Safari’s export tool works great for capturing and resizing images from the web.
Using Automator for Batch Resizing
For bulk image processing, Automator is a handy Mac tool that can resize entire batches:
-
Open Automator and select Service as the document type.
-
Add a Watch Me Do action. Then drag in the Scale Images preset.
-
Record resizing steps you want applied to all images.
-
Save and name your new service.
-
Right click image files in Finder and select your new service to process.
Automator is powerful for streamlining repetitive image resizing tasks.
Resize Images in Apple Photos, Pages, and Other Apps
Most Apple apps like Photos, Pages, Keynote, TextEdit, Mail, and more have integrated image resizing capabilities:
-
Photos – Select image(s) and click Export to resize dimensions and file format on export.
-
Pages, Keynote – Insert image, then adjust size using handles or measurements fields in the inspector pane.
-
Mail – When attaching images, select an image and resize dimensions/quality in the attachment options window.
-
Preview – Open an image, then choose Tools > Adjust Size and enter new values or scale with handles.
Spend some time exploring the image adjustment capabilities built into your favorite Apple apps. The options allow resizing images directly within many applications.
Use Automator Services for Right-Click Resizing
For quick access to image resizing from Finder, create your own Automator Services.
-
In Automator, select a Service and add Resize Images and Watermark Image actions.
-
Set Resize Images to your preferred dimensions and quality.
-
Save the Service and it will appear in your Finder right-click menu.
Now you can rapidly resize folders of images without opening any other apps!
Resize Images with Apple Shortcuts
The Shortcuts app lets you create custom automations for common tasks. Build one to resize images:
-
Create a new Shortcut and add a Select Photos action.
-
Use Set Variable actions to define new width and height.
-
Add a Resize Image action using the width/height variables.
-
Finish with a Quick Look action to preview resized images.
-
Run your shortcut by selecting images and tapping the Play button.
With Shortcuts, you can resize on demand or set it up to run automatically on newly added photos.
Resize Images on Your iPhone or iPad
If you need to resize images on your iPhone or iPad, it’s just as easy thanks to built-in tools:
-
Camera/Photos – After taking a photo, tap Edit and use the Crop tool to set new aspect ratio and size.
-
Preview – Open the image in Preview and use the Adjust Size options to scale larger or smaller.
-
Apps – Open the image in an app like Pages, Keynote, or Numbers. Use the format panel to resize.
Many of the same methods for resizing images on a Mac also work on iPhone and iPad thanks to Apple’s unified ecosystem.
Use Third-Party Mac Apps for Advanced Resizing
While built-in tools are great for basic resizing needs, third-party Mac apps provide more advanced features:
-
ImageOptim – Optimize and compress image file sizes along with resizing.
-
GraphicConverter – Batch resize plus filters, color correction, metadata editing, and more.
-
Acorn Image Editor – Powerful layer-based editing with precision resize options.
-
Affinity Photo – Robust photo editing and graphics app with pro-level tools.
For heavy or specialized image manipulation, dedicated apps like these offer more control over the resize process.
Hopefully this guide gave you a thorough overview of the options for resizing images on your Mac!
The key takeaways are:
-
Understand image resolution to pick appropriate sizes.
-
Use Preview and Photos for quick individual image resizing.
-
Leverage Automator and Shortcuts for efficient batch processing.
Resize multiple images at once
But you don’t have to struggle resizing your photo collection on Mac one by one. You can actually batch resize both with Preview or apps like batch editing and watermarking tool PhotoBulk.
Let’s start with Preview. Here’s a step-by-step for batch resize there:
- Select all s you want to resize in a Finder folder and right-click on them.
- Select Open With… and click on Preview.
- As you get your s open in Preview, you’ll see one selected in the center and the rest as thumbnails on the side. Select all thumbnails with Command + A.
- Click Tools in the Preview menu bar at the top and pick Adjust Size… option.
- Set your resize settings in the pop-up window and click OK:
Note that all s will be saved on top of your existing files, so if you want to only create resized copies, make sure you create copies first.
Now, let’s test multi resize in PhotoBulk.
In the app, all you have to do is drag and drop your batch onto the window and then select your editing options.
In addition to resize, you can choose to optimize your s, delete or keep only part of the metadata (can be useful if your phone records location and you want to share an online, as well as multiple other privacy uses), change format, batch-rename, and watermark the . Now, in our sample, we chose the script setting for watermarking, but you actually have a choice to set this up in other watermark formats, including just adding a date stamp, an (like a logo), or a single watermark anywhere on your pic.
Crop an image in Preview
And since we’ve already got one foot in editing, let’s also see how to crop an on your Mac. After all, one answer to how to reduce file size on Mac is simply cropping out the extra space in your pic — a space that in many cases can be very well done without.
Open your in Preview and follow these steps to crop your photo or other visual:
- Find and click the Markup icon in the window Menu bar (may be hidden under the >> icon in narrow s).
- Select the area you want to keep (click, drag, and release to make the selection).
- Click the Crop to Selection icon that appears when you’ve made the selection:
- That’s it, your gets cropped to your selected area!
Note that the edited photo gets saved instead of your original, so crop only the version you are ready to part with.
Mac How to Change Image Size (Proportional or Non-Proportional)
How do I resize an image file on a Mac?
Any image file that will open in Preview can be resized with Preview. If you haven’t changed the default file associations for your Mac, double-clicking on an image file should open it in Preview (alternatively you can right-click then choose Open With > Preview). With your file open, click Tools > Adjust Size at the top of the screen.
How to change image size on Mac?
Tip: To reduce the file size of multiple images at the same time, display the images in the same window, select them in that window’s sidebar, then choose Tools > Adjust Size. In the Preview app on your Mac, open the file you want to change. Rotate an image: Select the image, then click (or use the Touch Bar) to rotate the image to the left.
How do I resize a picture?
Select all the images you want to resize by clicking on each one in the Finder, or on your Desktop, while pressing the Command key. Right click and choose Open with Preview. All the images will open in Preview. Select all by pressing Command + A (or choose Edit > Select All).
How to reduce photo size on Mac?
You don’t need to use a third-party app to do this on your Mac. It can be done using the versatile, built-in Preview image editing app. The fastest way to reduce the photo size is by reducing the photo resolution. If a website or an application has an upper limit for a photo file size, first, try reducing the resolution.
