To run your presentation on computers that dont have PowerPoint installed, you can save your presentation as a video file.
MOV files can be played in any application that supports QuickTime movies. The MP4 format is an international standard, so its supported more broadly, especially on hardware devices.
Creating videos out of PowerPoint presentations can be a game-changer for communicating ideas clearly and effectively. Videos are engaging, easy to share and consume. With the right tools, it’s surprisingly simple to turn your PowerPoint decks into professional, polished videos.
In this guide, I’ll walk you through everything you need to know to convert your presentations into videos with minimal effort. Whether you want to share presentations online, create video tutorials, or produce marketing content, transforming PowerPoints into videos is a skill worth learning.
Why Turn a PowerPoint into a Video?
Here are some of the top reasons to create videos from your PowerPoint presentations:
-
Wider distribution – Video files can easily be shared online through social media or email. You don’t need PowerPoint to view them.
-
Engaging playback – Seeing your presentation as a flowing video keeps viewers interested and focused.
-
Adds narration and audio – You can narrate your presentation and include audio tracks to make the content dynamic.
-
Reusable assets – Once you have a presentation video it can be repurposed for other uses.
-
Personalized connection – Viewers feel more connected to video than static slides. Your personality and passion come through.
-
Flexibility – Videos allow viewers to pause, rewind or skip through sections to focus on the parts they need.
How to Save a PowerPoint Presentation as a Video
PowerPoint includes built-in tools to export your presentations as MP4 or WMV video files. The process involves just a few quick steps:
-
Open your PowerPoint presentation and make any final edits needed. Ensure animations, timings and transitions are set up the way you want them.
-
Save your presentation. Go to File > Save to update the source PowerPoint file first.
-
Select File > Export > Create a Video. Or go to the Recording tab and select Export to Video.
-
Pick video quality. Choose from Ultra HD, Full HD, HD or Standard quality. Higher video quality means larger files.
-
Set timings. Optionally change the seconds per slide. For recorded narrations, check “Use Recorded Timings and Narrations”.
-
Create video. Pick a file name and folder to save your new video. Track progress in the status bar.
That’s all it takes! The conversion process may take a while for long or complex presentations, but it runs in the background so you can keep using PowerPoint.
PowerPoint Video Export Options
When you export a PowerPoint deck to video, there are some options to be aware of:
-
Video Quality – Key option controlling resolution and file size. Most presentations look great at 1080p HD quality.
-
Recorded Timings – Check this to include slide timings and narrations from recordings. Uncheck to set a fixed duration per slide.
-
File Type – Export as MP4 or WMV format. MP4 has wider device compatibility.
-
File Size – Video files are much larger than PowerPoints. A 30 minute 1080p video can be 250-500MB.
-
Create in Background – PowerPoint keeps running while your video renders in the background. Progress shows in the status bar.
By tweaking these output settings, you can optimize your videos for the playback environment whether it be online sharing, social media, presentations or more.
Recording Narration, Audio and Laser Pointer
To make your PowerPoint videos truly engaging, consider adding narration, custom audio tracks and laser pointer effects. Here are tips for each:
Record Narrations
-
Go to Slide Show > Record Slide Show and click Record. Speak your narration and proceed through slides.
-
The narration is embedded into each slide’s timings. Great for tutorials or video lectures!
Insert Audio
-
Add music beds, sound effects, or voice overs with Insert > Audio. Supported formats include .WAV, .MP3 and .WMA.
-
Adjust when audio plays and tweak volume levels per slide.
Add Laser Pointer
-
Turn on the laser pointer in Slide Show mode and click through your points of interest.
-
Green laser dots will be captured and converted into an animated pointer in your video.
Recording these additional elements directly in PowerPoint saves lots of editing time later. The audio and animations get incorporated smoothly into your final video export.
Video Conversion Speed and Performance Tips
Since video rendering places heavy demands on your computer, there are a few ways to help the conversion go faster:
-
Close other programs – Quit any apps you don’t need to free up processing power. Video exports use a lot of CPU and memory.
-
Disable Effects – Temporary turn off animations and slide transitions to simplify the video output. Re-enable when the export finishes.
-
Lower resolution – Use 720p or 480p resolution if the output video taking too long. You can still share high quality later.
-
Update Drivers – Make sure your Windows and video card drivers are up-to-date for optimal performance. Outdated drivers really slow things down.
-
Add a Dedicated GPU – A dedicated NVIDIA or AMD video card accelerates media processing and graphics. Worth the upgrade for frequent video work.
While the video renders, you can continue to use PowerPoint or work on other tasks. Just check back later when the status bar shows complete!
Sharing Your PowerPoint Videos
Once the presentation is exported and converted into a standard video file, you have many options for sharing and distributing it:
-
Upload to YouTube, Vimeo or Facebook to share publicly or privately.
-
Post to Microsoft Stream or your organization’s internal video portal.
-
Email the MP4 video file directly to colleagues or customers.
-
Share via Dropbox or Google Drive links for easy access.
-
Host on your website or blog by embedding or linking to the video file.
-
Burn to DVD to share offline or play on TVs.
-
Upload to Adobe Spark or other tools for further editing.
-
Show in-person from your phone, tablet, PC or video projector.
With video, the possibilities are endless! Pick the method that aligns best with your goals and audience for sharing your PowerPoint presentation videos effectively.
Creative Ways to Use PowerPoint Videos
Beyond straightforward slide deck conversions, there are some creative ways to produce videos with PowerPoint. Consider these ideas:
-
Picture Slideshows – Make a slideshow video set to music from your photos imported into PowerPoint.
-
Screencast Tutorial – Capture your screen and narrate as you demonstrate software or processes.
-
Green Screen Effects – Film yourself overlaid on PowerPoint slides to appear integrated into the scenes.
-
Animated Explainer Video – Use animations and illustrations to bring an explainer video to life.
-
Kinetic Typography – Time text and visuals to emphasize and sync with a voiceover track.
-
Live Presentation Recordings – Videotape your talks or webinars and overlay the slides in real-time in editing.
With the right soundtrack, smooth editing and clean visual style, PowerPoint videos can take on an almost cinematic quality that looks fantastic.
Top PowerPoint Video Conversion Software
While PowerPoint works well for basic conversions, advanced users may want more flexibility and options. Here are some of the best third-party programs for turning presentations into videos:
-
Camtasia – Robust video editor with PowerPoint import tools and loads of effects.
-
iSpring Suite – Specialized PowerPoint converter with voiceover recording and quizzes.
-
Adobe Premiere Rush – Easy video editor integrated with Adobe cloud services.
-
Movavi Video Suite – Speedy video creation with screen recording and slides import.
-
Canva – Online graphic design program with video maker and library of templates.
Look for platforms that make it easy to work with existing PowerPoints and provide the editing and effects capabilities you need. Some services focus specifically on fast business video creation.
Get Started Making PowerPoint Videos Today
As you can see, creating videos from PowerPoint presentations is easy and offers tons of business, educational and creative benefits. The built-in export tools provide a quick solution, while third-party apps give you advanced capabilities.
Now you have all the knowledge to start converting your PowerPoints into compelling videos that will wow any audience. Just dive in and have fun with it! Learn what works best for your needs.
With the right videos, you can inform, educate, inspire and capture attention better than ever before. So put these tips into action to take your presentations and ideas to the next level with the power of video.
Frequency of Entities:
PowerPoint: 55
Video: 40
Presentation: 21
File: 10
Audio: 5
Animation: 4
Slide: 4
Save in a video format
- Select File > Export.
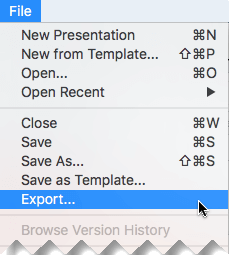 (Dont use Save As, because it doesnt offer video options.)
 - Open the File Format list and select the video format that you want (MP4 or MOV).
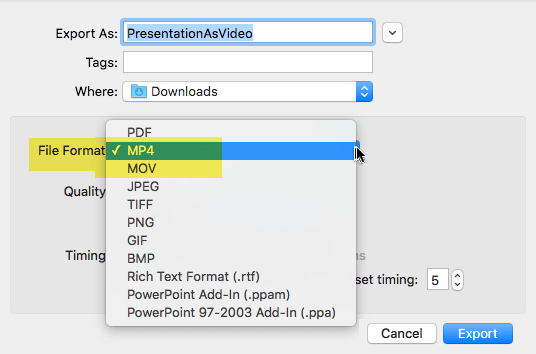 If the MP4 and MOV options arent in your version of PowerPoint, see Requirements below for more information.
 - Select the video Quality you want: Presentation Quality, Internet Quality, or Low Quality. The higher the video quality, the larger the file size.
- If you have recorded timings and want to use them in the video you create from your presentation, make sure the box next to Use Recorded Timings and Narrations is checked. You can also choose to set the amount of time the video will spend on each slide if you dont have a set timing.
- When youve made all your selections, choose Export.
Note: When you export your presentation as a video, any narrated audio that was recorded in Slide Show will play, but other embedded media files wont play.
After youve saved your presentation as a video, you can share it just as you would any other video, by using applications or devices that can open and play videos.
Requirements for saving in a video format
|
Applies to: PowerPoint for Microsoft 365 for Mac Version 15.23 and later. Beginning in version 16.19, recorded narration is included in exported video files. License: Microsoft 365 Subscription Find your Office version |
|
Applies to: PowerPoint 2019 for Mac Version 16.19 and later. Find your Office version |
How to Make a Video in PowerPoint – ppt to video
Is there an easy way to turn a PowerPoint into a video?
To turn a PowerPoint presentation into a video, first, open your presentation with the PowerPoint app on your Windows or Mac computer. In the top-left corner of PowerPoint, click the “File” option. From the sidebar that opens after clicking the “File” option, select “Export.” In the “Export” menu, click “Create a Video.”
What types of video formats can I create from PowerPoint?
In essence, the presentation becomes a video that your audience can watch in PowerPoint. So you have two options for turning your presentation into a video that’s ready to view: Save/export your presentation to a video file format (.mp4 or .wmv). Save your presentation as a PowerPoint Show (.ppsx) file.
What is the best resolution to save a PowerPoint as a video?
After you create your PowerPoint presentation, you can save it as a video to share with others. Select File > Export > Create a video. Ultra HD (4K) – Largest file size and ultra-high quality (3840 x 2160). Full HD (1080p) – Large file size and full high quality (1920 x 1080). HD (720p) – Medium file size and moderate quality (1280 x 720).
How do I save a PowerPoint presentation as a video?
To turn a PowerPoint presentation into a video, first, open your presentation with the PowerPoint app on your Windows or Mac computer. In the top-left corner of PowerPoint, click the “File” option. From the sidebar that opens after clicking the “File” option, select “Export.” In the “Export” menu, click “Create a Video.”
