In Outlook, when you want to invite people to attend a meeting or event, you usually send a meeting request. The recipient can then accept the request and the item is added to his or her calendar.
There is an alternative method that works more broadly with Outlook and other calendar programs. An Internet calendar (iCalendar) attachment or a link to an iCalendar file can be added to the message body. When the recipient opens the attachment or clicks the link, the event is added to his or her calendar program.
Note: Unlike Outlook meeting requests, when using iCalendar attachments and links you do not receive confirmations when people accept or decline.
Scheduling meetings and events with colleagues or clients is a routine task for many professionals. Outlook makes it easy to organize your calendar and send meeting invites right from your inbox.
Whether it’s a one-on-one client call or a team-wide brainstorm session, this guide will teach you how to create new calendar events and send invitations using Outlook.
By the end, you’ll have the skills to quickly and efficiently schedule meetings and manage your calendar like a pro! Let’s get started.
Overview of Outlook Calendar Invites
Before digging into the details, let’s do a quick overview of what calendar invitations in Outlook allow you to accomplish:
-
Create calendar events – Easily schedule meetings, appointments, conferences, events, and more on your calendar
-
Set time and location – Specify the date time estimated duration, recurrence, and location.
-
Invite attendees – Add email addresses of who should attend the event.
-
Send notifications – Invited attendees receive email notifications to accept or decline.
-
Track responses – You can see who accepted, declined, or hasn’t responded yet.
-
Update event details – Change the event at any time and re-notify attendees.
-
Add attachments – Include any files or resources relevant to the meeting.
So in a nutshell, Outlook calendar invitations allow you to plan events, invite participants, and manage responses all in one place!
How to Schedule a New Calendar Event
Let’s start with the basics – here are the steps to add a new meeting or appointment to your Outlook calendar:
-
Open the Calendar view in Outlook.
-
Click New Event at the top.
-
Enter the event title in the subject line (for example, “Strategy Planning Meeting”).
-
Set the date and time. You can enter a specific time or choose one of Outlook’s recommended meeting times.
-
Select the location or leave as “Online” for remote meetings.
-
Adjust any other options like reminder notifications and recurrence.
-
Click Save & Close to add the event to your calendar.
That’s all it takes to schedule a meeting on your calendar in Outlook! Now let’s look at inviting attendees.
How to Invite Attendees to a Calendar Event
Once your meeting is scheduled, here’s how to send invites:
-
In your calendar, double click the event to open the event window.
-
Go to the Invite Attendees section.
-
Click Add Attendees and enter email addresses.
-
Add an optional personalized message.
-
Select Send to deliver the invite.
-
Attendees will receive an email invitation with an Accept/Decline option.
-
You can track responses on your event to see who is attending or not.
Be sure to give attendees sufficient notice of at least a few days when possible so they can adjust schedules. Sending calendar invites through Outlook makes coordinating meetings easy and efficient.
Helpful Tips for Outlook Calendar Invites
To master Outlook meeting scheduling, keep these tips in mind:
-
Check attendee availability – See if invitees are free before choosing a time.
-
Avoid double bookings – Scan your calendar first to avoid conflicts.
-
Use tracking options – Require attendees to accept or decline to confirm attendance.
-
Set reminders – Use reminders to avoid forgetting about your own events!
-
Update event details – Edit event info and re-send invites if anything changes.
-
Add rooms or resources – Book conference rooms, equipment, etc. directly through invites.
-
Attach relevant files – Include any documents or resources needed for the meeting.
-
Use the scheduling assistant – This tool suggests meeting times based on attendee availability.
Pro Tip: Install the Outlook mobile app to manage your calendar from anywhere! Receive notifications and respond to invites on-the-go.
Recurring Meetings and Event Series
For meetings or events that repeat on a regular basis, you can schedule them as a recurring series rather than individual events.
Here’s how to set a recurring meeting:
-
When creating the event, toggle Recurrence to “Yes”.
-
Select your recurrence pattern – daily, weekly, monthly, etc.
-
Set a range of recurrence with a start and end date.
-
Update event details anytime and changes apply to the whole series.
-
Attendees can choose to accept the entire series with one response.
Recurring events are a great way to simplify scheduling for routine meetings like weekly status calls or daily standups.
Outlook Calendar Tips to Avoid Meeting Mayhem
Avoid calendar chaos with these tips:
-
Create a morning routine – Block out time for important daily rituals before meetings commandeer your day.
-
Schedule focus time – Reserve blocks of meeting-free time for focused work.
-
Set meeting-free days – Declare certain days meeting-free to allow uninterrupted focus.
-
Shorten meetings – Cut unnecessary meetings and tighten up those that are truly needed.
-
Clarify objectives beforehand – Establish clear goals, desired outcomes and agenda ahead of time.
-
Encourage punctuality – Start on time, end on time even if people are late/missing.
-
Control tangents – Politely steer off-topic conversations back on track.
-
Track action items – Note down tasks, owners and deadlines before ending each meeting.
With these Outlook calendar tips, you can take charge of your schedule rather than letting it control you!
Step 2: Send an iCalendar attachment
- On your calendar, click the appointment.
- On the Appointment tab, in the Actions group, click the down arrow on the Forward command.
- Click Forward as iCalendar. A new message window appears and an iCalendar is attached.
Step 1: Create an appointment
If you already created the appointment on your calendar, skip to the next section, Step 2: Send an iCalendar attachment.
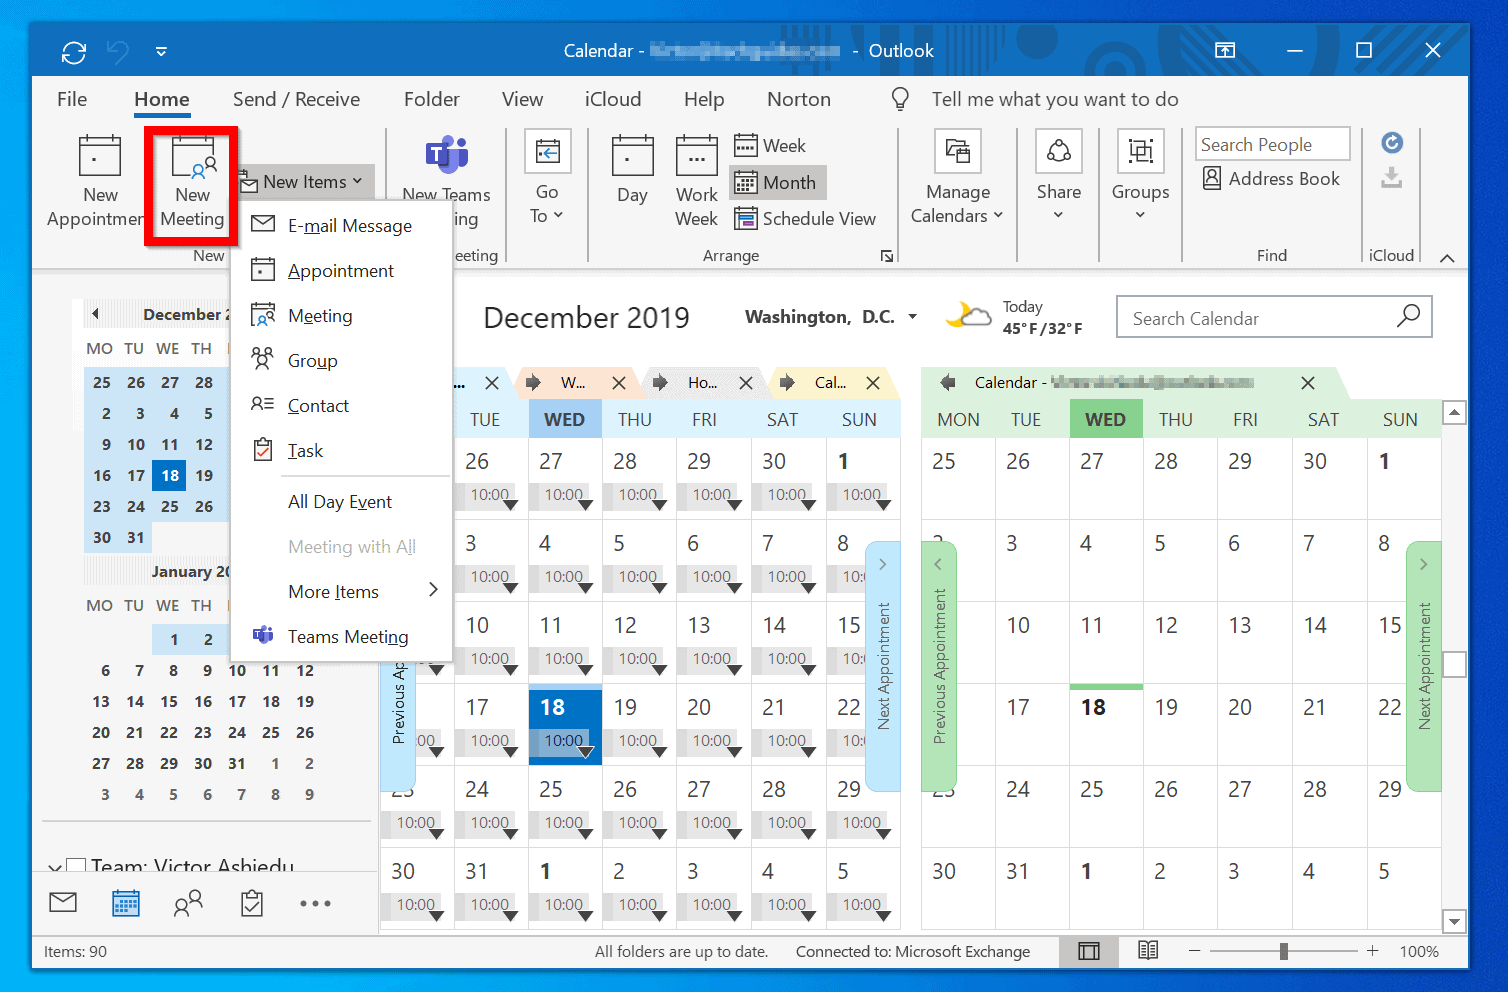
- In Calendar, on the Home tab, in the New group, click New Appointment.
- In the Subject and Location boxes, type the subject and location information.
- Enter the Start time and End time.
- On the Appointment tab, in the Actions group, click Save & Close.
How to Create an Outlook Calendar Invite
How do I send a calendar invite?
Write an invitation message in the body field. Click the body field below the date and time, and enter the details of your event here. Click the Send button. This button looks like a white envelope icon in the upper-left corner of your invite message. It will send your calendar invite to your specified contacts.
How does outlook send invitations?
Outlook sends an email with special additions that let receivers respond and add the event to their own calendars. How the invitation appears to invitees depends on their email software or web browser. Here’s our invite in Outlook software. At the top are buttons to accept, tentative or decline the invitation.
How do I create a calendar in outlook?
* Note: If you don’t see the above settings menu, then Turn off the Outlook beta. 4. Expand the calendar menu and select Calendar publishing. 5. Under Show availability, titles and Locations click Create. 6. Then click the ICS link to save the calendar file (calendar.ics) on your computer.
