When working with Excel, there are some small tasks that need to be done quite often. Knowing the ‘right way’ can save you a great deal of time.
One such simple (yet often needed) task is to number the rows of a dataset in Excel (also called the serial numbers in a dataset).
Now if you’re thinking that one of the ways is to simply enter these serial number manually, well – you’re right!
Imagine having hundreds or thousands of rows for which you need to enter the row number. It would be tedious – and completely unnecessary.
There are many ways to number rows in Excel, and in this tutorial, I am going to share some of the ways that I recommend and often use.
Of course, there would be more, and I will be waiting – with a coffee – in the comments area to hear from you about it.
As an Excel pro, numbering rows in your spreadsheets quickly and easily is a must-have skill. Whether you need sequential numbers for invoices, purchase orders, project tasks or data analysis, Excel has all the tools to auto number rows in no time.
In this hands-on guide, I’ll show you 6 foolproof ways to add automatic numbering to rows in Excel. You’ll learn how to:
- Use the fill handle to number rows with a quick drag
- Leverage the ROW and COLUMN functions for dynamic numbering
- Add sequential IDs to tables for automatic numbering
- Number filtered data without gaps
- Fix numbering errors if rows change
- Number rows in special sequences or formats
After reading this, your Excel auto numbering skills will reach expert status! Let’s dive in.
Overview of Auto Row Numbering in Excel
Before we dig into the step-by-steps, let’s quickly review how row numbering works in Excel:
-
Excel doesn’t have a dedicated numbering button, but we can mimic it.
-
Numbers update dynamically when using the ROW or COLUMN functions.
-
Tables auto number new rows added to them.
-
Formulas lock numbers in place for one-time use.
-
The fill handle makes quick numbering a breeze.
Now let’s check out the top 6 methods to supercharge your auto row numbering in Excel!
1. Number Rows with the Fill Handle
The fastest way to number rows in Excel is by using the fill handle. Just type your first two numbers to establish the pattern, then drag the fill handle down to complete the sequence
For example, to number rows from 1 to 10:
-
Type 1 and 2 in cells A1 and A2.
-
Select these two cells.
-
Hover over the fill handle in the bottom right.
-
Drag down to row 10 to fill the sequence.
The fill handle makes auto numbering rows a simple drag and drop!
2. Use the ROW Function to Number Rows Dynamically
The ROW function numbers rows more dynamically:
-
Type =ROW(A1) in cell A1 and hit Enter.
-
Copy or drag the fill handle down to auto fill other cells.
This numbers your rows starting from 1. And if you add/remove rows, the numbers update automatically!
3. Leverage COLUMN to Number Down Columns
To number columns across rows, use the COLUMN function:
-
Type =COLUMN(A1) in cell A1 and hit Enter.
-
Copy across row 1 to number the columns.
COLUMN starts numbering from column 1. Super handy for column labels!
4. Add Auto Numbering to Excel Tables
My favorite way to auto number rows is turning them into an Excel Table:
-
Select your data cells and click Insert > Table.
-
Check the box to include headers.
Now when you add rows, Excel automatically numbers them sequentially! No formulas required.
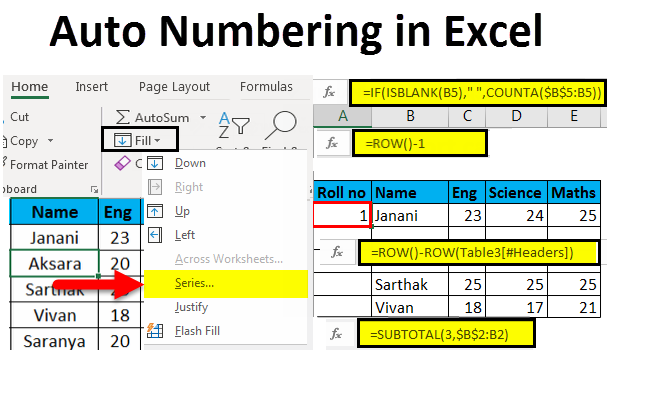
5. Number Filtered Rows with SUBTOTAL
To number filtered rows correctly, use SUBTOTAL:
-
Filter your data.
-
In the first visible cell, use =SUBTOTAL(3,Column)
-
Drag fill handle down filtered rows.
SUBTOTAL resets the row count for each contiguous filtered range. Perfect for numbered reports!
6. Fix Numbers When Rows Change
If your numbered rows move around or change, here’s a quick fix:
-
Select your first correctly numbered row.
-
Drag the fill handle down to renumber the full range.
This resets the sequence perfectly in just 2 clicks!
Customize Row Numbering in Excel
Beyond simple sequences, you can automate customized row numbering too:
-
Add leading zeros: =TEXT(ROW(),”000″)
-
Number by 5s: Start with 1 and 6, fill down
-
Reverse order: Start with high number and fill up
-
Non-contiguous ranges: Add multiple ROW formulas
-
Hide numbers on blanks: Wrap in IF(ISBLANK)
The options are endless! Pro tip: Learn the MOD function to number rows in any interval.
Troubleshoot Auto Row Numbering
If your auto numbering isn’t working right, here are some quick checks:
- Confirm cells are formatted as numbers, not text
- Adjust column width to view full numbers
- Ensure formulas fill down, not just copy formulas
- Clear numbering and refill to reset
- Change formula cell references as needed
And if needed, reconstruct your numbering from scratch. Master these techniques and row numbering is a cinch!
Number Rows in Seconds Like an Excel Pro
As you can see, Excel has all the tools you need to perfectly auto number rows in your worksheets.
The fill handle makes quick sequential numbering a breeze. ROW, COLUMN and tables provide dynamic numbering that updates instantly. And custom numbering is a snap with text and math functions.
Next time you need to number rows for invoices, tasks, data analysis or other sequences, use these pro tips to save time and impress colleagues!
1] Using Fill Handle
Fill handle identifies a pattern from a few filled cells and can easily be used to quickly fill the entire column.
Suppose you have a dataset as shown below:
Here are the steps to quickly number the rows using the fill handle:
- Enter 1 in cell A2 and 2 in cell A3.
- Select both the cells (A2 and A3).
- Note that there would be a small square at the bottom-right of the selection.

- Hover the cursor over this square, and you will notice that the cursor changes to a plus icon.

- Double-click on the fill handle square (while the cursor is in the plus icon form) and it will automatically fill all the cells until the end of the dataset.
Note that Fill Handle automatically identifies the pattern and fill the remaining cells with that pattern. In this case, the pattern was that the numbers were getting incrementing by 1.
In case you have a blank row in the dataset, fill handle would only work till the last contiguous non-blank row.
Also, note that in case you don’t have data in the adjacent column, double-clicking the fill handle would not work. You can, however, place the cursor on the fill handle, hold the right mouse key and drag down. It will fill the cells covered by the cursor dragging.
3] Using the ROW Function
You can also use Excel functions to number the rows in Excel.
In the Fill Handle and Fill Series methods above, the serial number inserted is a static value. This means that if you move the row (or cut and paste it somewhere else in the dataset), the row numbering will not change accordingly.
This shortcoming can be tackled using formulas in Excel.
You can use the ROW function to get the row numbering in Excel.
To get the row numbering using the ROW function, enter the following formula in the first cell and copy for all the other cells:
The ROW() function gives the row number of the current row. So I have subtracted 1 from it as I started from the second row onwards. If your data starts from the 5th row, you need to use the formula =ROW()-4.
The best part about using the ROW function is that it will not screw up the numberings if you delete a row in your dataset.
Since the ROW function is not referencing any cell, it will automatically (or should I say AutoMagically) adjust to give you the correct row number. Something as shown below:
Note that as soon as I delete a row, the row numbers automatically update.
Again, this would not take into account any blank records in the dataset. In case you have blank rows, it will still show the row number.
You can use the following formula to hide the row number for blank rows, but it would still not adjust the row numbers (such that the next row number is assigned to the next filled row).
How to automatically number rows in Microsoft Excel
How to add numbers automatically to a column in Excel?
Adding numbers automatically to a column in Excel can be done in two ways, using the ROW function or the Fill feature. The first method ensures that the cells display the correct row numbers even when rows are added or deleted. The second,
How to automatically number rows in Excel?
Run the code by pressing F5, and the rows get serial numbers automatically. After creating a Table from our dataset, we will use the ROW function to automatically number rows in Excel. STEPS: To insert a Table, select the range of cells C4:F16, excluding the Serial column. From the Tables group, select Table. A Create Table dialog box will appear.
How do you write a row number in Excel?
Type =ROW (A1) into the cell (if it is cell A1). If the cell is not A1, use the correct cell number. For example, if you are typing in cell B5, type =ROW (B5) instead. Press ↵ Enter. The cell will now display its row number. If you typed =ROW (A1), the cell will say 1. If you typed =ROW (B5), the cell will read 5.
How do I quickly number rows in Excel?
Here are the steps to quickly number the rows using the fill handle: Enter 1 in cell A2 and 2 in cell A3. Select both the cells (A2 and A3). Note that there would be a small square at the bottom-right of the selection. Hover the cursor over this square, and you will notice that the cursor changes to a plus icon.
