The tutorial explains how to quickly convert CSV files to Excel in any version, from 365 to 2007, avoiding typical issues.
Generally, there are two ways to transfer a CSV file to Excel: by opening it or importing as external data. This article provides the detailed guidance on both methods and points out the strengths and limitations of each. We will also red-flag possible pitfalls and suggest the most effective solutions.
CSV (comma separated values) files are a simple plain text format for storing tabular data. CSVs work perfectly for exporting and importing between programs and are ideal for converting to Excel.
If you regularly receive CSV files, you may spend hours manually reformatting them in Excel. The good news is you can automate converting CSV files into Excel spreadsheets in just a few clicks.
In this guide, you’ll learn:
- What CSV files are and why convert them
- 5 simple steps for converting CSV to Excel
- How to check data formatting after import
- Tips for customizing the import settings
- How to troubleshoot and clean messy CSV data
- Methods for automating CSV to Excel conversions
Follow these 5 easy steps to seamlessly convert CSVs into fully formatted Excel spreadsheets.
What Are CSV Files?
CSV stands for “comma separated values” CSV files contain plain text data separated by commas, They are commonly used for exporting and importing data between programs,
CSVs have a simple structure with values in each row separated by commas The first row usually contains column headings
Here’s an example CSV data file:
Date,Product,Category,Sales 01/01/2020,Widget 1,Electronics,$1001/02/2020,Widget 2,Electronics,$2001/03/2020,Widget 3,Electronics,$30CSVs work nicely for exporting Excel spreadsheet data since they are compact and structured. But to analyze or edit the information, you’ll want to convert back into Excel format.
Let’s look at how to quickly import CSV data into Excel.
Step 1: Save the CSV File
When you receive or download a CSV file, the first step is to save it in a designated folder on your computer.
Having the files saved ahead of time will make the importing faster. Use a consistent folder location and naming convention.
Step 2: Open a New Excel Spreadsheet
Launch Microsoft Excel on your computer. Open a new blank workbook file. This will become the converted Excel spreadsheet.
Step 3: Go to Data > From Text/CSV
With your blank Excel workbook open, go to the “Data” tab and select the “From Text/CSV” button. This will launch the import wizard.
You can also right-click on the spreadsheet and choose “From Text/CSV” from the pop-up menu.
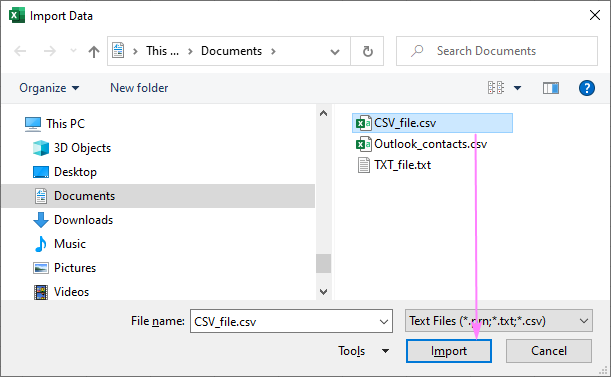
Step 4: Select the CSV File
In the import wizard, navigate to and select the saved CSV file you want to convert to Excel. Select “Import” to move to the next step.
Step 5: Set Delimiters
Since CSV files are plain text, you need to specify how the data fields are separated.
Choose “Comma” as the only delimiter and set all other boxes to unchecked. This will properly split the CSV’s comma-separated values into separate columns. Select “Next” and then “Finish” to complete the import.
The CSV data will now populate into the Excel spreadsheet as formatted columns and rows. That’s all it takes! Now let’s look at some tips for finalizing the converted spreadsheet.
Check Data Formatting
Once the import finishes, scan the spreadsheet to make sure all data formatted properly:
- Verify date fields were converted to Excel date format
- Look for blank cells that should have values
- Check numbers and currencies are in the right formats
- Confirm text and numbers are aligned left/right correctly
Spend a minute reviewing key fields to catch any formatting issues. Excel does a good job converting data types, but it’s worth a quick check.
Customize Import Settings
If you regularly import the same CSV files, you can customize the import to fit your specific needs:
- Delimited – Only check Comma, uncheck other separators
- Advanced – Specify Date formats like DMY, MDY etc.
- Import data as – Choose column types like Text vs General
- Trailing minus – For negative numbers formatted like 123-
- Consecutive delimiters – How to handle blank consecutive values
Setting up saved import presets will speed up your CSV to Excel conversions.
Clean Up Messy CSV Data
Sometimes CSV data contains formatting quirks that should be fixed in Excel:
- Leading/trailing spaces – Use TRIM function to remove extra spaces
- Inconsistent date formats – Convert all dates to the same format
- Non-breaking spaces – Do Find/Replace to remove strange spaces
- Erroneous commas within fields – Split column to separate value & comma
Taking a minute to clean up irregular CSV formatting will improve your Excel data quality.
Automate CSV to Excel Conversion
As an advanced approach, you can use Power Query to fully automate importing CSV files into Excel.
With Power Query, you can:
- Save template queries for each CSV type
- Schedule automatic refresh of imported data
- Load CSVs from folders or websites
- Further clean and transform after import
Setting up automated Power Query CSV imports will help you efficiently manage high CSV volumes.
Quickly Convert CSV Data into Excel
- Save CSV files in designated folder
- Open new blank Excel workbook
- Go to Data > From Text/CSV
- Select CSV file and Import
- Set delimiter as Comma
Following these steps allows you to smoothly import CSV data into properly formatted Excel spreadsheets.
Converting CSVs into Excel makes the data much easier to analyze, visualize, report on, and share with others. By automating the CSV import process, you can save significant time and frustration each week.
So learn these quick tips for flawless CSV to Excel conversion results. Ditch the manual copy-paste approach and leverage the built in tools to import CSVs effortlessly.

Converting CSV to Excel: opening vs. importing
When Microsoft Excel opens a .csv file, it uses your default data format settings to understand how exactly to display each column of text data. This works fine in most situations.
If your text file has specific values and you want to control how to display them in Excel, then do importing rather than opening. Here are a few typical use cases:
- The CSV file uses different delimiters.
- The CSV file contains different date formats.
- Some numbers have leading zeroes that should be kept.
- You want to see a preview of how your CSV data will be converted into Excel.
- You are looking for more flexibility in general.
How to transfer CSV to Excel by connecting to it
In Excel 365, Excel 2021, Excel 2019 and Excel 2016, you can import data from a text file by connecting to it with the help of Power Query. Heres how:
- On the Data tab, in the Get & Transform Data group, click From Text/CSV.

- In the Import Data dialog box, select the text file of interest, and click Import.
- In the preview dialog box, the following options are available to you:
- Delimiter. Pick the character that separates values in your text file.
- Data Type Detection. You can let Excel automatically determine data type for each column based on the first 200 rows (default) or entire dataset. Or you can choose not to detect data types and have the data imported in the original Text format.
- Transform Data. Loads the data to the Power Query Editor, so you can edit it before transferring to Excel. Make use of this feature to set the desired format for particular columns.
- Load. Controls where to import the data. To get the csv file imported to a new worksheet, select Load. To transfer the data to an existing or new sheet in the form of a table, PivotTable/PivotChart, or only create a connection, choose Load to.
Clicking the Load button will import the CSV data in the table format like this one:
 The imported table is linked to the original CSV document, and you can update it anytime by refreshing the query (Table Design tab > Refresh). Tips and notes:
 - To change the table to a normal range, right-click any cell, and then click Table > Convert to Range. This will permanently remove the query from the sheet and disconnect the imported data from the original file.
- If values in a certain column are imported in a wrong format, you can try fixing it yourself by converting text to number or text to date.
How to Convert a CSV File to Excel
How do I convert a CSV file to excel or Google Sheets?
This tutorial demonstrates how to convert a CSV file to Excel or Google Sheets. Excel has the ability to open or import both CSV and TXT files. In the Ribbon, go to File > Open > Browse, and then choose the text or CSV file to be opened. The Text Import Wizard opens to the first of three steps.
How to convert a CSV file to excel?
Let us look at three ways in which we can convert a CSV file to Excel. You can directly open a CSV file that is in any folder from Windows Explorer or your file browser. To open the file in Excel, simply double-click the file.
How to import a CSV file to excel?
The steps to import a CSV file to Excel is as follows: Select the cell from where you want to start displaying the imported data. From the Data tab, select ‘From Text ’ under the ‘ Get External Data ’ group. This will open a dialog box, from where you can select the CSV file that you want to import.
How to open a CSV file in Excel?
Follow the below steps to perform the task. Steps: First, do not open the CSV file. Instead right-click on the file and go to Open with > Excel. As a result, the CSV file is now open in Microsoft Excel. Next, from the Excel Ribbon, click on the File tab.
