You can record your PowerPoint presentation—or a single slide—and capture voice, ink gestures, and your video presence. When completed, it’s like any other presentation. You can play it for your audience in a Slide Show or you can save the presentation as a video file. So, instead of just “handing the deck” to someone, people can see your presentation with the passion and personality intact.
A new feature for Microsoft 365 was rolled out in early 2022. Exactly when your business has this feature is also based on when your admin distributes new features in Microsoft 365.
All recording tools are in the Record tab in the ribbon, but you can start by selecting the Record button.
You can also record by selecting one of the options in the Record section of the Record tab.
If you have notes in your presentation, they’re turned into text at the top of the screen so you can use them like a teleprompter as you record.
Tip: Use the auto-scroll feature in teleprompter and set it to scroll at your preferred speed.
There are several options you can use when you record a presentation. You can turn your camera and microphone on or off by selecting the icons at the top. There are several options you can use when you record a presentation. You can turn your camera and microphone on or off by selecting the icons at the top. To change your camera or microphone, choose the Select more options <···> icon. You can even add a customizable camera that can be resized, repositioned, and formatted to go with your slide content. Select Edit, then select Cameo. Adjust the formatting for the camera, then select Record again to return to the recording environment.
In the Select the camera mode menu, you can select Show Background or Blur Background.
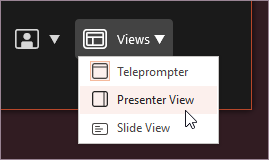
You can also change the layout in the Views menu to switch between Teleprompter, Presenter View, or Slide View.
 In the Teleprompter view, select the auto-scroll feature. Then adjust the scroll speed as per your preference to refer to script with ease while recording.
In this process, what you record is embedded in each slide, and the recording can be played back in Slide Show. A video file is not created by this recording process. However, if you need one, you can save your presentation as a video with a few extra steps.
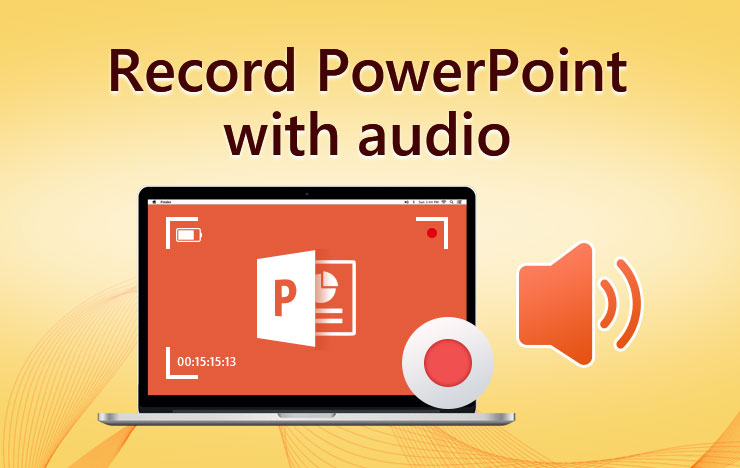
Adding audio to PowerPoint presentations can make them more engaging and memorable for your audience. With audio, you can narrate your slides, incorporate music or sound effects, include audio clips, and more. PowerPoint makes it easy to insert audio files or record narration directly into your slides.
Follow these steps to add audio to your PowerPoint presentation
1. Add Existing Audio Files
To add an existing audio file like a music track or sound bite
-
Select the slide you want to add the audio file to,
-
Go to the Insert tab and click Audio.
-
Select Audio on My PC then browse your files and select the audio clip to insert.
-
The audio file will be added to the slide as an icon. You can drag it around to position it.
-
When presenting, the audio will play when you reach that slide.
This method allows you to quickly insert audio tracks you’ve already created or downloaded. Supported audio formats include WAV, MP3, and WMA.
2. Record Narration in PowerPoint
To record your own narration directly in PowerPoint:
-
Select the slide where you want to start narrating.
-
Go to Insert > Audio and choose Record Audio.
-
Give your audio clip a name and click Record.
-
A 3-2-1 countdown will appear before recording starts.
-
Begin speaking into your computer’s microphone to record your narration.
-
When finished, click Stop and then Play to review your recording.
-
Re-record if needed until you’re satisfied. Click OK to insert the recording into the slide.
With this method you can narrate your presentation slide-by-slide. Make sure you have a working microphone connected to your computer for recording.
Tips for Narration
Here are some tips for effective narration:
-
Speak clearly and naturally in a conversational tone. Don’t read directly from slides.
-
Break up long passages – record 3-5 sentences at a time. Pause between each.
-
Script your narrative to include key points. Time slides to match your recording.
-
Avoid filler words like “um” and keep pace consistent without rushing.
-
Record sections again if you stumble or make mistakes. Aim for a smooth delivery.
3. Set Audio Playback Options
Once your audio files are added, you can customize playback settings:
-
Select the audio icon then go to Playback tab.
-
Trim the start/end points with the sliders under Trim Audio.
-
Fade audio in/out using Fade Duration.
-
Adjust volume under Volume.
-
Choose when audio plays under Start and Play Across Slides.
-
Select Play in Background for music behind narration.
Experiment with the options to get the timing and sound mix you want.
4. Add Audio Files to Multiple Slides
There are a couple ways to add audio across multiple slides:
-
Play Across Slides option – lets you play one long audio file through successive slides.
-
Loop Until Stopped – plays the audio file in a loop until manually stopped.
-
Play in Background – background music can play continuously across slides.
-
Record each slide – record narration slide-by-slide for full coverage.
Using these options, you can score your entire presentation with background music or record narration throughout.
5. Check Audio Timing
With audio-narrated slides, timing is important. After adding audio, verify:
-
Narration matches slide content flow.
-
Recordings are the right length to cover information on each slide.
-
Slides automatically advance after narration ends to avoid dead air.
-
Music clips transition between slides smoothly without abrupt cuts.
Check timing by presenting with slides and audio together. Make duration adjustments as needed.
6. Add Visual Countdown Timers
Visual timers showing recording countdowns help presenters time their narration:
-
Download free countdown video loops from sites like Mixkit, Coverr or Pexels Videos.
-
Add the video loop to a slide. Resize small and position out of the way.
-
Before recording, play the video loop to visually count down.
-
Time your narration length to the countdown duration.
Timers boost presentation flow and pacing for smooth recordings every time.
7. Record Slide Timings
You can manually record timings to synchronize narration audio with slide changes:
-
Select Slide Show > Record Slide Show.
-
Click through the presentation normally. Pauses are timed between clicks.
-
Audio clips and narration should be already added to slides before recording timings.
-
Stop recording when complete. The slide timings will save.
Timings ensure your audio plays for the intended duration and slides change in sync when played back automatically.
8. Check Playback and Sound Quality
Before finalizing your presentation, always preview it with the audio in Slide Show mode. Verify:
-
Volume levels are adequate – increase if too soft.
-
Music or narration don’t overpower each other. Balance volumes.
-
Audio plays back smoothly without popping or clipping.
-
Listen on the speaker system you will use for the real presentation.
Make final audio adjustments and re-record if sound quality is poor. Good audio quality enhances the viewer experience.
9. Compress Large Audio Files
Audio files like long music tracks can make your PowerPoint file size very large. To reduce, use compressed formats like MP3 and consider:
-
Compress command – right click audio > Compress to make file smaller.
-
Change sample rate to 22050 Hz or 11025 Hz under Audio Tools > Format.
-
Convert files to smaller formats like Windows Media Audio before inserting.
Look for low file size music and compress audio clips for web distribution. This keeps presentations easy to email and share.
10. Add Visual Audio Indicators
Small visual details like equalizer bars or sound waveforms can indicate audio tracks for viewers:
-
Search “audio waveform” or “equalizer” for images. Add to intro/title slides.
-
Animate simple shapes like lines or rectangles to wiggle in sync with music.
-
Flash a music note icon briefly when audio starts playing.
-
Use Morph transition to make shapes gradually transform into audio icons.
Subtle visual cues clarify that audio is meant to play for that slide without needing overt text labels.
11. Boost Accessibility
To make audio-enhanced presentations accessible for those with disabilities:
-
Provide transcripts for narration – insert text boxes with narratives.
-
Describe key audio details like music and sound effects in slide notes.
-
Keep important information in slide text – don’t only communicate via audio.
-
Include closed captioning of narration if possible.
-
Offer audio-free versions if requested.
-
VoiceOver tool in Mac PowerPoint describes on-screen actions.
With planning, audio can be added without excluding viewers who can’t hear it.
12. Presenting with Audio
When presenting slides with audio:
-
Keep volume loud enough for the room size and audience to hear clearly.
-
Pause between slides to allow audio tracks to completely finish.
-
Click consistently as audio ends to transition smoothly.
-
If audio stops unexpectedly, quickly click to the next slide.
-
Have backup audio files ready if connectivity glitches.
-
Use presentation tools like laser pointers or slide advancers to control playback.
Practicing with your full audio setup ensures your presentation flows smoothly when it counts.
13. Export Presentations to Video
To create a video file of your presentation with audio:
-
Go to File > Export and select Create a Video.
-
Choose a quality type for output like 1080P HD.
-
Select a file format like MP4, MOV or AVI.
-
Choose to Include Audio by checking the box.
-
Click Create Video – a processing progress bar will display.
The exported video will combine your slides, animations, transitions, and audio together into a dynamic, shareable format.
Audio Tips and Tricks
-
Use audio styles like Subtle for background music or Media for sound clips to pre-set volumes.
-
Insert Fade slide transitions between narrated slides for smooth audio cross-fading.
-
Add interest with subtle ambient sounds like office noise or crowd chatter where appropriate.
-
Balance voice tone, music tempos, sound effects with slide pacing and mood.
-
Cut music clips from intros or trailers – many are designed to complement presentations.
-
Boost energy with uptempo songs and pacing. Slower music can establish calm moods.
-
Use free audio content from PowerPoint’s built-in audios, YouTube library or sites like Free Music Archive.
-
Check copyright rules if using third-party audio – give attribution
Record a slide show
- With your presentation open, on the Slide Show tab, click Record Slide Show.
- Clicking the upper half of the button starts you on the current slide.
- Clicking the lower half of the button gives you the option to start from the beginning or from the current slide.
(The Clear command deletes narrations or timings, so be careful when you use it. Clear is grayed out unless you have previously recorded some slides.)
- In the Record Slide Show box, check or clear the boxes for your recording, and click Start Recording. More about these options:
- Slide and animation timings: PowerPoint automatically records the time you spend on each slide, including any animation steps that occur, and the use of any triggers on each slide.
- Narrations, ink, and laser pointer: Record your voice as you run through your presentation. If you use the pen, highlighter, eraser, or laser pointer, PowerPoint records those for playback as well.
Important: Pen, highlighter, and eraser recording are available only if you have the February 16, 2015 update for PowerPoint 2013 or a later version of PowerPoint installed. In earlier versions of PowerPoint, pen and highlighter strokes are saved as ink annotation shapes.
- At the top left corner of the window is the Recording toolbar, which you can use to:
- Go to the next slide:

- Pause the recording:

- Re-record the current slide:
 If you re-record your narration (including audio, ink, and laser pointer), PowerPoint erases your previously recorded narration (including audio, ink, and laser pointer) when you start recording again on the same slide. You can also re-record by going to Slide Show > Record Slide Show.
- Go to the next slide:
- To use ink, eraser, or the laser pointer in your recording, right-click the slide, click Pointer options, and pick your tool:
- Laser Pointer
- Pen
- Highlighter
- Eraser (This option is grayed out unless you have previously added ink to some slides.)
To change the color of the ink, click Ink Color.
- To end your recording, right-click the final slide, and click End Show. Tip: When you finish recording your narration, a sound icon appears in the lower-right corner of each slide that has narration. The recorded slide show timings are automatically saved. Timings are shown in Slide Sorter view just beneath each slide.
In this process, what you record is embedded in each slide, and the recording can be played back in Slide Show. A video file is not created by this recording process. However, if you want a video file, you can save your presentation as a video with a few extra steps.
Set the slide timings manually
PowerPoint automatically records your slide timings when you add narrations, or you can manually set the slide timings to accompany your narrations.
- In Normal view, click the slide that you want to set the timing for.
- On the Transitions tab, in the Timing group, under Advance Slide, select the After check box, and then enter the number of seconds indicating how long the slide should appear on the screen. Repeat the process for each slide that you want to set the timing for.
Tip: If you want the next slide to appear either when you click the mouse or automatically after the number of seconds that you enter—whichever comes first—select both the On Mouse Click and the After check boxes.
How to add and record audio in your PowerPoint presentation
FAQ
Can you record audio on PowerPoint while presenting?
Why can’t I record audio on PowerPoint?
How do I record my screen with audio on a PowerPoint presentation?
How do I record a narration in PowerPoint?
PowerPoint records the presentation window and captures your voice and webcam feed as you navigate the slides. Select the left-facing and right-facing arrows to move to the previous and next slides in the presentation. Open the Slide Show tab and select Record Slide Show . Select the Record button on the toolbar to start recording your narration.
How do I record a PowerPoint presentation?
There are different ways to manage recordings in your presentation: An audio icon appears on a slide when narration is available. You can also remove narration or timings from your slide. If you’re in record mode, select Clear. When you’re done recording, save and share your presentation as a PowerPoint file or video. Select File.
How to record audio in PowerPoint?
Narrations, ink, and laser pointer. This option allows you to record narrations and you must have this option enabled in order to record audio in PowerPoint. Read more about the ink and laser pointer below. Let’s leave these options as checked as it will not affect your final slideshow. You could also access the options in the Slide Show ribbon.
How do I record a voiceover in PowerPoint?
Open the PowerPoint presentation in which you would like to record a voiceover narration. Head over to the “Slide Show” tab and, in the “Set Up” group, select “Record Slide Show.” Once selected, a drop-down menu will appear. Here, you can choose to start the narration from the beginning or from the current slide.
