We have two free options for you! Make a storyboard online with StudioBinders Storyboard Creator, or download a free storyboard template for Microsoft Word below.
Storyboarding is a crucial part of planning and visualizing a video film or other visual narrative before production. Creating detailed storyboards allows you to map out scenes, camera angles, actions, and more on paper before filming.
While there are dedicated storyboarding programs, you can also easily create a storyboard using Microsoft Word. Word provides all the basic text, shape and image tools you need to layout and visualize your story.
Follow this comprehensive guide to learn how to create a professional-quality storyboard in Word from start to finish.
What is a Storyboard and Why Use One?
A storyboard is a series of illustrated panels that visually depict key scenes and sequences from a video or film. Storyboards serve several important purposes:
-
Pre-visualize the story – Storyboards let you plot out your entire video storyline from start to finish before filming. This helps catch any narrative issues early.
-
Plan shot sequences – Each panel focuses on an individual scene or camera angle. This helps you carefully plan all the shots you’ll need.
-
Communicate ideas – Storyboards provide a clear visual medium to share your video ideas and vision with others.
-
Save time and money – Identifying potential shooting issues in the storyboarding stage can prevent expensive reshooting later down the line.
While storyboards take some upfront effort to create, the amount of time and money they save during video production makes them incredibly valuable.
Step 1 – Set Up Your Word Document
The first step is structuring your Word document for storyboarding. Here’s how:
-
Create a new blank Word document.
-
Switch the page orientation to landscape by going to Layout > Orientation > Landscape.
-
Adjust the page margins to 0.5″ or less on all sides. This creates more room for panels.
-
Add page borders by going to Layout > Page Borders and selecting a border style. This frames the page.
Your document setup is complete! Now you’re ready to start adding storyboard elements.
Step 2 – Add a Storyboard Title and Description
Start by adding a clear title and brief description at the top of the page.
The title should simply state what the video is. For example, “Baking a Cake Video Storyboard”.
The description provides quick context, like “An introductory baking tutorial for beginning cooks”.
Keeping this info visible at the top gives anyone reviewing your board clarity on what exactly they’re looking at.
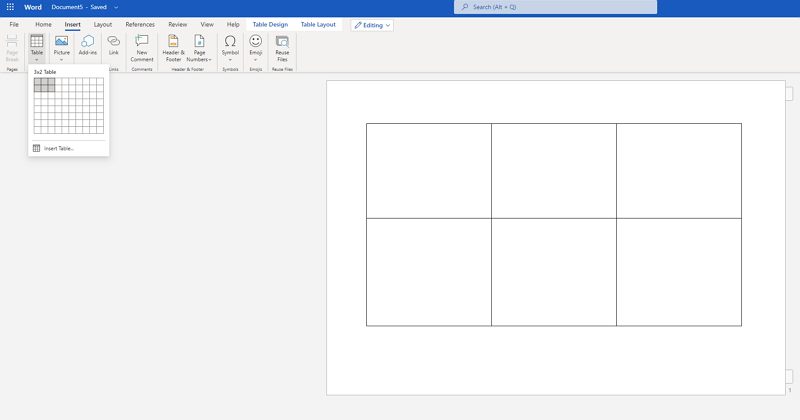
Step 3 – Set Up Storyboard Panels and Lines
Panels in a storyboard represent scenes. They usually contain a sketch of the scene action plus dialogue, narration or other notes.
To set up blank panels in Word:
-
Add vertical dividing lines between panels using Word’s line shape tool.
-
Make the lines extend from the top to bottom page border you added earlier.
-
Insert horizontal panel border lines using the line tool to define rows of panels.
The lines create a grid and delimit spaces for you to insert panels. Leave enough rows and columns for all your planned scenes.
Step 4 – Add Panel Scenes and Details
Now comes the fun part – filling the panels! Here are tips for creating great storyboard panels in Word:
-
Sketch the scene using Word’s shape and drawing tools. Don’t worry about perfect art – stick figures and basic shapes are fine. Focus on showing key actions and characters.
-
Add narration/dialogue using text boxes. Capture any important narrative details or character dialogue.
-
Include shot labels noting camera perspectives like CLOSE UP or WIDE ANGLE. You can also note shot durations like “5 sec”.
-
Number the panels in the order they’ll be filmed. This helps keep the shot sequence clear.
-
Use one panel per shot generally. However, wide shots or other extended scenes can sometimes span multiple panels.
Spend time making the panels clear, detailed, and sequentially numbered. This provides critical visual information when shooting the actual video down the road.
Step 5 – Add a Header Row
Once your panels are filled in, you can further organize your storyboard by adding a header row.
In the first row, add headers above each column for info like:
- Scene number
- Shot/panel number
- Shot description
- Action notes
- Dialogue
- Shot duration
Then in each row, fill in the details for that scene in the appropriate column.
This allows anyone reviewing the storyboard to scan key details at a glance.
Step 6 – Include Revision Notes and Comments
As you review your storyboard, you’ll likely find places to refine scenes and shots. To track feedback and revisions:
-
Add revision notes using comment callout shapes and text boxes.
-
Mark up panels with arrows, boxes, text etc to highlight areas that need tweaking.
-
Use a bright color like red for all revision markings to make them stand out.
Clear revision notes help avoid miscommunication and ensure needed changes get incorporated before filming.
Step 7 – Save and Export Your Storyboard
Once your storyboard is complete, export a copy in PDF format for easy sharing and reviewing.
To export your Word storyboard as a PDF:
-
Go to File > Export > Create PDF/XPS Document.
-
Select “Optimize for Print” under Publish Options.
-
Save the exported PDF with a filename like “StoryboardTitle_v1”.
The PDF preserves all your layout and allows anyone to view the storyboard on any device. You can also print copies as needed.
Storyboard Templates in Word
Creating an entire storyboard from scratch in Word requires some work. To save time upfront, you can start from a premade storyboard template.
Word’s templates include simple storyboard layouts you can quickly customize for your video. Just enter your info into the placeholder panels provided.
To access templates in Word:
-
Go to File > New and search for “Storyboard”
-
Browse and select a template design you like
-
Click Create and begin editing the template to fit your story
Using an existing template gives you a jumpstart on your storyboard layout.
Benefits of Creating Storyboards in Word
While Word isn’t full-featured storyboarding software, it has key advantages:
Accessibility – Nearly everyone has Word already. No need to purchase another program.
Ease of use – Storyboarding with Word is intuitive and beginner-friendly. Shapes, text boxes, lines, and other basic tools cover all you need.
Visually effective – Word provides all the drawing, typography and layout tools required to create clear, professional-looking storyboard visuals.
Collaboration – Word documents make it easy to co-develop or share storyboards for feedback in the pre-production process.
Cost – Besides your existing Word license, storyboards are 100% free to create.
For straightforward video projects, Word delivers a fast, convenient way to bring your storyboard vision to life.
Storyboarding Your Video in Word
By following the steps in this guide, you can produce a highly functional storyboard for any film or video project using widely accessible Word software.
Remember to focus on:
- Planning scenes in detail with clear sketches and descriptions
- Sequencing shots in logical order
- Getting feedback early via exported PDFs
- Iterating based on review notes before production starts
Investing the time upfront to craft a well-thought-out Word storyboard helps ensure production success. You’ll have a vital visual plan to refer back to each step as you film and edit your polished final video.
So grab a copy of Word, fire up a new document, and start storyboarding your next blockbuster!
Microsoft Word Storyboard Templates
Whether shooting a film, online video or commercial, a good storyboard template for Word (docx) will make it easy to communicate your vision with clarity. You can even import it directly into Google Docs. Need shot inspiration? Check out our Ultimate Guide to Camera Shots & Angles
What is a Microsoft Word Storyboard?
A Microsoft Word storyboarding template is a graphic layout that sequences illustrations and s inside Microsoft Word with the purpose of visually telling a story. A storyboard communicates how a scene will play out and is often used for motion pictures, television, animation, commercials, pre-visualizations or interactive media. Storyboard panels can be comprised of custom drawings, screenshots from comparable videos, or photos taken on location.
A storyboard template for Word or storyboarding software can make the process of assembling and sharing a storyboard much easier.
Preview and download 60+ free storyboard templates, ideal for video, film, TV, animation or simply pitching a story. Available for Photoshop, Powerpoint, Word, or as a PDF.
Storyboard Quick Links:
Very Basic Storyboarding for Web Design – Microsoft Word
How to create a storyboard in word?
So, it will be great to go through the step by step process of creating a Storyboard in Word with the help of the following steps: The user has to begin with Word and open a new Word document to create the Storyboard. Now the user needs to click on the Page Layout option followed by Orientation and then select the Landscape option.
How do I make a storyboard online?
Make a storyboard online with StudioBinder’s Storyboard Creator, or download a free storyboard template for Microsoft Word below. What is a Microsoft Word Storyboard? A Microsoft Word storyboarding template is a graphic layout that sequences illustrations and images inside Microsoft Word with the purpose of visually telling a story.
What is a storyboard template?
A storyboard template for Word or storyboarding software can make the process of assembling and sharing a storyboard much easier. Preview and download60+ free storyboard templates, ideal for video, film, TV, animation or simply pitching a story. Available for Photoshop, Powerpoint, Word, or as a PDF.
How do I create a professional-looking storyboard in word?
Here are some tips to help you create a professional-looking storyboard in Word: Sketch a rough draft. Taking the time to sketch a quick rough draft of your storyboard by hand can provide you with a blueprint for your Word document. It can also help you generate ideas.
